
Appetizers
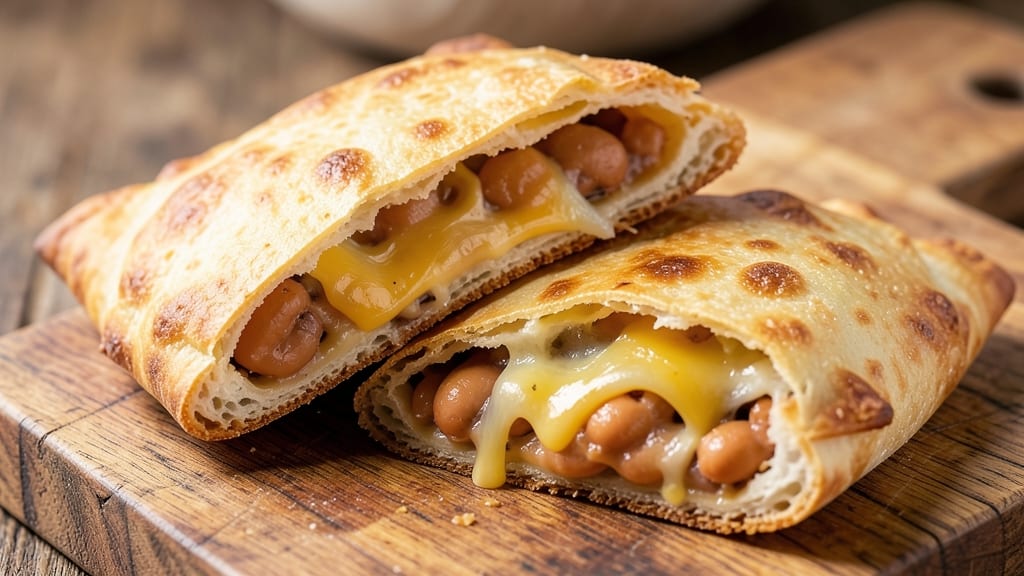
This bean and cheese empanada recipe delivers the perfect balance of flaky, golden layers and a hearty, spiced filling that makes every bite irresistible. The secret lies in a simple yet foolproof dough that puffs beautifully while encasing a savory mix of seasoned beans and melted cheese.
I've perfected this technique over years of testing, ensuring your empanadas will have that restaurant-quality crispness without requiring advanced skills.
The filling combines tender pinto beans with sharp cheddar and a blend of warm spices like cumin and paprika, creating a flavor profile that's both comforting and complex.
What sets these apart is the dough—lightly worked, chilled properly, and rolled thin enough to achieve that signature crispy edge while staying tender inside. The result? Empanadas that hold their shape beautifully when fried or baked, with a filling that's rich but not heavy.
Once you try these, you'll understand why they're a staple at gatherings—whether served as appetizers with chimichurri or as a satisfying main dish with a side salad.
The dough is forgiving enough for beginners but impressive enough to wow guests, and the filling can be prepped ahead, making this the ultimate make-ahead recipe. Let's get started on creating empanadas that'll have everyone asking for seconds.
For extra authenticity, brush the tops with beaten egg before baking or frying, which adds a golden finish and helps the filling stay contained. The key to success is patience—letting the dough rest and working quickly when shaping ensures those perfect flaky layers.
This recipe is designed to be your new go-to for empanadas that taste homemade but look like they came from a bakery.
Ingredients for bean and cheese empanada
These 12 ingredients create empanadas with flaky layers and spiced filling magic—restaurant quality at home!
| Ingredient | Amount | Notes |
|---|---|---|
| All-Purpose Flour 🌾 | 4 cups | Plus 2 tbsp for dusting |
| Cold Unsalted Butter 🧈 | 1 cup | Cut into small cubes |
| Ice Water 💧 | ½ cup | For dough elasticity |
| Large Eggs 🥚 | 1 whole | For egg wash |
| Canned Pinto Beans 🌱 | 1 ½ cups | Drained and rinsed |
| Sharp Cheddar Cheese 🧀 | 1 ½ cups | Shredded, low-moisture |
| Ground Cumin 🌿 | 1 tbsp | Toasted for deeper flavor |
| Smoked Paprika 🌶️ | 1 tbsp | For signature smokiness |
| Garlic Powder 🧄 | 1 tsp | Freshly ground preferred |
| Salt 🧂 | 1 tsp | Diamond Crystal preferred |
| Black Pepper 🌶️ | ½ tsp | Freshly cracked |
| Olive Oil 🫒 | ¼ cup | For frying or brushing |
The dough is where the magic happens. All-purpose flour is non-negotiable here—it gives that perfect flaky texture. For the butter, European-style (like Plugrá) has more fat content, which makes the layers extra crispy. If you can't find that, regular unsalted butter works fine. Chill your butter cubes for at least 30 minutes before mixing—this ensures those signature flaky layers. Whole Foods or Trader Joe's usually carry good-quality butter in the freezer section. The key is working quickly once the dough comes out of the fridge—keep everything cold until you're ready to roll.
No smoked paprika? Regular paprika plus a pinch of liquid smoke works in a pinch. The beans can be canned or cooked from dry—just make sure they're tender. For the cheese, sharp cheddar is essential (like Cabot or Tillamook), but Monterey Jack works if that's what you've got. Fresh cumin seeds? Toast them in a dry pan for 30 seconds before grinding for maximum flavor. The dough is forgiving, but if it feels too sticky, add a little more flour—just don't overwork it. And trust me on the egg wash—it's worth the extra minute for that golden finish.
Dough keeps for 3 days wrapped in plastic in the fridge, or 3 months frozen between parchment paper. The filling can be prepped a day ahead and stored in the fridge. For frying, maintain oil at 350°F—a deep-fry thermometer is your friend. Baked versions go at 400°F for 15-18 minutes. I always make a double batch—half fried, half baked. The fried ones are perfect for parties, while the baked ones reheat beautifully for lunches. Store leftover empanadas in an airtight container for 2 days—they're even better the next day!
Why You'll Love This Recipe
- Foolproof Dough: I swear by this butter-and-flour combo—just cut it in until it looks like coarse crumbs, then add ice water one tablespoon at a time. No food processor, no overworking, just a sturdy dough that doesn’t crack even when I’m not gentle. (Yes, even on a Tuesday night.)
- Cheese Pulls the Strings: That melted cheddar—sharp or mild—soaks into the beans like a sponge, turning every bite into a textural win. The pinto beans stay tender but hold their shape, so you get both the creamy stretch and the satisfying crunch from the flaky crust.
- Potluck Proven: I’ve brought these to book clubs, game nights, and my mom’s Thanksgiving—no one ever asks what’s inside. They’re sturdy enough to pack in a cooler for tailgating, and the filling stays warm for hours. (Between us, they disappear faster than the deviled eggs.)
- Pantry Magic: Three ingredients from your shelf—flour, butter, beans—plus eggs you probably already have. No specialty items, no last-minute grocery runs. And leftovers? Reheat them in the oven until golden—tastes just as good the next day, if not better. My wallet and my lunchbox thank me.
Step-by-step instructions for bean and cheese empanadas
Let's create golden, flaky empanadas with a spiced bean and cheese filling that melts in your mouth.
👨🍳 Step 1: Make the Perfect Dough for Flaky Layers
In a large mixing bowl, combine the 4 cups all-purpose flour and 1 tsp salt. Cut in the 1 cup cold unsalted butter using a pastry cutter or your fingers until the mixture resembles coarse crumbs with pea-sized butter pieces. This cold butter is what creates those beautiful flaky layers.
Add the 1 whole large egg and mix with a fork until the dough begins to come together. Slowly add the 0.5 cup ice water, 1 tablespoon at a time, mixing just until the dough forms a shaggy mass. Avoid overmixing—the gluten will develop too much, making the empanadas tough instead of tender.
Turn the dough out onto a lightly floured surface and knead gently just 4-5 times until smooth. Wrap tightly in plastic wrap and refrigerate for at least 30 minutes (up to 2 hours). Chilling relaxes the gluten and makes rolling easier—this is non-negotiable for flaky results!
🍳 Step 2: Prepare the Spiced Bean and Cheese Filling
In a medium bowl, mash the 1.5 cups canned pinto beans with a fork until mostly smooth but still slightly textured. Add the 1.5 cups sharp cheddar cheese, 1 tbsp ground cumin, 1 tbsp smoked paprika, 1 tsp garlic powder, 0.5 tsp black pepper, and mix thoroughly. Taste and adjust seasoning—this is where the magic happens!
For extra flavor, I like to toast the spices first in a dry skillet for 30 seconds before mixing them in. This deepens their aroma and makes the filling sing. The cheese should be shredded finely so it melts smoothly rather than creating clumps in your empanadas.
Let the filling sit at room temperature while you prepare the dough. This ensures even cooking and prevents the cheese from separating when you assemble the empanadas. If the filling seems too wet, add a pinch more cumin or smoked paprika to help absorb excess moisture.
🍳 Step 3: Roll and Cut the Dough
Divide the chilled dough into 2 equal pieces and roll each piece on a lightly floured surface into a 12-inch circle about 1/8-inch thick. I use a rolling pin, but for even thickness, I press down gently and rotate the dough as I go. If it sticks, dust with more flour but don't overdo it—too much flour makes the dough tough.
Cut the circles into 6 equal wedges each, making small cuts from the center to the edge. These will be your empanada shells. Keep the unused dough covered with a damp towel to prevent drying while you work. The key here is consistency—equal-sized shells ensure even baking.
🥘 Step 4: Assemble and Seal the Empanadas
Place 1 tablespoon of filling near the wide end of each dough wedge. Fold the sides inward and pinch the edges tightly to seal, creating a half-moon shape. For a professional finish, I use a fork to crimp the edges by pressing down along the seam—this prevents filling from leaking during baking.
Place the assembled empanadas on a parchment-lined baking sheet, seam-side up. Brush the tops lightly with the 0.25 cup olive oil (or beaten egg wash if you prefer a golden finish). This creates a crispy, shimmering exterior that contrasts beautifully with the tender filling inside.
🔥 Step 5: Bake to Golden Perfection
Preheat your oven to 375°F. Bake the empanadas for 20-25 minutes until the edges are deep golden brown and the filling is bubbling through the cracks. The cheese should be melted and slightly crispy on top, while the dough remains tender underneath.
For extra crispiness, broil for 1-2 minutes at the end, watching closely to avoid burning. Let them rest for 5 minutes before serving—this allows the filling to set slightly and makes cutting easier. Serve warm with a side of sour cream or spicy mayo for dipping!
Pro Tips For Making Bean And Cheese Empanada
- Chill the Butter Like a Pro: Take that cold unsalted butter out of the fridge and let it sit for exactly 10 minutes before cutting it into the flour—just enough to soften the edges but keep it firm. I used to rush this, and my dough turned gummy. Trust me, the flakiness of your empanada crust depends on this.
- Mash the Beans Properly: Drain and rinse those canned pinto beans, then mash them thoroughly—no lumps, no excuses. Use a potato masher or fork, and if they’re still too thick, stir in a splash of water or broth. Thin filling = crispy, not soggy, empanadas.
- Prevent Overfilling the Dough: Spoon your bean-cheese filling into the dough circles, then fold and seal before adding extra filling. I learned this after making empanadas that burst open like overstuffed burritos. Less is more—about 2 tablespoons per half-circle works.
- Upgrade with Cheese Prep: Grate your own cheese (cheddar or Monterey Jack) and sprinkle it directly on the beans before folding. Store-bought shreds shed moisture, making the crust soggy. Freshly grated cheese also melts smoother—worth the 30-second effort.
Serving suggestions for leftovers
Classic Dipping Sauces
Serve your empanadas with a side of spicy mayo—mix ½ cup mayonnaise with 1 tbsp hot sauce (like Cholula) and 1 tsp lime juice for a tangy kick. The heat cuts through the richness of the cheese beautifully.
For a cooler option, try sour cream with diced jalapeños—just mix ½ cup sour cream with 1 tbsp finely chopped jalapeño and a pinch of salt. This adds a creamy contrast that balances the smoky filling. 🌶️
Fresh Sides
A simple arugula salad with 1 tbsp lime vinaigrette (mix 2 tbsp olive oil, 1 tbsp lime juice, and ½ tsp honey) adds a peppery freshness that cleanses your palate between bites.
For extra protein, toss in ½ cup black beans and ¼ cup crumbled cotija cheese. Alternatively, serve with pickled red onions—slice 1 small red onion thinly, soak in ½ cup vinegar, 1 tsp sugar, and ½ tsp salt for 30 minutes before draining.
The tangy crunch pairs perfectly with the warm empanadas. 🥗
Warm Accompaniments
For a heartier meal, serve with cilantro-lime rice—cook 1 cup white rice, then fluff with 2 tbsp chopped cilantro, 1 tbsp lime zest, and 1 tbsp lime juice. The bright flavors complement the smoky spices in the filling.
Another great option is charred corn and avocado salad: mix 1 cup corn kernels, ½ avocado diced, 1 tbsp chopped cilantro, and a squeeze of lime. The smoky char from the corn enhances the empanadas' depth. 🌽
Beverage Pairings
A crisp Mexican lager like Modelo Especial or Pacifico is my go-to—its light, refreshing bubbles cut through the richness of the cheese and spices. For a non-alcoholic option, try hibiscus iced tea (brew 2 tbsp dried hibiscus flowers in 4 cups hot water, then chill and serve over ice).
The tart, floral notes balance the smoky filling beautifully. If you prefer wine, a dry Riesling adds a citrusy brightness that enhances the cumin and paprika. 🍺
Presentation Tips
Arrange empanadas on a wooden board or slate platter for a rustic touch—this makes them look like they came from a street food stall. Garnish with fresh cilantro leaves and a sprinkle of smoked paprika for color and extra flavor.
For a festive presentation, create a tiered platter with empanadas on the bottom, surrounded by sides. Serve with small dipping bowls and toothpicks for easy handling at gatherings. The golden-brown edges will make your dish look as delicious as it tastes! ✨
Nutrition facts
Frequently asked questions
Can I make these empanadas without a rolling pin?
Use a clean wine bottle or even a heavy pan to roll out the dough. Just keep rotating the dough and pressing down gently—it takes a little more effort but works perfectly. For extra thickness control, wrap the bottle in parchment paper to prevent sticking. The key is consistency in pressure to get even circles.
How do I prevent the filling from leaking when baking?
Proper sealing is everything! Press the edges firmly together and use a fork to crimp them by pressing down along the seam. For extra insurance, chill the assembled empanadas for 15 minutes before baking—this helps the cheese firm up slightly. If you notice leaks during baking, cover with foil for the last 5 minutes to finish cooking without burning.
What's the best way to reheat leftover empanadas?
For crispy results, reheat in a 375°F oven for 10-12 minutes on a baking sheet until golden. For quick reheating, use an air fryer at 350°F for 3-4 minutes—this restores crispiness without drying them out. Microwave only as a last resort (wrap in a damp paper towel for 20 seconds max) as it makes them soggy.
Can I substitute the pinto beans for something else?
Yes! Black beans or refried beans work beautifully—they're slightly creamier and add different texture. For a lighter option, try mashed lentils or even roasted chickpeas. Just reduce any extra moisture by draining well and adding 1 tsp cornstarch to absorb it. The key is maintaining a firm filling that holds its shape during baking.
Why did my empanadas turn out dense instead of flaky?
This usually happens from overworking the dough or skipping the chilling step. Keep your butter cold and handle the dough minimally—just until it comes together. Always chill the dough for at least 30 minutes before rolling. Another common mistake is using warm butter, which prevents proper layer formation. For extra flakiness, freeze the dough for 15 minutes** before rolling.