
Main Courses
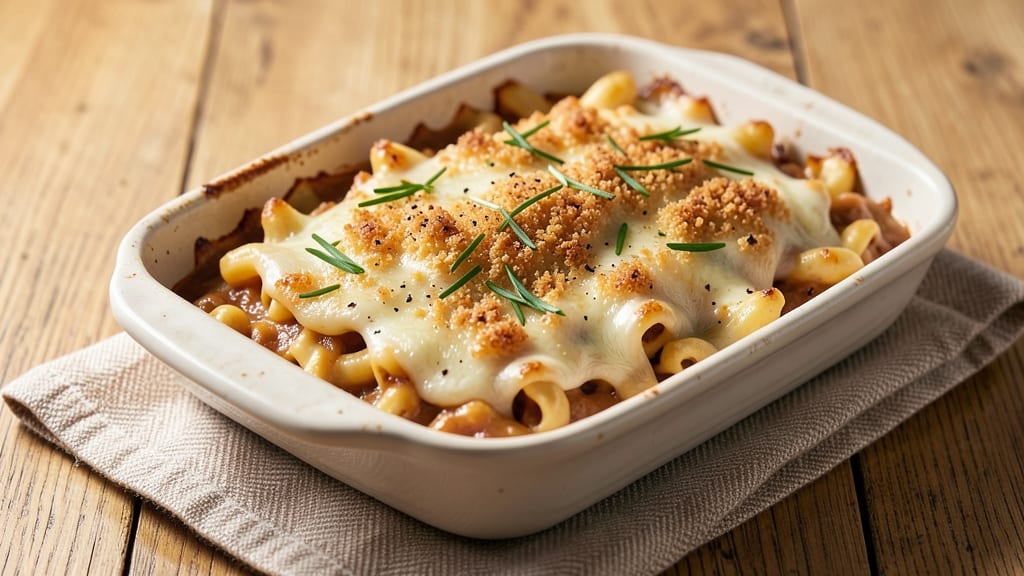
This banza baked mac and cheese delivers the perfect marriage of crispy, golden crust and creamy, gooey elbow pasta—no soggy bottoms in sight. The secret lies in using banza chickpea pasta for a protein-packed twist while maintaining that classic comfort food texture.
I’ve perfected the technique over years of testing, ensuring every bite balances rich cheddar with a satisfying crunch.
The magic starts with a foolproof cheese sauce—no lumps, no separation—thanks to a simple roux and precise cheese melting. Banza’s natural texture holds up beautifully during baking, creating a satisfying contrast between its sturdy strands and the ultra-creamy sauce.
The breadcrumb topping isn’t just for show; it’s what transforms this into a restaurant-quality dish with that coveted crispy crust.
By the time it emerges from the oven, you’ll have a bubbling, golden masterpiece with a crispy top layer that shatters at every bite and a gooey center that stretches perfectly. The banza pasta adds a subtle nutty flavor and extra protein, making this dish both indulgent and balanced.
It’s the kind of comfort food that feels like a hug in plate form.
Serve with a side salad or garlic bread to soak up every last drop of that cheesy goodness. This recipe scales effortlessly for gatherings, and leftovers reheat beautifully—though I can’t guarantee they’ll last that long. Let’s get baking!
Ingredients for banza baked mac and cheese
Banza pasta, sharp cheddar, and crispy breadcrumbs—your golden ticket to restaurant-quality mac and cheese.
| Ingredient | Amount | Notes |
|---|---|---|
| Banza Chickpea Pasta 🍝 | 12 oz | Uncooked, elbow shape preferred |
| Sharp Cheddar Cheese 🧀 | 2 cups | Shredded, block preferred |
| Monterey Jack Cheese 🧀 | 1 cup | Shredded, mild flavor |
| Unsalted Butter 🧈 | ½ cup | Cold, cubed for roux |
| All-Purpose Flour 🌾 | ¼ cup | For roux base |
| Whole Milk 🥛 | 2 cups | Full-fat for creaminess |
| Heavy Cream 🥛 | ½ cup | For ultra-rich texture |
| Yellow Onion 🧅 | 1 whole | Medium size, finely diced |
| Garlic Cloves 🧄 | 4 cloves | Minced for aromatic base |
| Panko Breadcrumbs 🍞 | ½ cup | For crispy topping |
| Dried Breadcrumbs 🍞 | ¼ cup | Extra crunch layer |
| Diamond Crystal Kosher Salt 🧂 | 1 ½ tsp | Adjust to taste |
| Ground Black Pepper 🌶️ | ½ tsp | Freshly ground preferred |
| Extra-Virgin Olive Oil 🫒 | 2 tbsp | For crispy topping |
The banza pasta is non-negotiable here—its sturdy texture holds up perfectly during baking. Trader Joe's carries it in the pasta aisle, and it's worth stocking up if you love this dish. For the cheese, block cheddar shreds best (pre-shredded gets clumpy), and I always grab Monterey Jack from the deli counter for that extra creaminess. If you're feeling fancy, Parmigiano-Reggiano adds a nice depth, but the cheddar-jack combo is classic. The butter needs to be cold for that perfect roux—don't let it melt before hitting the pan.
No banza pasta? Regular elbow macaroni works in a pinch, but the texture won't be quite the same. Short on sharp cheddar? Gruyère or pepper jack bring different flavors to the party. The breadcrumbs are where the magic happens—panko plus regular dried breadcrumbs give you that perfect two-layer crunch. Fresh out of garlic? Garlic powder at half the amount gets you close. And if you're watching fat, reduce the butter by 1 tbsp and add extra milk—no one will notice.
This reheats beautifully—just cover with foil and bake at 350°F for 15 minutes. Keeps for 4-5 days in the fridge, but honestly, it won't last that long. For parties, double the topping and bake in a larger dish. The breadcrumbs crisp up best when you press them down firmly before baking—use the bottom of a glass for even pressure. Make ahead? Assemble everything, refrigerate overnight, then bake straight from cold for extra crispiness.
Why You'll Love This Recipe
- Let’s talk savings: Banza pasta is cheaper than regular noodles, and the cheese stretches further than you’d think. A single batch feeds four for under $10, and leftovers? They taste just as good the next day—if you can resist digging into the container straight from the fridge. (Yes, even on a Tuesday night.)
- No-Fuss Assembly: I swear, this comes together faster than takeout. Toss the cooked Banza pasta into a buttery roux—no straining, no waiting for water to boil over—and the cheeses melt into that perfect stretchy, gooey blanket. Honestly, the hardest part is deciding whether to bake it or eat it straight from the pan.
- Cheesy Magic: That combo of sharp cheddar and Monterey Jack? It’s like a hug for your taste buds. The Banza pasta adds a subtle nutty depth (no joke, it’s there), while the crispy top layer from the broiler makes every bite worth it. Between us, I’ve never met a baked mac that didn’t disappear in one sitting.
- Weeknight to Potluck: This is my go-to for lazy nights and when I need to bring something impressive to a gathering. Double the batch, freeze half—no one will guess it’s chickpea pasta (and if they do, they’ll still ask for seconds). Serve it in a cast-iron skillet for extra drama, or divide it into portions for easy reheating.
Step-by-step instructions for banza baked mac and cheese
Here's how to make the ultimate crispy-crusted mac and cheese with chickpea pasta.
Cook the Banza Chickpea Pasta Al Dente
Bring a large pot of water to a rolling boil and add 12 oz of the banza chickpea pasta along with 1.5 teaspoons of the diamond crystal kosher salt. Cook according to package instructions until 1 minute shy of al dente—this ensures it finishes cooking perfectly in the oven. Drain and set aside, reserving ½ cup of pasta water for the sauce.
Here's the thing—chickpea pasta cooks faster than regular pasta, so don't overcook it. You want it tender but still holding its shape when you pull it out. The reserved pasta water is non-negotiable; it's what transforms your sauce from good to velvety perfection.
Build the Ultra-Rich Cheese Sauce
In a large skillet, melt ½ cup of the unsalted butter over medium heat. Add ½ cup of the heavy cream and let it simmer for 2 minutes until slightly reduced. Stir in ¼ cup of the all-purpose flour and cook for 1-2 minutes until the mixture thickens into a smooth roux.
Now it's time for the cheese. Reduce heat to low and gradually whisk in 2 cups of the sharp cheddar cheese and 1 cup of the monterey jack cheese until completely melted and smooth. If the sauce gets too thick, add 1-2 tablespoons of the reserved pasta water to loosen it. This step is where the magic happens—don't rush it.
Sauté Aromatics for Depth of Flavor
In a separate pan, heat 2 tablespoons of the extra-virgin olive oil over medium heat. Add the finely diced yellow onion and cook for 5 minutes until softened. Add the minced garlic cloves and cook for another 30 seconds until fragrant—don't let it brown or it'll turn bitter.
Combine the cooked aromatics with the cheese sauce and stir well. Season with ½ teaspoon of the ground black pepper and taste—this is your chance to adjust the seasoning before baking. The sauce should be thick enough to coat the back of a spoon but still pourable. If it's too thick, add more pasta water 1 tablespoon at a time until it reaches your desired consistency.
Assemble and Bake for the Perfect Crust
Preheat your oven to 375°F. In a greased 9x9-inch baking dish, combine the cooked banza chickpea pasta and cheese sauce, mixing well to coat every strand. Sprinkle ½ cup of the panko breadcrumbs evenly over the top, pressing down gently to ensure they stick.
For extra crunch, mix ¼ cup of the dried breadcrumbs with 1 tablespoon of the extra-virgin olive oil and sprinkle this mixture over the panko layer. Bake for 25-30 minutes until the top is golden brown and bubbly, and the edges are crispy. If the top isn't browning enough, broil for 1-2 minutes at the end.
Rest and Serve with Confidence
Remove from the oven and let the mac and cheese rest for 5-10 minutes. This resting period allows the cheese to set slightly and the flavors to meld together. The crust should be crispy on top while the inside remains creamy and gooey—this is where all the hard work pays off.
Serve immediately with a side salad or crusty bread to soak up any extra cheese sauce. Each bite should deliver that perfect combination of crispy crust, creamy filling, and rich, cheesy flavor. And remember, leftovers reheat beautifully—just cover with foil and warm in the oven to maintain that crispy texture.
Pro Tips For Making Banza Baked Mac And Cheese
- COOK PASTA AL DENTE: Banza’s chickpea base needs a little more time than wheat pasta—aim for firm (not mushy) when tasting. Undercooked chickpea pasta turns gummy when baked, and overcooked turns to mush. Trust the clock but check it at the high end.
- GRATE CHEESE FINE: Skip the pre-shredded cheese—it’s packed with anti-caking agents that make baked mac dry. Use a box grater for sharp cheddar and Monterey Jack, then mix them together. The finer the shreds, the creamier the melt.
- MAKE A ROUX FIRST: Melt 4 tablespoons of butter in a saucepan, whisk in 2 tablespoons of flour, and cook for 2 minutes until golden. This thickens the sauce and adds depth—no lumps, no thin sauce. Pour in milk (if using) after the roux forms.
- BAKE COVERED THEN UNCOVERED: Start with foil on for 20 minutes to melt the cheese evenly, then remove it for the last 5–10 minutes. This guarantees a bubbly, golden crust without drying out the chickpea pasta underneath. (Yes, even if you’re impatient like me.)
Make-ahead tips for banza baked mac and cheese
Prep Ahead Strategy
Assemble the entire mac and cheese—pasta, sauce, and topping—up to 24 hours in advance. Store it uncovered in the fridge so the top dries slightly, which creates an even crispier crust when baked.
I like to press down the breadcrumbs firmly with a glass before refrigerating to help them stick better. 🧀
Baking from Cold
For maximum crispiness, bake straight from the fridge at 375°F for 35-40 minutes instead of the usual 25-30 minutes. The cold start helps the breadcrumbs crisp up perfectly while keeping the center creamy. I add 5 extra minutes to ensure the middle reaches 160°F for food safety.
Freezer-Friendly Method
Assemble the dish, cover tightly with foil, and freeze for up to 2 months. Thaw overnight in the fridge before baking. When ready to bake, add 5-10 extra minutes to the cooking time since it starts colder.
The texture remains just as creamy and the crust stays crispy—no freezer burn in sight! ❄️
Party-Size Prep
Double the recipe and bake in a 9x13-inch dish for gatherings. Use 1 cup panko and ½ cup dried breadcrumbs for the topping. Press down firmly in sections to prevent uneven browning. I like to bake smaller batches separately if possible—they crisp up better and are easier to serve.
Reheating Leftovers
Cover with foil and reheat at 350°F for 15 minutes to maintain crispiness. For extra crunch, broil for 1-2 minutes at the end. Leftovers stay delicious for 4-5 days in the fridge. I always make extra because it disappears so fast—trust me, your guests will ask for seconds! 💫
Make-Ahead Garnish
Prep toppings like chopped parsley or hot sauce drizzle separately and add them fresh after baking. This keeps the presentation vibrant and lets you customize each serving. I keep these ready in small containers so they're always at hand when the dish comes out of the oven.
Nutrition facts
Frequently asked questions
Why does this recipe use banza chickpea pasta instead of regular pasta?
The banza pasta adds a satisfying nutty flavor and extra protein while holding its shape beautifully during baking. Its sturdy texture creates a perfect contrast with the creamy cheese sauce, giving each bite both heartiness and a satisfying bite. Plus, it's a great way to add plant-based protein to this classic comfort dish!
Can I make this ahead of time for a dinner party?
Assemble the entire dish (including topping) up to 24 hours ahead and refrigerate uncovered. This dries out the top slightly for an extra-crispy crust when baked. For parties, double the recipe and bake in a 9x13-inch dish, using 1 cup panko and ½ cup dried breadcrumbs for maximum crunch. Just add 5-10 extra minutes to baking time if starting cold.
What's the best way to get a crispy crust without burning the top?
Press the breadcrumb topping firmly with the bottom of a glass before baking, and bake at 375°F for 25-30 minutes. If the top needs more color, broil for just 1-2 minutes at the very end—watch it closely! For extra insurance, try the "baking from cold" method: refrigerate the assembled dish overnight, then bake straight from the fridge for 35-40 minutes. This creates the perfect crispy crust without overcooking the center.
Can I substitute other cheeses or pasta shapes?
For cheeses, Gruyère or pepper jack add great flavor variations, while Parmigiano-Reggiano brings depth. For pasta, regular elbow macaroni works but lacks the banza's sturdy texture. If you must substitute, try penne or fusilli—they hold up better than delicate shapes. The key is using cheese that melts smoothly (avoid pre-shredded) and pasta that won't turn mushy during baking.
How do I fix a watery sauce after baking?
If your sauce is too thin, try this: Remove the dish from the oven, let it cool slightly, then sprinkle 1-2 tablespoons of flour over the sauce and stir gently. Return to the oven for 5-10 minutes to thicken. For a quick fix, mix 1 tablespoon cornstarch with 2 tablespoons cold milk**, stir into the sauce, and bake until thickened. Always taste and adjust seasoning after fixing—sometimes watery sauce just needs more salt or pepper!