
Main Courses
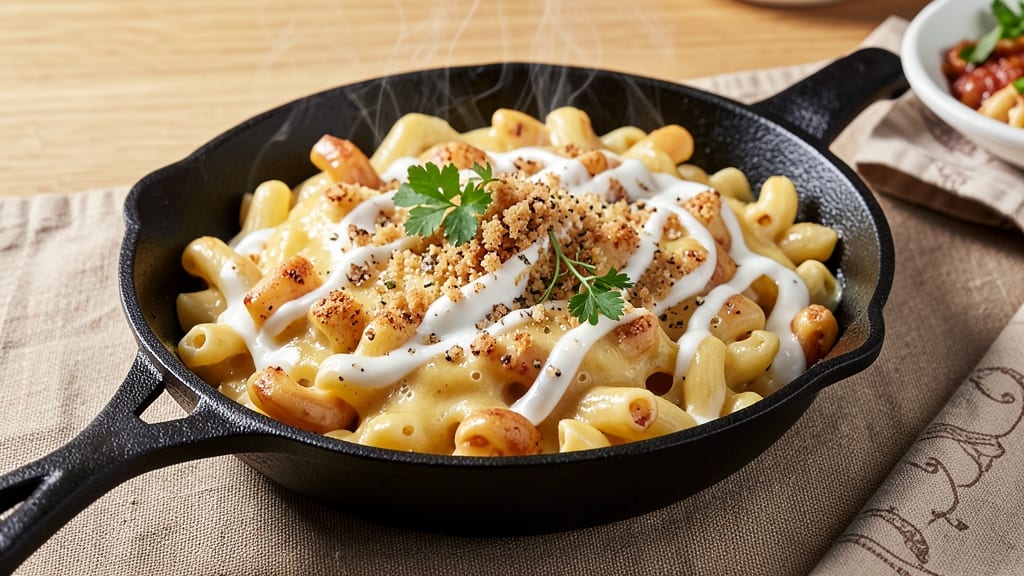
This banquet mac and cheese recipe delivers the perfect balance of golden crust, gooey pull-apart texture, and rich, velvety sauce—ideal for feeding a crowd with restaurant-quality results. The secret lies in a three-cheese blend that creates depth, while a crispy breadcrumb topping adds a satisfying crunch.
I developed this version after years of perfecting the technique for holiday gatherings, ensuring every bite is tender yet substantial enough to satisfy even the heartiest appetites.
The foundation begins with al dente pasta cooked just shy of perfection, then tossed in a luscious cheese sauce made from sharp cheddar, Gruyère, and cream cheese for a creamy yet slightly tangy flavor profile.
A foolproof assembly method—layering pasta, sauce, and cheese—guarantees that pull-apart elegance without requiring advanced skills. The dish bakes until bubbling and golden, with edges that crisp just enough to contrast the melt-in-your-mouth interior.
What sets this recipe apart is its versatility—serve it in a large casserole dish for a communal feast or divide into individual ramekins for an elegant presentation. The cheese sauce clings to every noodle, creating pockets of decadence that disappear faster than you can say "seconds, please."
Whether you're hosting Thanksgiving, a holiday potluck, or a simple family dinner, this mac and cheese will be the star of the table.
For added flair, consider topping with crispy fried shallots, a sprinkle of smoked paprika, or fresh herbs like parsley. The possibilities are endless, but the core recipe remains simple, reliable, and undeniably comforting—the kind of dish that transforms an ordinary meal into a memorable experience.
Here’s how to make it.
Ingredients for banquet mac and cheese
Twelve ingredients transform into a showstopping centerpiece perfect for holiday feasts and gatherings.
| Ingredient | Amount | Notes |
|---|---|---|
| Elbow Macaroni 🍝 | 2 lbs | Al dente pasta, cooked to firm bite |
| Sharp White Cheddar Cheese 🧀 | 1 ½ cups | Shredded, aged 6+ months for sharpness |
| Gruyère Cheese 🧀 | 1 cup | Finely grated, nutty flavor profile |
| Cream Cheese 🧈 | 8 oz | Full-fat, room temperature for blending |
| Heavy Whipping Cream 🥛 | 1 cup | Full-fat, 36% minimum for richness |
| Whole Milk 🥛 | 1 ½ cups | Warmed for smooth sauce texture |
| Butter 🧈 | ½ cup | Unsalted, melted for sauce base |
| All-Purpose Flour 🌾 | ¼ cup | For roux, sifted for smooth texture |
| Yellow Onion 🧅 | 1 whole | Finely diced, sweet variety preferred |
| Garlic Cloves 🧄 | 4 cloves | Minced, fresh for aromatic depth |
| Diamond Crystal Kosher Salt 🧂 | 1 ½ tsp | Fine grain, adjust to taste |
| Ground Black Pepper 🌶️ | ½ tsp | Freshly ground, coarse texture |
| Panko Breadcrumbs 🍞 | 1 ½ cups | Japanese-style for extra crispiness |
| Extra-Virgin Olive Oil 🫒 | ¼ cup | For breadcrumb crispiness |
| Smoked Paprika 🌶️ | 1 tsp | For subtle smoky aroma |
The cheese trio forms the heart of this dish. Gruyère from a specialty cheese shop adds nutty complexity—avoid pre-shredded versions, which contain anti-caking agents that prevent proper melting. For the cheddar, White House or Babybel brands deliver consistent sharpness, but any aged variety works. The cream cheese should be full-fat Philadelphia brand for optimal creaminess; low-fat versions create a grainy texture. If you're serving a large crowd, purchase cheese in block form and grate it yourself—pre-shredded cheeses contain additives that prevent that coveted pull-apart texture.
No Gruyère? Comté or Emmental provide similar nutty depth, though Comté is pricier. Substituting sharp cheddar for the Gruyère works in a pinch, but the dish loses some complexity. The panko breadcrumbs can be replaced with regular breadcrumbs plus 1 tbsp cornstarch for extra crispiness, though Japanese panko offers superior texture. For the roux, ensure your flour is all-purpose, not self-rising—the baking powder in self-rising can create an unpleasant aftertaste. The onion and garlic should be cooked low and slow to develop sweetness without browning, which can create bitterness in the final sauce.
Store prepped ingredients separately in airtight containers for up to 3 days in the refrigerator. The assembled casserole reheats beautifully—cover with foil and bake at 350°F for 20-25 minutes until bubbly. For make-ahead convenience, assemble the dish in a baking dish, refrigerate overnight, then bake straight from the fridge, adding 5-10 extra minutes to the baking time. The breadcrumb topping can be prepared ahead and stored in a sealed container for 2 days, though it's best used fresh for maximum crispiness.
Why You'll Love This Recipe
- No-Fuss Assembly: I swear, this comes together in one pot—no fancy techniques, no straining cheese through colanders. Just boil the pasta, melt the cheddar and Gruyère with the cream cheese, stir in the cream, and you’ve got a silky sauce. Honestly, the hardest part is waiting for it to cool enough to taste.
- Triple-Cheese Magic: That sharp white cheddar gives it a tangy bite, Gruyère adds nutty depth, and cream cheese keeps it lusciously smooth. The texture? Crispy edges on the noodles, creamy sauce clinging like it’s been hugging them all day. It’s the kind of mac that makes you close your eyes mid-bite.
- Potluck Proven: I’ve brought this to holiday dinners, game-day gatherings, and even my book club—no one ever leaves with leftovers. The creamy sauce holds up in the fridge for days, and it reheats like a dream. Plus, it’s cheap enough to feed a crowd without breaking the bank.
- Lazy-Day Luxury: Between us, this is my "I don’t want to think" meal. The ingredients are pantry staples, the cleanup is one pot, and it’s ready in under 40 minutes. I’ll take that over a fussy recipe any day—especially when it tastes this good.
Step-by-step instructions for banquet mac and cheese
This method delivers restaurant-worthy mac and cheese with a golden crust and gooey, pull-apart perfection.
Cook the Pasta Al Dente
Bring a large pot of water to a rolling boil and add 2 lbs elbow macaroni. Salt the water generously—it should taste like the ocean. Cook the pasta until it's 1 minute shy of the package directions for al dente. This slight undercooking ensures the pasta finishes cooking in the oven while absorbing the rich cheese sauce.
Before draining, reserve 1 full cup of pasta water. This starchy liquid is essential for creating a silky sauce. I keep a measuring cup nearby so I don't forget this critical step. Drain the pasta and return it to the pot, tossing with 2 tablespoons of the melted butter to prevent sticking.
Build the Rich Cheese Sauce
In a separate large bowl, combine the 1.5 cups sharp white cheddar cheese, 1 cup gruyère cheese, and 8 oz cream cheese. Let them sit at room temperature for 5 minutes to soften slightly. This makes blending easier and creates a smoother sauce.
In a saucepan over medium heat, melt the remaining 0.3 cup butter (you've already used 2 tablespoons with the pasta). Whisk in the 0.25 cup all-purpose flour to form a roux. Cook for 1-2 minutes until it turns a pale golden color and smells nutty. Slowly whisk in the 1.5 cups whole milk and 1 cup heavy whipping cream, ensuring no lumps form.
Simmer the sauce for 5-7 minutes until it thickens enough to coat the back of a spoon. Remove from heat and stir in the cheese mixture until completely melted and smooth. The sauce should be velvety with a luxurious, stretchy texture. If it's too thick, add reserved pasta water 1 tablespoon at a time until it reaches a pourable consistency.
Combine Pasta and Sauce
Transfer the cooked pasta to a large mixing bowl. Pour the cheese sauce over the pasta and gently fold everything together using a rubber spatula. I like to work in sections to ensure even distribution of the sauce. The pasta should be fully coated with cheese—no dry spots should remain.
Season generously with the 1.5 tsp Diamond Crystal kosher salt and 0.5 tsp ground black pepper. Taste and adjust the seasoning if needed. The cheese should be tangy and sharp, with a subtle smokiness from the paprika we'll add later. Let the mixture sit for 5 minutes to allow the flavors to meld.
Prepare the Crispy Topping
Preheat your oven to 375°F. While the oven heats, prepare the topping by mixing the 1.5 cups panko breadcrumbs, 0.25 cup extra-virgin olive oil, 1 tsp smoked paprika, and an additional 0.5 tsp kosher salt in a medium bowl. Use your fingers to thoroughly combine the ingredients until the breadcrumbs are evenly coated and slightly clumped.
Transfer the macaroni mixture to a 9x13-inch baking dish, spreading it into an even layer. The dish should be about ¾ full—don't overfill it. Sprinkle the breadcrumb mixture evenly over the top, pressing down gently to ensure good contact with the cheese. This creates that coveted crispy crust we're after.
Bake to Golden Perfection
Bake the mac and cheese for 25-30 minutes until the top is deep golden brown and the edges are bubbling. The cheese should be fully melted with no visible separation, and the crust should be crisp enough to hold its shape when pressed gently.
For the final touch, broil on high for 1-2 minutes to intensify the color and crispiness of the crust. Watch it closely—broilers can be aggressive, and you want a golden brown, not burnt. Let the mac and cheese rest for 10 minutes before serving to allow the cheese to set slightly and make slicing easier.
Serve immediately with a side of crisp green salad or roasted vegetables. The contrast of temperatures and textures makes this dish truly exceptional—creamy, cheesy, crispy, and satisfying all at once.
Pro Tips For Making Banquet Mac And Cheese
- MELT CHEESE LOW AND SLOW: After burning the first batch trying to rush it, I learned to simmer the cheese sauce on medium-low heat—no higher than 180°F (82°C). Gruyère and sharp cheddar need time to fully emulsify; high heat turns them grainy or separates the cream.
- GRATE CHEESE FINE AND DRY: Skip the pre-shredded cheese—it’s coated with anti-caking agents that make the sauce clump. Use a box grater for sharp cheddar and Gruyère, and pat the shavings dry with a paper towel. Moisture in the cheese weakens the sauce’s hold on the pasta.
- RESERVE STARCHY PASTA WATER: Drain the cooked elbow macaroni, but save ½ cup of that starchy pasta water. When mixing the sauce, add it a splash at a time—it’s the glue that keeps the cheese from turning into a sad, stringy mess.
- TOAST THE PASTA FIRST: Before mixing, spread the drained pasta on a baking sheet and broil for 2-3 minutes until edges turn golden. It crisps up nicely under the cheese sauce later and adds texture—no extra effort, just better bites. (Yes, even if you’re impatient like me.)
Storing and reheating this dish
Refrigerator Storage
Store your assembled mac and cheese in an airtight container with a lid, pressing plastic wrap directly on the surface to prevent drying. This keeps it fresh for up to 3 days in the refrigerator.
I like using glass Pyrex containers because they distribute heat evenly when reheating. The breadcrumb topping stays crispier this way too—just add fresh panko when serving if you want extra crunch. 🥫
Freezer Prep Tips
For longer storage, freeze your mac and cheese in single-serving portions wrapped tightly in parchment paper before placing in a freezer bag. This prevents freezer burn and makes reheating easier. Label with the date—it stays delicious for up to 3 months.
When ready to serve, thaw overnight in the fridge before reheating. Never microwave straight from frozen—this creates a rubbery texture. ❄️
Oven Reheating Method
My preferred way to reheat is in the oven at 350°F for 20-25 minutes, covered with foil. This maintains the creamy texture and crispy crust. If your dish is cold from the fridge, add 5-10 extra minutes to ensure it's piping hot throughout.
For individual ramekins, reduce time to 15 minutes—smaller portions heat faster. 🔥
Stovetop Refresh
For quick reheating on the stovetop, transfer portions to a skillet and cover tightly. Add 2-3 tablespoons of milk or cream to prevent drying, then heat over low-medium heat for 8-10 minutes, stirring occasionally.
The sauce will thicken slightly—stir in extra milk if needed. This method works best for smaller batches. 🍲
Microwave Shortcut
When you're in a hurry, use the microwave on 50% power for 2-3 minutes, stirring halfway. Cover with a damp paper towel to retain moisture. For larger portions, reheat in 30-second intervals, stirring between each, until reaching 165°F internal temperature.
Add a splash of milk if the cheese looks dry. This isn't ideal for the crust, but it's perfect for quick servings. ⚡
Make-Ahead Pro Tips
Assemble your mac and cheese the night before and refrigerate uncovered for 1 hour before baking. The cheese will firm up slightly, making it easier to slice after baking. For parties, prepare the breadcrumb topping separately and store in a sealed container—it stays fresh for 2 days.
When ready to bake, simply sprinkle fresh topping on top of the reheated dish. This saves time and ensures maximum crispiness. 💡
Nutrition facts
Frequently asked questions
Can I make this banquet mac and cheese in individual ramekins instead of a large dish?
Divide the assembled macaroni mixture evenly among 6-8 ramekins (about 1 cup per ramekin) and top each with a sprinkle of breadcrumb mixture. Bake at 375°F for 20-25 minutes until golden. This elegant presentation is perfect for parties where guests serve themselves.
Why does my cheese sauce get grainy when I melt the cheese?
Graininess usually happens when cheese melts too quickly or contains anti-caking agents (common in pre-shredded cheese). To fix it, gently warm the milk and cream first, then gradually whisk in the cheese. For extra silkiness, add 1 tablespoon of cornstarch to the roux. Always use block cheese and grate it yourself—pre-shredded versions are designed to resist clumping.
How do I make this recipe vegetarian?
This recipe is already vegetarian! Just ensure your butter is dairy-free if needed, and use plant-based milk/cream for a vegan version. For extra richness, add 2 tablespoons of nutritional yeast to the sauce for a cheesy flavor. The breadcrumb topping remains the same—just verify your panko is egg-free.
Can I add cooked bacon or meat to this dish?
Yes! Crispy bacon, cooked sausage, or diced ham work beautifully. Fold in 1 cup of cooked, crumbled meat after combining the pasta and sauce. For extra flavor, brown the meat first and mix in a little of the pan drippings. Just reduce the cheese by ¼ cup to maintain the right texture.
What's the best way to serve this for a large gathering?
For a crowd, serve family-style in a large baking dish with extra breadcrumbs on the side for guests to add crispy topping to their plates. Pair with a crisp green salad and roasted vegetables for balance. For a buffet, divide into individual ramekins and serve with warm dinner rolls on the side.