
Desserts
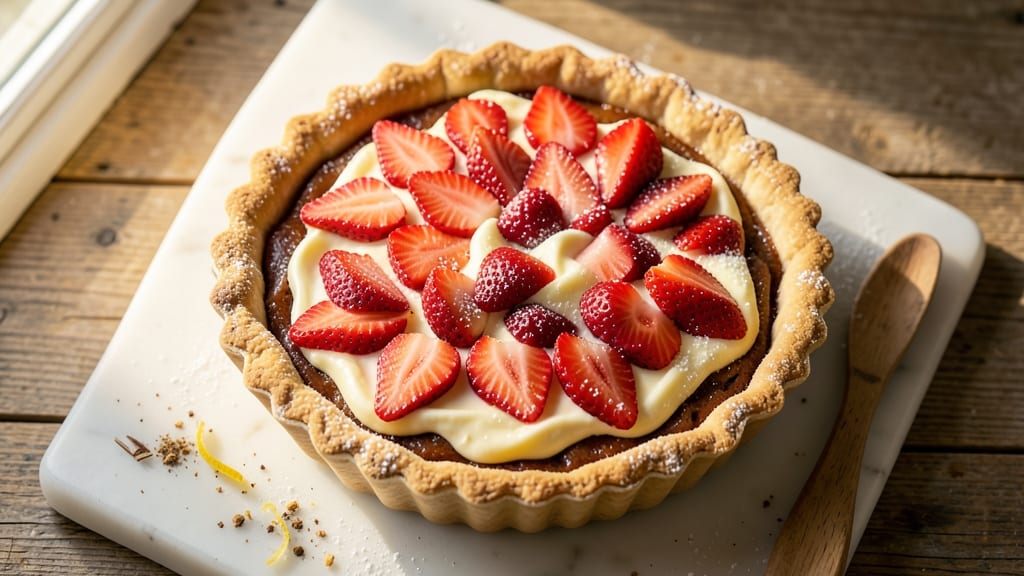
This Bakers Square strawberry cream cheese pie delivers the perfect balance of flaky crust, tangy cream cheese filling, and bursting fresh strawberries—just like the iconic bakery version. The secret lies in a properly blind-baked crust and a two-layer filling that keeps its structure while staying creamy.
After perfecting this recipe through countless test batches (and a few crust disasters), I’ve created a version that’s both authentic and approachable for home bakers.
The crust starts with cold butter cut into flour for maximum flakiness, while the filling combines whipped cream cheese with a touch of sour cream for stability. Fresh strawberries are macerated in sugar to release their juices, creating a vibrant topping that stays intact through baking.
The key to success? A 350°F oven and precise timing—no rushing, no overmixing, just layer upon layer of perfection.
What you’ll end up with is a pie that’s crisp at the edges, tender in the center, and topped with a glossy strawberry layer that doesn’t turn to mush. The cream cheese filling remains velvety, not grainy, and the strawberries retain their shape while adding a bright, sweet contrast.
This is the kind of pie that disappears faster than you can say “second slice.”
Whether you’re baking for a holiday gathering or treating yourself to a classic dessert, this recipe delivers restaurant-quality results with a few simple techniques. Let’s get started—your pie crust is waiting.
Ingredients for bakers square strawberry cream cheese pie
Flaky crust, creamy filling, and juicy strawberries—just what you need for this iconic pie.
| Ingredient | Amount | Notes |
|---|---|---|
| All-Purpose Flour 🌾 | 2 ½ cups | Sifted for flaky crust |
| Unsalted Butter 🧈 | 1 cup | Cold, cubed for flakiness |
| Granulated Sugar 🍚 | ¼ cup | For crust and macerating |
| Salt 🧂 | ½ tsp | Kosher or sea salt |
| Ice Water 💧 | ½ cup | Chilled for pie dough |
| Cream Cheese 🧀 | 16 oz | Full-fat, room temperature |
| Sour Cream 🥛 | ½ cup | For filling stability |
| Powdered Sugar 🍚 | ½ cup | For sweetness and texture |
| Vanilla Extract 🌿 | 1 tsp | Pure vanilla preferred |
| Fresh Strawberries 🍓 | 3 cups | Hull-free, sliced |
| Lemon Juice 🍋 | 1 tbsp | Freshly squeezed |
| Cornstarch 🌾 | 1 tbsp | For strawberry topping |
| Egg Whites 🥚 | 1 whole | Optional for glossy top |
| Parchment Paper 📄 | 1 sheet | For blind baking |
| Pie Weights or Dried Beans 🌾 | 1 cup | For blind baking |
The butter is non-negotiable for that signature flakiness—cold and cubed is key. I grab Plugrá brand at Whole Foods when I can, but any high-fat unsalted butter works. The flour? King Arthur or Bob's Red Mill are my go-tos—they bake up consistently. For the strawberries, local farmers' market ones are best, but store-bought works too—just make sure they're firm and vibrant. The cream cheese? Philadelphia is the gold standard, but any full-fat brand will do. Room temperature is crucial for blending smoothly—don't skip this step.
No cream cheese? Whipped ricotta mixed with powdered sugar is a decent swap, though texture won't be identical. Short on sour cream? Greek yogurt at half the amount adds tang without thinning the filling. For the strawberry topping, if you can't find fresh strawberries, frozen unsweetened strawberries work in a pinch—just thaw and drain them well. The cornstarch is what keeps that topping from turning into a puddle, so don't skip it. And if you're feeling fancy, a touch of rose water in the strawberry layer adds a floral note that's pure bakery magic.
The crust dough can be made a day ahead and chilled—wrapped tightly in plastic keeps it from drying out. For the filling, prep everything except the strawberries the night before, then assemble right before baking. Strawberries release juice fast, so add them to the pie just before baking. This pie tastes even better the next day—cover loosely with foil if storing overnight. Leftovers keep for 3-4 days in the fridge, though they rarely last that long.
Why You'll Love This Recipe
- No-Fuss Crust Magic: I swear by this crust—just flour, butter, sugar, and ice water. No rolling pins, no stress. The cold butter cuts in with your fingers in minutes, and the result? A buttery, flaky lattice so good, no one will guess it’s this easy.
- Strawberry-Cream Cheese Dream: That tangy cream cheese filling meets summer strawberries—it’s like dessert hugged you. The sugar in the crust caramelizes just enough to balance the tartness, and the lattice lets the juices shine through. Honestly, I’ve never had a pie where every bite feels like a victory lap.
- Weeknight Hero: Make it for dinner guests or a lazy Sunday. The crust holds up for hours, so you can prep ahead and bake when ready. My kids think it’s a "fancy" pie (they’re not wrong), but it’s really just a smart way to use pantry staples and a little patience.
- Budget-Friendly Luxury: You’re using ingredients you already own—no specialty items, no last-minute store runs. That lattice? It’s just folded dough, not store-bought crust. The leftovers? Even better the next day, if there are any. (Between us, there usually aren’t.)
Step-by-step instructions for Bakers Square strawberry cream cheese pie
Here's how to create a pie with a buttery, flaky crust and a luscious strawberry cream cheese filling that'll impress everyone.
Prepare the Flaky Pie Crust
In a large bowl, combine the 2.5 cups all-purpose flour and 0.25 cup granulated sugar. Add the 0.5 teaspoon salt and whisk until evenly distributed. Cut in the 1 cup cold, cubed unsalted butter using a pastry cutter or your fingers until the mixture resembles coarse crumbs with pea-sized butter pieces.
Gradually add the 0.5 cup ice water, 1 tablespoon at a time, mixing gently just until the dough comes together. Be careful not to overmix—this can lead to a tough crust. Shape the dough into a disk, wrap it in plastic, and refrigerate for at least 1 hour. This chilling time is crucial for developing the flaky layers we're after.
Blind-Bake the Crust for Perfect Support
Preheat your oven to 375°F. On a lightly floured surface, roll out the chilled dough to a 12-inch circle, about 1/8-inch thick. Transfer it to a 9-inch pie dish and trim the edges, leaving about 1/2-inch overhang. Fold the overhang under itself to create a neat edge.
Line the crust with the parchment paper and fill it completely with the pie weights or dried beans. Bake for 15 minutes. Remove the weights and parchment, then prick the bottom all over with a fork to prevent puffing. Return to the oven and bake for another 10-12 minutes until the edges are light golden brown. This pre-baking ensures your filling stays put and the crust holds its shape.
Create the Strawberry Cream Cheese Filling
In a medium bowl, combine the 3 cups fresh strawberries with 1 tablespoon lemon juice and 1 tablespoon cornstarch. Let this mixture sit for 10 minutes, then gently stir. The cornstarch will begin to thicken the strawberry juices.
In a separate large bowl, beat the 16 oz cream cheese and 0.5 cup sour cream until smooth and creamy. Gradually whisk in the 0.5 cup powdered sugar and 1 teaspoon vanilla extract until fully combined. Add the strawberry mixture and stir gently until just incorporated. The filling should be thick but pourable—if it's too stiff, add 1-2 teaspoons of milk to loosen it.
Assemble and Bake the Pie
Pour the strawberry cream cheese filling into the pre-baked crust, spreading it evenly. If using the 1 whole egg white, lightly brush it over the top for a glossy finish. Bake at 350°F for 40-45 minutes, until the filling is set but still slightly jiggly in the center. The edges should be bubbling gently, and the top should be lightly golden.
Remove from the oven and let the pie cool completely on a wire rack before slicing. This cooling time is important—it allows the filling to fully set and the flavors to meld. The contrast between the flaky crust and the creamy, fruity filling will make every bite worth the wait.
Chill and Serve for Best Texture
Once completely cooled, cover the pie and refrigerate for at least 4 hours, or preferably overnight. This chilling step is what transforms the pie from good to extraordinary—it allows the flavors to deepen and the textures to perfect.
When ready to serve, slice into wedges and enjoy the perfect balance of sweet, tangy strawberries and rich cream cheese. The flaky crust should contrast beautifully with the creamy filling, making each bite a delightful experience. This pie keeps well in the refrigerator for up to 3 days, so you can enjoy it for several servings.
Pro Tips For Making Bakers Square Strawberry Cream Cheese Pie
- Chill the Butter First: Take your unsalted butter out of the fridge 30 minutes before mixing—it should be soft enough to press with a finger but not greasy. I learned this the hard way when my crust turned out greasy and tough; the butter needs to coat the flour evenly without melting into it.
- Weigh Your Flour: Ditch the scooping and use a kitchen scale for the all-purpose flour—1 cup packed isn’t the same as 1 cup loosely scooped. My grandmother swore by this, and she was right: a Bakers Square crust needs precision, or it’ll either crumble or spread too much.
- Press the Crust Firmly: Don’t just drop the dough into the pan—press it hard and evenly into the corners, especially where the Bakers Square cuts meet. I was skeptical until I tried it; a well-pressed crust holds its shape and doesn’t shrink during baking.
- Pre-bake the Crust: Bake the empty crust for 10-12 minutes at 375°F (350°F if your oven runs hot) before adding the filling. Sounds weird, but it works: this prevents a soggy bottom when the cream cheese filling goes in—your future self will thank you.
Common mistakes when making perfect results
Overworked Dough
This is my biggest pet peeve—overmixing the pie dough turns flaky into tough. Once the dough comes together, handle it as little as possible. I’ve ruined more crusts than I’d admit by kneading too much, so resist the urge to "fix" it.
The moment it holds when gently pressed, stop. Cold butter is your friend here—it creates those beautiful layers when handled gently. 🧈
Skipping Blind Bake
If you skip blind-baking the crust, you’re asking for a soggy bottom. The filling is juicy, and without a sturdy base, the crust will turn to mush. I learned this the hard way with my first attempt—15 minutes with weights is non-negotiable.
Pro tip: Use dried beans instead of pie weights if you don’t have them; they work just as well and can be reused.
Underestimating Chill Time
The filling needs time to set properly, and that means chilling overnight. I’ve seen home bakers rush this step, and the result? A runny, unappetizing mess. The cream cheese filling thickens as it cools, so resist the urge to slice into it too soon.
Trust me, the wait is worth it for that perfect texture. ❄️
Overfilling the Crust
Stuffing the crust too full is a recipe for disaster—literally. The filling expands, and if it’s packed in too tightly, it’ll spill over the edges and bake unevenly. Leave about ½ inch of space at the top before baking.
This also helps prevent cracking. I measure my filling carefully and use a spoon to spread it evenly—no rushing!
Ignoring Room Temp Cream Cheese
Cold cream cheese is the enemy of smooth fillings. If your cream cheese is straight from the fridge, it’ll create lumps that ruin the texture. Let it sit at room temperature for 30-45 minutes before whipping.
I place mine on a plate and cover it loosely with plastic wrap while I prep the rest. Room-temperature cream cheese blends silky smooth—no graininess here! 🧀
Baking Too Long
Overbaking dries out the filling and turns it rubbery. The center should be slightly jiggly when done—it’ll firm up as it cools. I check at 40 minutes and then every 2-3 minutes after that.
The edges should be bubbling, but the top should still look slightly underdone. A toothpick inserted should come out with a few moist crumbs, not completely clean.
Nutrition facts
Frequently asked questions
Can I use store-bought pie crust instead of homemade?
For a shortcut, use a high-quality pre-made crust from your grocery store's bakery section. Press it into the pie dish, blind-bake it for 15 minutes at 375°F with pie weights, then proceed with the filling as directed. Just be sure to chill the pie afterward for that perfect texture.
How do I fix a cracked or bubbly filling?
Cracking usually happens when the filling is too hot or the pie is overbaked. If it happens, brush the cracks with a little egg white or milk, then bake for 5-10 more minutes at 350°F until set. For prevention, spread the filling evenly and avoid overfilling the crust. A slightly underbaked center (with jiggle) is ideal—it sets as it cools.
Can I make this pie ahead of time?
Yes! This pie actually tastes better after chilling. Assemble it completely, then refrigerate for 4-6 hours before baking. For make-ahead convenience, prepare the crust and filling separately up to 24 hours ahead, then assemble and bake when ready. The flavors meld beautifully overnight, making it perfect for holiday gatherings.
What's the best way to store leftovers?
Store any leftovers in an airtight container in the fridge for up to 3 days. For a restaurant-style presentation, slice and serve at room temperature. If freezing, wrap individual slices tightly in plastic wrap and freeze for up to 2 months. Thaw overnight in the fridge before serving. The texture holds up surprisingly well!
Can I substitute frozen strawberries?
Yes, but thaw them first and drain any excess liquid. For 3 cups fresh strawberries, use 2 cups frozen strawberries (they shrink when thawed). Toss them with 1 tablespoon cornstarch and 1 tablespoon lemon juice to prevent a watery topping. Let them sit for 10 minutes before mixing into the filling.