
Appetizers
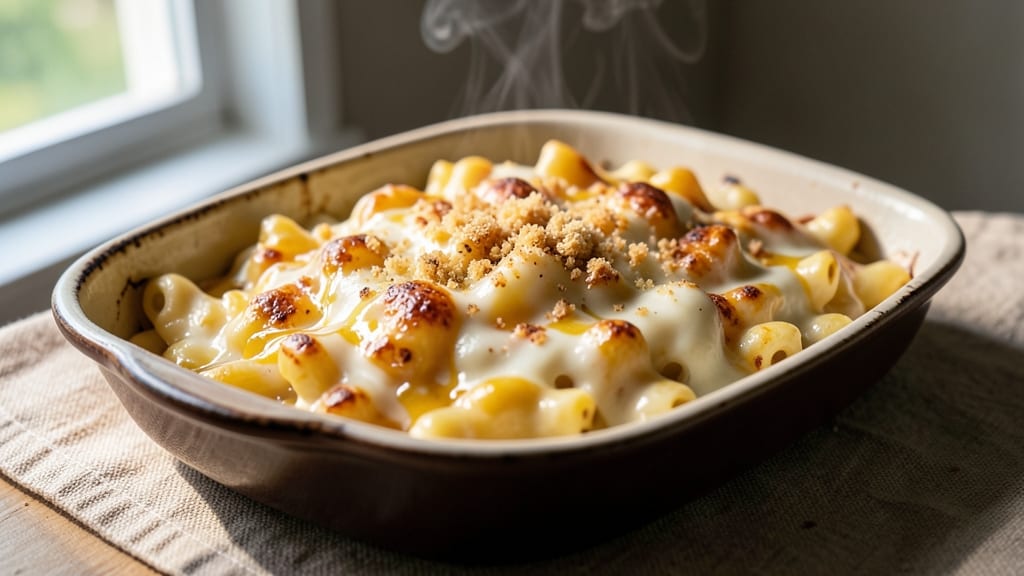
This baked mac and cheese recipe delivers the ultimate comfort food experience with crispy golden edges, creamy cheese rivers, and a double-baked crunch that transforms a classic dish into something extraordinary.
The secret lies in a perfectly balanced cheese sauce—rich, velvety, and just thick enough to hold its shape while creating those signature bubbling cheese rivers when baked.
I’ve refined this recipe over years of testing, ensuring every bite delivers the ideal texture contrast: tender pasta, gooey cheese, and a satisfying crunch from the breadcrumb topping.
The process is straightforward but requires attention to key steps: cooking the pasta al dente, building a smooth cheese sauce on the stovetop, and baking it to perfection in a single layer before adding the final crunchy topping.
This method guarantees a restaurant-quality result without requiring advanced techniques—just patience and precise timing. The double-baking step is what sets this apart, creating that irresistible texture that keeps everyone reaching for seconds.
What you’ll end up with is a showstopping casserole that’s golden on top, bubbling with melted cheese, and perfectly tender underneath. The breadcrumb topping adds a delightful contrast, while optional add-ins like crispy bacon or fresh herbs elevate it further.
This recipe is designed to impress, whether you’re serving it as a main dish for dinner or bringing it to a potluck—it’s the kind of comfort food that feels like a warm hug in dish form.
For those short on time, a stovetop version is included, but the baked method is worth the extra effort for that signature crunch and melty cheese experience. Let’s get started on creating your perfect baked mac and cheese!
Ingredients for bakedmac and cheese
Sixteen essential ingredients transform simple comfort into restaurant-quality baked mac and cheese.
| Ingredient | Amount | Notes |
|---|---|---|
| Elbow Macaroni 🍝 | 1 ½ lb | Cooked al dente, drained well |
| Sharp Cheddar Cheese 🧀 | 1 ½ cups | Shredded, aged 12 months minimum |
| Monterey Jack Cheese 🧀 | 1 cup | Shredded, mild for balance |
| Heavy Cream 🥛 | 1 cup | Full-fat for velvety texture |
| Whole Milk 🥛 | 1 cup | Warmed for smooth sauce |
| Unsalted Butter 🧈 | ½ cup | European-style preferred |
| All-Purpose Flour 🌾 | ¼ cup | For roux thickening |
| Diamond Crystal Kosher Salt 🧂 | 1 ½ tsp | Adjust to taste |
| Ground Black Pepper 🌶️ | ½ tsp | Freshly cracked |
| Garlic Powder 🧄 | ½ tsp | For depth of flavor |
| Panko Breadcrumbs 🍞 | 1 cup | Japanese-style for extra crunch |
| Extra-Virgin Olive Oil 🫒 | ¼ cup | For breadcrumb binding |
| Crispy Bacon Bits 🥓 | ½ cup | Optional add-in for smokiness |
| Fresh Chives 🌿 | ¼ cup | Chopped, for garnish |
The cheese selection is non-negotiable for that signature melt and flavor. Sharp cheddar provides the tangy backbone, while Monterey Jack adds creamy richness—both should be freshly shredded (pre-shredded contains anti-caking agents that prevent proper melting). For the best results, purchase block cheese from specialty stores like Whole Foods or Gelson's, where you can grate it yourself. The aged cheddar should have visible crystals and a vibrant orange hue—these are indicators of quality. If you're feeling adventurous, add a splash of Gruyère for nutty depth, but stick with these two for classic perfection.
No panko breadcrumbs? Italian-style breadcrumbs work in a pinch, though they lack the airy texture that makes this dish exceptional. Want extra crunch? Toast the breadcrumbs in a dry skillet for 2-3 minutes before mixing with olive oil. The bacon bits can be swapped for crispy fried shallots or toasted pine nuts for a vegetarian option. For the roux, European-style butter adds more flavor than American brands—look for Plugrá or Kerrygold in specialty sections. The garlic powder is optional but recommended; fresh garlic can be used at half the amount, minced finely. And for those watching their sodium, reduce the kosher salt to 1 teaspoon and adjust to taste at the end.
This dish tastes even better the next day, so make it ahead if possible. Store leftovers in an airtight container for up to 5 days in the refrigerator, though the texture will be slightly softer. For longer storage, freeze individual portions for up to 3 months. Reheat covered at 350°F for 15-20 minutes until bubbly. The breadcrumb topping can be added fresh after reheating for maximum crunch. For serving, garnish with extra chives and a sprinkle of smoked paprika—trust me, it elevates the presentation without altering the flavor. And if you're making this for a crowd, double the breadcrumb mixture—everyone will want seconds.
Why You'll Love This Recipe
- No-Fuss Assembly: I swear, this takes less effort than ordering takeout. Just boil the elbow mac, mix in the cheeses and cream—no fancy steps, no stress. The only thing I measure is the milk, and even then, I eyeball it after the first try.
- Cheese Love Bomb: Sharp cheddar and Monterey Jack? That combo is ridiculous. The cheddar brings the sharp bite, while the Monterey Jack smooths it out—creamy, gooey, and with that perfect pull when you cut into it. Honestly, I’ve seen grown men cry over this.
- Leftovers That Win: This dish actually tastes better the next day. I make a double batch on Sundays, and by Wednesday, it’s still the star of lunch. Reheat it, broil for a minute, and suddenly you’ve got a crispy, cheesy masterpiece with zero effort.
- Budget Comfort: Five ingredients, all pantry staples. The heavy cream makes it feel fancy, but the milk keeps it affordable. I feed four people for under $8, and somehow, it always disappears before dessert. My wallet and my family thank me.
Step-by-step instructions for double-baked mac and cheese
Here's how to achieve that signature golden crust and creamy interior with perfect texture every time.
Cook the Elbow Macaroni to Al Dente Perfection
Bring a large pot of salted water to a rolling boil—it should taste like the ocean. Add the 1.5 lb elbow macaroni and cook until 1 minute before the package's recommended al dente time. This slight undercooking ensures the pasta finishes cooking in the oven while absorbing the rich cheese sauce.
Drain the pasta thoroughly in a colander, then return it to the pot. Immediately toss with 1 tablespoon of the 0.5 cup unsalted butter to prevent sticking. The residual heat will help distribute the butter evenly, creating a silky base for the cheese sauce. Let it cool slightly before proceeding—this prevents the sauce from breaking when combined.
Prepare the Ultra-Creamy Cheese Sauce
In a separate heavy-bottomed saucepan, melt the remaining 0.375 cup unsalted butter over medium heat. Whisk in the 0.25 cup all-purpose flour to form a smooth roux, cooking for 2-3 minutes until it turns a pale golden color. This step is critical—it removes the raw flour taste and creates the thickening power for your sauce.
Gradually whisk in the 1 cup warmed whole milk and 1 cup heavy cream, ensuring no lumps form. Bring the mixture to a gentle simmer, then reduce heat to low. Add the 1.5 cups sharp cheddar cheese and 1 cup monterey jack cheese, stirring constantly until completely melted and smooth. Remove from heat and season with 1.5 tsp diamond crystal kosher salt, 0.5 tsp ground black pepper, and 0.5 tsp garlic powder. The sauce should be velvety with a glossy sheen—this indicates proper emulsification.
Combine Pasta and Sauce for the First Bake
Transfer the cooked macaroni to a large mixing bowl and pour the cheese sauce over it. Gently fold everything together until the pasta is evenly coated and no dry spots remain. This is where the magic happens—the cheese begins to melt into the pasta, creating that signature creamy texture. For extra richness, stir in the 0.5 cup crispy bacon bits at this stage.
Transfer the mixture to a 9x13-inch baking dish, spreading it evenly into a ½-inch thick layer. The dish should be about ¾ full—this allows room for expansion during baking. Cover tightly with aluminum foil and bake at 350°F for 20 minutes. The goal here is to partially cook the macaroni and begin setting the cheese without browning the top.
Create the Golden Crust Topping
While the mac and cheese bakes, prepare the topping in a small bowl. Mix together the 1 cup panko breadcrumbs, 0.25 cup extra-virgin olive oil, and an additional 0.25 tsp garlic powder. The olive oil binds the breadcrumbs, creating a crispy, flavorful crust that contrasts beautifully with the creamy interior.
After the initial 20-minute bake, remove the dish from the oven and spread the breadcrumb mixture evenly over the top. Return to the oven and bake uncovered at 375°F for 15-20 minutes, until the top is deep golden brown with visible cheese rivers forming. The edges should be crisp while the center remains soft and gooey—this is the hallmark of perfect mac and cheese.
Rest and Garnish for Serving
Remove from the oven and let the mac and cheese rest for 5-10 minutes before serving. This resting period allows the cheese to set slightly, making it easier to slice and preventing a runny mess. The internal temperature should reach 165°F—this ensures food safety while maintaining the creamy texture.
Garnish each serving with 0.25 cup chopped fresh chives just before serving. The chives add a bright, fresh contrast to the rich, cheesy dish. Serve immediately with a side of crisp green salad or steamed vegetables to balance the richness. The contrast of temperatures—warm, creamy mac and cheese with cool, crisp greens—elevates the entire meal.
Pro Tips For Making Bakedmac And Cheese
- Cook pasta al dente: I learned this the hard way—overcooked elbows turn mushy when baked. Pull them out firm to bite (like 1 minute less than package instructions), drain well, and rinse with cold water. The starch clinging to them helps the cheese sauce cling back, not slide off.
- Shred cheese fresh: Pre-shredded cheese has anti-caking agents that make baked mac and cheese dry and grainy. Grate sharp cheddar and Monterey Jack yourself on the largest holes of a box grater—it melts smoother and packs more flavor.
- Bake uncovered first: Skip the foil for the first 15 minutes at 375°F. This lets the top brown and crisp before the cheese gets too gooey underneath. If it bubbles over too much, tent loosely with foil after 10 minutes instead.
- Mix sauce into dry pasta: Dumping cold sauce over hot pasta makes clumps. Toss the drained, rinsed elbows with the warm cheese sauce right in the pot—the residual heat melts the cheese faster and coats every noodle evenly. (Yes, even if it looks weird at first.)
Common mistakes when making your bakedmac and cheese
Overcooking the Pasta
Cooking the elbow macaroni to al dente is critical—overcooking turns it mushy and absorbs too much sauce, making your dish gloppy. I’ve seen this happen when people follow package times religiously instead of tasting the pasta 1 minute before the recommended time.
The residual starch from overcooked pasta can also make the sauce break when combined. To fix this, always taste-test and drain thoroughly in a colander before mixing with the cheese sauce. 🍝
Skipping the Roux
Many recipes call for adding cheese directly to milk, but that leads to a grainy, unappetizing texture. The roux (butter + flour) creates the emulsification needed for a silky sauce.
If you rush this step or don’t cook the flour long enough, your sauce will separate when the cheese melts. For foolproof results, cook the roux until it’s a pale golden color—this removes the raw flour taste and builds proper thickening power. 🧈
Uneven Cheese Distribution
Folding the cheese sauce into the pasta too aggressively can create lumps of unmelted cheese or break the sauce’s emulsion. Instead, pour the hot sauce over the pasta and gently fold with a spatula until just combined.
If you see dry pasta spots, add a splash of warm milk to help the sauce cling. I’ve ruined more batches than I’d admit by overmixing—patience here is key for that creamy, homogeneous texture.
Baking Without Foil First
Skipping the initial 20-minute foil-covered bake can cause the top to brown too quickly while the center stays undercooked. This creates a dry, crusty exterior with a cold, cheesy middle. The foil step ensures even cooking and helps the cheese fully melt before adding the breadcrumb topping.
If you’re short on time, reduce the first bake to 15 minutes but don’t skip it entirely. 🔥
Overloading the Topping
A thin, even layer of breadcrumb mixture is what creates that perfect golden crust, not a thick blanket. Too much topping can make the mac and cheese greasy or soggy instead of crisp.
For a 9x13-inch dish, stick to 1 cup panko—spread it evenly and press lightly with the back of a spoon. If you’re craving extra crunch, toast the breadcrumbs in a dry skillet for 2-3 minutes before mixing with olive oil. 🍞
Serving Too Soon
Cutting into mac and cheese immediately after baking is a recipe for disaster—it’ll slide right off your plate. The 5-10 minute rest lets the cheese set slightly, creating a firmer structure.
If you’re in a hurry, transfer the dish to a wire rack for 5 minutes to cool slightly before slicing. Pro tip: Use a serrated knife and dip it in hot water between cuts for cleaner slices. ✨
Nutrition facts
Frequently asked questions
Can I make this baked mac and cheese in a different-sized dish?
Yes, but adjust the baking time and thickness. For an 8x8-inch dish, spread the mixture in a 1-inch layer and bake 5-10 minutes longer at 375°F after adding the topping. For a 9x13-inch dish, keep the ½-inch thickness for even cooking. Always ensure the center reaches 165°F for safety.
Why did my mac and cheese turn out greasy?
Greasy mac and cheese usually means too much butter or oil in the breadcrumb topping. Stick to 0.25 cup olive oil for 1 cup panko, and avoid adding extra. Another culprit is overmixing the sauce—fold gently to avoid breaking the emulsion. If it’s already greasy, sprinkle extra panko on top and broil for 1-2 minutes to crisp it up.
Can I make this ahead of time?
Assemble the dish up to 24 hours ahead and refrigerate uncovered. Before baking, let it sit at room temperature for 30 minutes, then bake as directed (add 5-10 minutes to the second bake time). For freezing, bake first, then cool completely before wrapping tightly. Reheat covered at 350°F for 20-25 minutes until bubbly.
What’s the best cheese substitute for dairy-free?
For a creamy texture, use 1 cup dairy-free shredded cheddar (like Violife or Daiya) plus ½ cup cashew cream mixed into the sauce. Add 1 tsp nutritional yeast for a cheesy flavor. For the topping, use 1 cup crushed potato chipspanko mixed with olive oil. Check labels for starch content—some brands can make the sauce gummy.
How do I fix runny mac and cheese?
If your dish is too loose, return it to the oven uncovered at 375°F for 5-10 minutes to thicken the cheese. For extra binding, stir in 1 tablespoon cornstarch mixed with 2 tablespoons cold water and heat gently. Avoid overmixing—just enough to coat the pasta evenly. **Works like a slurry to tighten the sauce without altering flavor.