
Main Courses
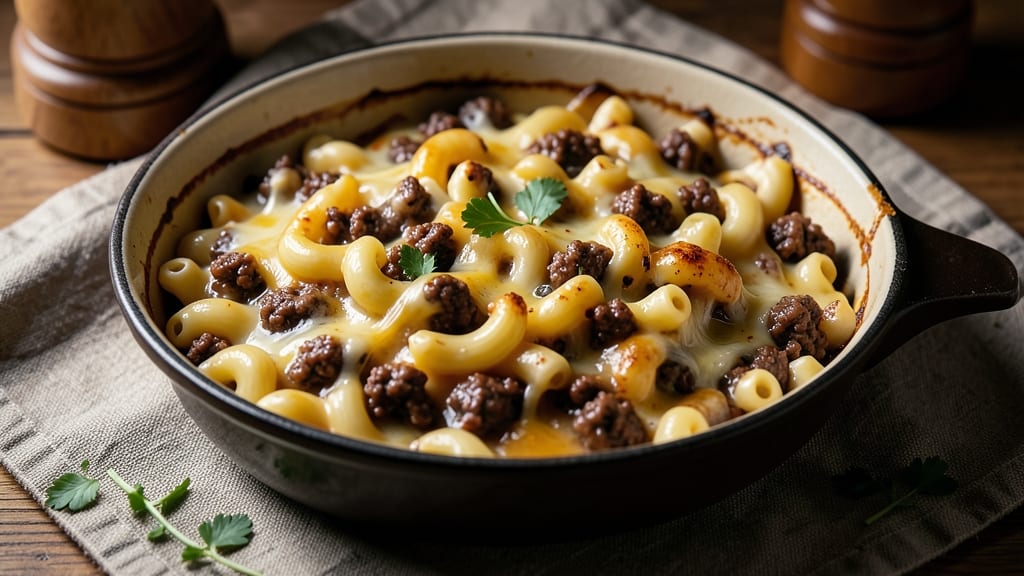
This baked mac and cheese with beef recipe delivers the ultimate comfort food experience—creamy, cheesy, and packed with hearty protein all in one satisfying dish. The secret lies in browning ground beef for deep flavor before mixing it into a velvety cheese sauce that coats every strand of pasta.
I developed this recipe during a particularly chilly evening when I craved something rich, filling, and impossible to resist.
The beauty of this one-pan wonder is its simplicity: tender beef simmers in a rich tomato base while the mac and cheese bakes to golden perfection.
Using a blend of sharp cheddar and Gruyère creates that signature creamy, stretchy texture we all love, while the beef adds substantial protein that keeps everyone satisfied. The result is a dish that feels indulgent yet comes together with minimal effort.
What makes this recipe stand out is how it transforms basic ingredients into something restaurant-quality. The beef infuses the cheese sauce with savory depth, while the crispy breadcrumb topping adds a satisfying crunch.
Each bite delivers that perfect balance of creamy, cheesy goodness with a hearty beef flavor that elevates it beyond ordinary mac and cheese.
Perfect for feeding a crowd or a cozy family dinner, this dish pairs beautifully with a simple green salad or crusty bread. The best part? It all comes together in one pan, making cleanup a breeze. Let's get started on this hearty, protein-packed comfort classic.
Ingredients for baked mac and cheese with beef
Sixteen ingredients transform into one-pan comfort that feels indulgent yet comes together easily.
| Ingredient | Amount | Notes |
|---|---|---|
| Elbow Macaroni 🍝 | 1 ½ lbs | Medium or fine elbow shape |
| Ground Beef 🥩 | 1 ½ lbs | 80/20 fat ratio preferred |
| Sharp Cheddar Cheese 🧀 | 2 cups | Shredded, block preferred |
| Gruyère Cheese 🧀 | 1 cup | Shredded, adds nutty depth |
| Heavy Cream 🥛 | 1 cup | Full-fat for creaminess |
| Whole Milk 🥛 | 1 cup | Warmed for smooth sauce |
| Tomato Paste 🍅 | ½ cup | Canned, for rich base |
| Yellow Onion 🧅 | 1 whole | Diced, for flavor base |
| Garlic Cloves 🧄 | 4 cloves | Minced, aromatic punch |
| All-Purpose Flour 🌾 | ½ cup | For roux, thickens sauce |
| Dried Thyme 🌿 | 1 tsp | Earthy aroma, essential |
| Salt 🧂 | 1 ½ tsp | Kosher or sea salt |
| Black Pepper 🌶️ | ½ tsp | Freshly ground, bold flavor |
| Panko Breadcrumbs 🍞 | ½ cup | For crispy topping |
| Butter 🧈 | 2 tbsp | Melted, for topping |
The beef is non-negotiable here—80/20 fat ratio gives the best flavor and texture. Costco or Walmart usually have the best prices on bulk ground beef, and it's worth splurging for the higher fat content. The cheeses are where this dish gets its magic: sharp cheddar for tang and Gruyère for that signature stretch. I always grab the block cheeses and shred them myself—pre-shredded gets clumpy and lacks flavor. For the macaroni, medium or fine elbow works best, but don't worry if you've got another shape—it'll still turn out delicious.
No sharp cheddar? Pepper Jack adds a little kick, or Monterey Jack if you want milder flavor. Running low on Gruyère? Parmesan gives a similar umami punch, though it won't melt as smoothly. The tomato paste is crucial for depth—San Marzano if you're fancy, but regular canned works fine. Fresh thyme is ideal, but dried at half the amount works in a pinch. The breadcrumbs? Panko is perfect for that crispy texture, but regular breadcrumbs toasted in the oven first will do the trick. Pro tip: toast your breadcrumbs before adding them to the top—they'll stay crunchy longer.
This dish reheats beautifully—honestly tastes better the next day as everything melds together. Keeps for 4-5 days in the fridge, though I rarely have leftovers that long. For make-ahead meals, assemble everything except the topping, cover with foil, and refrigerate overnight. The cheese sauce will firm up slightly but still bake beautifully. Freezes for 3 months if you portion it into individual servings—just add a splash of milk when reheating to keep it creamy.
Why You'll Love This Recipe
- One-Pan Magic: I swear by this recipe when I’m too tired to scrub a million dishes—just brown the beef, toss everything in one baking dish, and walk away. The heavy cream and cheeses melt into that perfect golden crust while the macaroni soaks up all the savory beef flavor.
- Rich Umami Bomb: That combo of sharp cheddar and Gruyère? Chef’s kiss. The beef adds deep, meaty richness, and the heavy cream keeps it velvety without tasting heavy. It’s the kind of dish that makes you close your eyes mid-bite—no exaggeration.
- Leftovers That Don’t Suck: Honestly, I make this twice and freeze half because reheating it later is still amazing. The cheese doesn’t turn grainy, and the beef stays juicy—unlike some sad, rubbery casseroles I’ve suffered through. (Yes, even on a Tuesday night.)
- Budget-Friendly Crowd-Pleaser: Ground beef stretches further than you’d think, and the cheeses stretch even more when baked. I feed my family of four for under $10, and no one complains—my picky teenager included. It’s the ultimate “everyone wins” dinner.
Step-by-step instructions for baked mac and cheese with beef
This hearty dish comes together in one pan—rich, cheesy, and packed with protein!
Cook the Elbow Macaroni Al Dente
Bring a large pot of water to a rolling boil and add the 1.5 lbs elbow macaroni. Stir immediately to prevent sticking. Cook until 1 minute before the package directions for al dente texture—this ensures it finishes cooking in the oven. Reserve 1 cup of pasta water before draining, as it helps create a smooth sauce later.
Drain the pasta and return it to the pot. Here's the thing—adding a splash of the reserved pasta water (about ¼ cup) keeps the strands from drying out while you prepare the rest of the dish. Toss the macaroni with a pinch of salt and set it aside while you work on the beef mixture.
Brown the Ground Beef and Build the Sauce Base
In a large oven-safe skillet, heat 2 tbsp butter over medium-high heat. Add the 1.5 lbs ground beef, breaking it apart with a wooden spoon. Cook until the beef is deeply browned and most of the fat has rendered out—this takes about 8-10 minutes. Drain excess fat if needed, leaving about 1 tablespoon in the pan for flavor.
Push the beef to one side of the pan and add the diced yellow onion and minced garlic cloves. Sauté for 2-3 minutes until the onions soften and the garlic becomes fragrant. Stir in the 0.5 cup tomato paste, 0.5 cup all-purpose flour, 1 tsp dried thyme, 1.5 tsp salt, and 0.5 tsp black pepper. Cook for 1 minute to toast the flour and deepen the flavors.
Create the Creamy Cheese Sauce
Slowly pour in the 1 cup whole milk and 1 cup heavy cream, whisking constantly to prevent lumps. Bring the mixture to a gentle simmer over medium heat, stirring frequently. Let it cook for 3-4 minutes until it thickens slightly—it should coat the back of a spoon but still be pourable.
Reduce the heat to low and gradually add the 2 cups sharp cheddar cheese and 1 cup gruyère cheese, stirring until fully melted and smooth. If the sauce thickens too much, add 1-2 tablespoons of the reserved pasta water to loosen it. Taste and adjust seasoning with more salt or pepper if needed.
Combine and Bake to Perfection
Add the cooked macaroni to the skillet and stir gently to coat every strand with the creamy cheese sauce. Transfer the skillet to a 375°F preheated oven and bake for 20-25 minutes, until the top is golden brown and bubbly. Watch closely after 20 minutes—ovens vary, and you want that perfect crispy finish.
While it bakes, melt the remaining 2 tbsp butter in a small saucepan over low heat. Stir in the 0.5 cup panko breadcrumbs until lightly toasted—this will become your crispy topping. Once the mac and cheese is bubbling, sprinkle the buttery breadcrumbs evenly over the top and return to the oven for 2-3 minutes until golden.
Rest and Serve with Confidence
Remove the skillet from the oven and let it rest for 5 minutes before serving. This resting time allows the layers to set slightly, making it easier to scoop without losing the creamy sauce. The breadcrumb topping should be crispy and golden, while the interior remains gooey and rich.
Serve immediately with a side of steamed green beans or a simple garden salad. Each bite delivers the perfect balance of cheesy comfort and hearty beef—this is the ultimate one-pan meal that feels like a hug in food form!
Pro Tips For Making Baked Mac And Cheese With Beef
- Brown the Beef Right: Drain the grease halfway through cooking the ground beef—after about 5 minutes—and wipe out the pan with a paper towel. This keeps the meat from getting greasy while still packing in deep flavor. (Yes, it’s extra work, but your mac and cheese will taste like it came from a restaurant.)
- Shred Cheese Like a Pro: Skip the food processor for Gruyère—it turns into glue. Instead, use a box grater or pulse in short bursts, then finish by hand. Sharp Cheddar? Grate it fresh; pre-shredded sticks clump and burn. (I learned this after pulling out a sad, rubbery cheese mess.)
- Don’t Overcook the Pasta: Pull the elbow macaroni out al dente—1 minute less than the package says. It’ll finish cooking in the oven, and undercooked noodles turn mushy when baked. Drain it hot and toss immediately with a splash of pasta water to stop cooking.
- Layer Like a Cake: Start with a thin layer of mac and cheese in the baking dish, then add half the beef, then another thin layer of mac, then the rest of the beef. Top with cheese and cream. This ensures every bite has both flavors, not just a cheesy top and a dry bottom. (I know, it’s tedious, but it’s worth it.)
Storing and reheating this dish
Refrigerator Storage
Let your baked mac and cheese with beef cool completely before transferring to an airtight container—I use glass Pyrex with snap-on lids for best results. Store at 40°F or below for up to 4-5 days, though I’ve never had leftovers last that long!
The flavors actually deepen overnight as the cheeses meld together. Just be sure to cover it tightly to prevent drying out. 🧀
Freezer-Friendly Tips
This dish freezes beautifully for up to 3 months if you portion it properly. Use quart-sized freezer bags or glass containers with 1-inch headspace to account for expansion.
For individual servings, freeze in single portions—this way, you can reheat just what you need. Label with the date to track freshness. ❄️
Stovetop Reheating
My preferred method is stovetop reheating because it keeps the texture creamy. Transfer the mac and cheese to a skillet over medium-low heat and add 2-3 tablespoons of milk or heavy cream to prevent drying.
Cover with a lid and heat for 8-10 minutes, stirring occasionally, until it reaches 165°F. Taste and adjust seasoning—it often needs a pinch of salt after reheating. 🔥
Microwave Revival
For quick meals, use the microwave with caution. Cover the dish with a damp paper towel and heat on 50% power in 1-minute intervals, stirring between each. Add 1-2 tablespoons of milk if it looks dry.
Avoid overcooking—just until it’s heated through (165°F internal temp). The breadcrumb topping may soften, but the creamy center stays intact. ⏰
Oven Refresh
For a crispy topping revival, transfer the leftovers to an oven-safe dish, cover with foil, and bake at 350°F for 15-20 minutes. Remove the foil for the last 2-3 minutes to crisp up the breadcrumbs.
This method works best if you reheat from room temperature—no need to thaw frozen portions first. 🌡️
Nutrition facts
Frequently asked questions about baked mac and cheese with beef
Can I use ground turkey or chicken instead of beef?
Ground turkey or chicken will work, but the flavor profile changes. For turkey, use a leaner cut (like 93/7) and add an extra 1 tbsp olive oil when browning to compensate for less fat. Chicken will make it lighter, but you might want to add ½ tsp smoked paprika to enhance the savory depth. The beef gives this dish its hearty, rich character, so if you're swapping for health reasons, consider adding ½ cup cooked lentils for extra protein.
What's the best way to make this dish extra crispy on top?
For that perfect golden crust, toast your panko breadcrumbs separately in a dry skillet over medium heat for 2-3 minutes until they're deeply browned. Mix them with 2 tbsp melted butter and a pinch of salt before sprinkling on top. Another pro tip: Broil for the last 1-2 minutes (watch closely!) to get a restaurant-style finish. Just be sure to cover the dish with foil first to prevent burning.
Can I make this dish without a skillet that goes in the oven?
Yes! Transfer everything to a 9x13-inch baking dish instead. Cook the beef and sauce base in a regular skillet first, then mix in the pasta and transfer to the baking dish. Cover with foil and bake at 375°F for 20 minutes, then remove the foil and add your breadcrumb topping for the last 5 minutes. The texture will be slightly less crispy on the sides, but still delicious.
How can I make this dish spicier?
Add ½ tsp cayenne pepper or 1 tbsp hot sauce to the sauce base when cooking. For extra heat, stir in ½ cup diced jalapeños (seeds removed for mild heat) with the onions. If you love cheesy spice, swap ½ cup of the cheddar for pepper jack. Finish with a sprinkle of red pepper flakes on top before baking for a final kick.
Why did my mac and cheese get watery after baking?
This usually happens when the cheese sauce wasn't thick enough before baking or the pasta absorbed too much liquid. To fix it: Next time, let the cheese sauce thicken longer on the stove (it should coat the back of a spoon). Also, make sure your pasta is al dente before mixing it in. If it's already watery, bake uncovered at 400°F for 5-10 minutes to evaporate excess moisture. For future batches, reduce the milk by ¼ cup if your sauce seems too thin.