
Appetizers
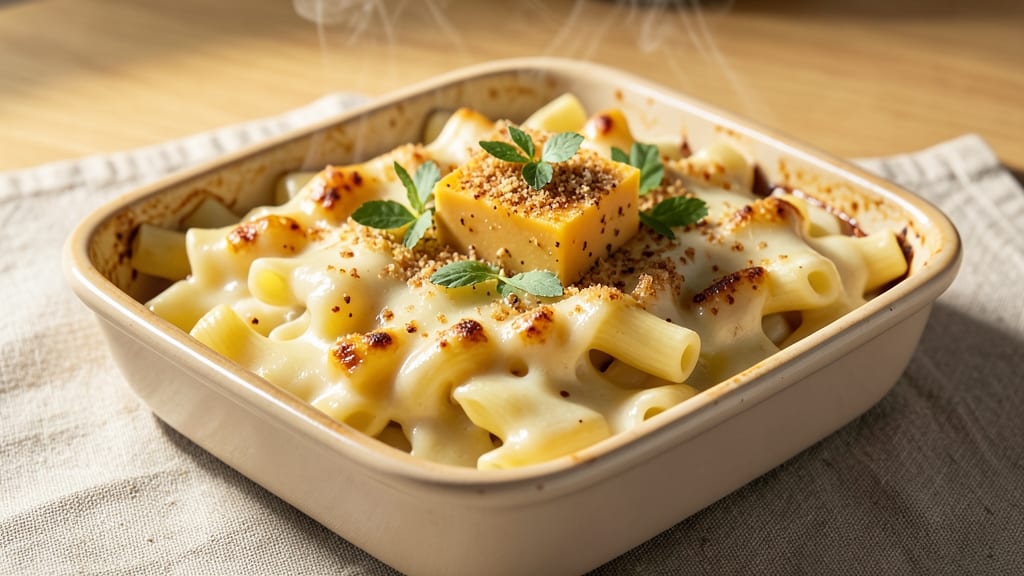
This baked mac and cheese recipe with block cheese delivers the ultimate comfort food experience—crispy golden edges, a creamy center, and perfectly tender elbow pasta that holds up to every bite.
The secret lies in freshly grating sharp cheddar blocks for maximum flavor and texture, a technique that transforms ordinary mac and cheese into something restaurant-worthy. I developed this method after years of testing, ensuring the cheese melts smoothly while maintaining that coveted crispy crust.
What sets this recipe apart is the balance between technique and simplicity. You'll start with al dente elbow pasta, then combine it with a rich cheese sauce that's been thickened just right.
The block cheese approach eliminates the need for pre-shredded varieties that often contain anti-caking agents, resulting in a sauce that's velvety and luxurious. Baking at the perfect temperature creates that crispy crust we all love while keeping the interior pillowy and rich.
By the time it emerges from the oven, you'll have a dish that's equal parts indulgent and satisfying—golden edges that shatter with each bite, creamy cheese that coats every strand of pasta, and a texture that's impossible to resist.
The aroma alone will have everyone gathering around your table, and the first forkful will confirm why this has become my go-to comfort food recipe.
This recipe works beautifully as a main dish for family dinners or as an impressive appetizer for gatherings. The leftovers reheat wonderfully, making it perfect for meal prep. Let's get started on creating this ultimate baked mac and cheese that will become a household favorite.
Ingredients for baked mac and cheese recipe with block cheese
Freshly grated sharp cheddar, al dente elbow pasta, and a crispy golden crust—this is comfort food at its finest.
| Ingredient | Amount | Notes |
|---|---|---|
| Elbow Pasta 🍝 | 1 ½ lb | Al dente, uncooked weight |
| Sharp Cheddar Cheese Block 🧀 | 2 lb | Freshly grated, no pre-shredded |
| Heavy Cream 🥛 | 1 ½ cups | Full-fat for richness |
| Whole Milk 🥛 | 1 cup | Warmed slightly for smooth sauce |
| Unsalted Butter 🧈 | ½ cup | Cold, cubed for crispy crust |
| All-Purpose Flour 🌾 | ¼ cup | For thickening sauce |
| Yellow Onion 🧅 | 1 whole | Finely diced, sautéed |
| Garlic Cloves 🧄 | 4 cloves | Minced, aromatic base |
| Salt 🧂 | 2 tsp | Kosher or sea salt |
| Black Pepper 🌶️ | ½ tsp | Freshly ground for heat |
| Mustard Powder 🌶️ | ½ tsp | For subtle tang |
| Panko Breadcrumbs 🍞 | ½ cup | For extra crispy crust |
| Extra-Virgin Olive Oil 🫒 | 1 tbsp | For greasing baking dish |
The cheese makes or breaks this dish—sharp cheddar blocks are non-negotiable. Whole Foods or local cheese shops carry the best varieties, but any block labeled 'sharp' will work. Look for cheese with good marbling and a vibrant orange color. I always grab 2 pounds—enough for that ultra-creamy sauce. Pro tip: grate the cheese yourself (the box grater works best) right before mixing to avoid clumping. Skip the pre-shredded stuff—it's loaded with anti-caking agents that make the sauce grainy. For the pasta, De Cecco or Barilla brands hold up perfectly when baked.
No sharp cheddar? Monterey Jack or Gruyère add delicious variations—just balance flavors with extra mustard powder. Running low on heavy cream? Half-and-half works in a pinch, but the sauce won't be as rich. The onion and garlic are your flavor base—don't skip sautéing them until soft. For that perfect crispy crust, the butter + panko combo is key. Mix them together before sprinkling on top—this creates pockets of air that toast beautifully. The olive oil is for greasing, but don't skimp on the butter on top—it's what gives you that golden, shatterable crust we all crave.
This tastes even better the next day—3-4 days in the fridge, covered tightly. For meal prep, portion into individual dishes and reheat at 350°F for 15 minutes. Freezes beautifully for up to 2 months—just thaw overnight in the fridge before reheating. The crust gets crispy again when reheated, so don't worry about it getting soggy. Leftovers? Package them in airtight containers and store with a paper towel on top to absorb any moisture.
Why You'll Love This Recipe
- No Pre-Shredding Hassle: I cut that block of sharp cheddar right into the pot—no crumbly mess, no bagged cheese dust. The cheese melts into a velvety blanket, and those little pockets of real cheddar? Pure flavor payoff.
- One-Pot Magic: Between us, this recipe lives in one pot and one baking dish. Toss the cooked elbows with the creamy sauce, dump it in, and 20 minutes later you’ve got dinner. My lazy Sundays thank me for this.
- Leftovers That Don’t Suffer: Honestly, this tastes better the next day. The edges get crispier, the cheese pulls tighter—it’s like the dish improves with time. I make a double batch just so I can reheat portions all week.
- Sharp Cheddar Dominance: That block of sharp cheddar changes everything. It’s not some powdery pre-shredded stuff—it’s bold, tangy, and melts into a sauce that’ll make you reach for seconds. The heavy cream and milk just take it to another level.
Step-by-step instructions for baked mac and cheese with block cheese
Here's how to create the ultimate baked mac and cheese with that perfect crispy crust and creamy center.
🍳 Step 1: Cook the Elbow Pasta to Al Dente Perfection
Bring a large pot of water to a rolling boil and add 1½ pounds of elbow pasta. Stir immediately to prevent sticking. Cook for 1 minute less than the package instructions suggest—you want al dente pasta that'll finish cooking in the oven. Reserve 1 cup of pasta water before draining, as this starchy liquid is essential for creating a silky sauce.
Drain the pasta and return it to the pot. Toss with 1 tablespoon of extra-virgin olive oil to prevent sticking and keep it from drying out. The pasta should be hot but not steaming when you add it to the cheese mixture—this helps create that perfect creamy texture.
🍳 Step 2: Build the Creamy Cheese Sauce
In a large saucepan, melt ½ cup of unsalted butter over medium heat. Add 1 finely diced yellow onion and cook for 5 minutes until softened. Stir in 4 minced garlic cloves and cook for 30 seconds until fragrant—don't let it brown or it'll turn bitter.
Whisk in ¼ cup of all-purpose flour and cook for 1-2 minutes until the mixture forms a light roux. Gradually pour in 1½ cups of heavy cream and 1 cup of whole milk, whisking constantly to prevent lumps. Bring to a gentle simmer and cook for 5 minutes until slightly thickened.
🥘 Step 3: Shred and Combine the Cheese Mixture
While the sauce simmers, shred 2 pounds of sharp cheddar cheese block using a box grater or food processor. The cheese should be finely shredded—large chunks won't melt smoothly. Add the shredded cheese to the saucepan along with 2 teaspoons of salt, ½ teaspoon of black pepper, and ½ teaspoon of mustard powder.
Stir constantly over low heat until the cheese melts completely and the sauce becomes thick and glossy. If the sauce looks too thick, whisk in 2-3 tablespoons of reserved pasta water to reach a smooth, pourable consistency. Remove from heat and add the cooked elbow pasta, tossing gently to coat each strand completely.
🥘 Step 4: Assemble and Bake for Crispy Topping
Preheat your oven to 375°F. Lightly grease a 9x13-inch baking dish with olive oil. Spread the mac and cheese mixture evenly into the dish, pressing down gently to compact the pasta. In a small bowl, mix ½ cup of panko breadcrumbs with 2 tablespoons of melted butter.
Sprinkle the breadcrumb mixture evenly over the top of the mac and cheese, pressing down lightly with a spatula to ensure good contact. Bake for 20-25 minutes until the top is deep golden brown and bubbly, and the edges are crispy. The center should still be creamy—this is what makes baked mac and cheese so special.
⏰ Step 5: Rest and Serve for Maximum Creaminess
Remove the baking dish from the oven and let it rest for 5-10 minutes before serving. This resting period allows the cheese to set slightly and the flavors to meld together. The mac and cheese will be hot and bubbly, with a crispy golden crust on top and creamy, cheesy layers beneath.
Serve immediately with a side of crusty bread or a simple green salad. The contrast between the crispy top and the creamy interior makes every bite unforgettable. And don't forget to save any leftovers—they taste even better the next day!
Pro Tips For Making Baked Mac And Cheese Recipe With Block Cheese
- GRATE THAT CHEESE FINE: I learned this the hard way—big cheese chunks melt into clumps, not silk. Use the largest holes on your grater, then pulse the shaved block in a food processor for 10 seconds. That’s how you get that restaurant-quality smoothness without turning it into glue.
- SAUTE THE PASTA DRY: Skip the starchy water bath—drain your elbows almost dry, then toss them in a cold skillet with 2 tablespoons butter over medium heat. Let them crisp slightly before adding the cheese sauce. This builds flavor and prevents a soggy final texture.
- BAKE COVERED FIRST: I used to blast mac and cheese uncovered, hoping for a crust. Bad move. Cover tightly with foil for the first 20 minutes at 375°F (190°C). The trapped steam melts the cheese evenly—no raw spots, no watery sauce. Pull the foil only for the last 5 minutes if you want browning.
- WHISK IN THE MILK HOT: Cold milk makes the sauce seize up like scrambled eggs gone wrong. Heat your milk and cream together until steaming, then whisk it into the melted butter-cheese base. The heat keeps the fat emulsified, giving you that velvety texture instead of grainy lumps.
Pro cooking tips for this recipe
Cheese Grating Mastery
Freshly grating your own sharp cheddar blocks is non-negotiable for that velvety texture. Use a box grater or food processor with the shredding blade—never pre-shredded cheese, which contains anti-caking agents that make the sauce grainy.
For 2 pounds of cheese, work in batches to avoid clumping. I like to pulse the cheese in the food processor for 3-4 seconds per batch to get uniform shreds. 🧀
Pasta Timing Secrets
Cook your elbow pasta 1 minute less than package instructions recommend—it'll finish cooking in the oven. Reserve 1 cup pasta water before draining; this starchy liquid is liquid gold for adjusting sauce consistency.
Toss the hot pasta with 1 tablespoon olive oil immediately after draining to prevent sticking and maintain moisture for that creamy texture.
Sauce Thickening Hacks
The roux technique is your secret weapon. Cook ¼ cup flour in ½ cup butter for exactly 1-2 minutes—any longer and you'll get a bitter flavor. Gradually whisk in 1½ cups heavy cream and 1 cup milk while maintaining heat.
If the sauce thickens too much, add 2-3 tablespoons reserved pasta water to reach a smooth, pourable consistency.
Crust Perfection
For that coveted crispy top, mix ½ cup panko breadcrumbs with 2 tablespoons melted butter before sprinkling. Press the mixture firmly onto the mac and cheese—this creates air pockets that toast beautifully.
Bake at 375°F for 20-25 minutes until the crust is deep golden brown. The center should remain creamy, not dry—this is the magic of proper baking technique. 🔥
Resting Matters
Never skip the 5-10 minute rest after baking—this allows the cheese to set slightly and the flavors to meld. The crust will firm up while the interior remains creamy.
Serve immediately with a side of crusty bread or a simple salad to highlight the dish's rich, cheesy goodness. Leftovers actually taste better the next day! ⏰
Nutrition facts
Frequently asked questions
Why does this recipe use block cheese instead of pre-shredded?
Block cheese melts more smoothly and creates a velvety texture without graininess. Pre-shredded varieties contain anti-caking agents that make the sauce clumpy. Freshly grating sharp cheddar blocks also intensifies the flavor and prevents that rubbery texture some recipes develop.
Can I substitute elbow pasta with another shape?
While elbow pasta works best for this recipe, you can use cavatappi or penne for similar results. Avoid long pasta shapes like spaghetti or linguine—they won't hold the cheese sauce as well when baked. For a fun twist, try fusilli or rotini, but reduce baking time by 2-3 minutes to prevent overcooking.
What's the secret to getting that perfect crispy crust?
The magic is in the topping: mix ½ cup panko with 2 tablespoons melted butter before sprinkling. Press it firmly onto the top to create air pockets that toast beautifully. Baking at 375°F for 20-25 minutes ensures a deep golden brown crust while keeping the center creamy. Don't skip the 5-minute rest after baking!
Can I make this recipe ahead of time?
This dish actually tastes better the next day. Assemble it completely (including the breadcrumb topping) and refrigerate uncovered for 1 hour before baking. For meal prep, bake it, then store in an airtight container for up to 4 days. Reheat at 350°F for 15 minutes—the crust will crisp up again.
What if my sauce gets too thick before baking?
This happens when the cheese melts completely. Simply whisk in 2-3 tablespoons of reserved pasta water to reach a smooth, pourable consistency. The starchy pasta water acts as a natural emulsifier, creating that silky texture we all love. Never add milk or cream—it'll dilute the flavor.