
Appetizers
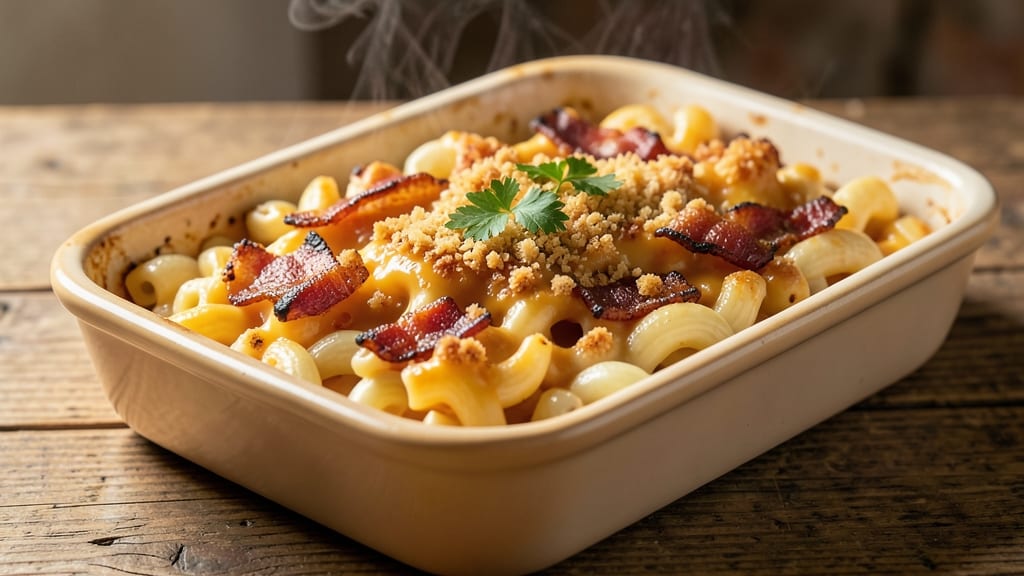
This baked mac and cheese recipe with bacon and breadcrumbs delivers the ultimate comfort food experience in a single pan. The smoky crunch of crispy bacon and golden breadcrumbs creates a flavor profile that's impossible to resist.
I've perfected this method to ensure every bite combines creamy cheese with that addictive textural contrast—tender pasta, rich sauce, and crispy toppings all working together.
The secret to achieving that signature crispy top lies in the breadcrumb mixture and proper baking technique. You'll start with a velvety cheese sauce that coats each elbow macaroni perfectly, then layer in crispy bacon and a buttery breadcrumb topping that turns golden and crunchy in the oven.
This recipe transforms simple pantry staples into a restaurant-quality dish that's ready in just 45 minutes.
What you'll end up with is a steaming plate of mac and cheese where the first bite delivers that perfect combination of creamy, cheesy goodness contrasted by the smoky crunch of bacon and crispy breadcrumbs.
The aroma alone will have everyone gathering around your table, and the first forkful will have them asking for seconds. This is comfort food at its finest—rich, satisfying, and absolutely worth the effort.
The best part is how versatile this recipe is. Serve it as a main dish for dinner, bring it to your next potluck, or prepare a double batch for meal prep.
The leftovers reheat beautifully, making this the perfect recipe for busy weeknights when you want something hearty and delicious without spending hours in the kitchen. Let's get started on this crowd-pleasing classic!
Ingredients for baked mac and cheese recipe with bacon and breadcrumbs
Pantry staples that transform into a restaurant-worthy dish with crispy bacon and golden breadcrumbs.
| Ingredient | Amount | Notes |
|---|---|---|
| Elbow Macaroni 🍝 | 12 oz | Uncooked, standard elbow shape |
| Sharp Cheddar Cheese 🧀 | 2 cups | Shredded, sharp variety preferred |
| Medium Cheddar Cheese 🧀 | 1 cup | Shredded, medium sharpness |
| Heavy Cream 🥛 | 1 cup | Full-fat for creaminess |
| Whole Milk 🥛 | 1 cup | Warmed for smoother sauce |
| Unsalted Butter 🧈 | 4 tbsp | Cold for crispy breadcrumbs |
| Panko Breadcrumbs 🍞 | 1 cup | Japanese-style for extra crunch |
| Thick-Cut Bacon 🥓 | 6 oz | Cooked crispy, crumbled |
| Yellow Onion 🧅 | 1 whole | Diced small, about 1 cup |
| Garlic Cloves 🧄 | 3 cloves | Minced for aromatic base |
| All-Purpose Flour 🌾 | 2 tbsp | For thickening sauce |
| Kosher Salt 🧂 | 1 ½ tsp | Adjust to taste |
| Ground Black Pepper 🌶️ | ½ tsp | Freshly ground preferred |
| Mustard Powder 🌶️ | ½ tsp | For subtle tang |
The cheeses are where the magic happens. Sharp cheddar gives that signature tang, while medium cheddar adds creaminess—don't skip the sharp variety. Kraft or Cabot are solid choices, but if you've got a local cheesemonger, grab their best sharp cheddar. The bacon? Thick-cut from Costco cooks up crispier than thin slices. Cook it ahead and crumble it while warm—it'll stay crispy in the oven. For the breadcrumbs, Panko from Trader Joe's is my go-to, but any panko works. Freshly grated Parmesan in the breadcrumb mix adds an extra layer of flavor, but it's optional.
No sharp cheddar? Extra-sharp white cheddar at half the amount works in a pinch. Running low on heavy cream? Full-fat Greek yogurt thinned with milk gets you close. The mustard powder can be swapped for a pinch of Dijon if that's what you've got. For the onion, video or sweet onions work too—just make sure they're diced small. The garlic? Fresh is non-negotiable here—jarred garlic has no flavor. If you're making this ahead, cook the bacon and prep the cheese sauce in advance, then assemble before baking. The breadcrumb topping can be mixed right before going in the oven to keep it extra crispy.
This reheats beautifully—just cover with foil and bake at 375°F for 10 minutes. Keeps for 4-5 days in the fridge, but honestly, it disappears faster than that. For meal prep, bake two pans at once and store in airtight containers. The sauce gets even richer overnight, so leftovers might be even better. If you're serving at a party, assemble the dish, then bake it right before serving—everyone will be impressed by that perfect crispy top.
Why You'll Love This Recipe
- One-Pan Magic: I swear by this recipe because it’s literally one bowl, one oven, and zero dishes until the last bite. The bacon cooks right in the sauce—no extra skillet, no extra mess—while the breadcrumbs toast on top like a golden blanket.
- Crispy-Creamy Obsession: That sharp cheddar melts into a stretchy, velvety center, but the breadcrumb crust? Chef’s kiss. The contrast of crunchy top and gooey middle makes every forkful feel like a hug—especially when the bacon bits get tucked into the cracks.
- Leftovers That Don’t Suffer: Between us, most baked mac and cheese turns into a sad, soupy mess when reheated. Not this one. The breadcrumbs stay crispy, the cheese holds its shape, and I’ve sent this to work lunches (or my kids) without a single complaint.
- Budget Weeknight Win: Elbow mac, a block of cheddar, and a few slices of bacon? That’s real grocery money. I make this when I’m broke, when I’m tired, or when I just want to feed a crowd without breaking the bank—because 10 servings cost less than takeout.
Step-by-step instructions for baked mac and cheese with bacon and breadcrumbs
This one-pan wonder delivers ultimate comfort food with crispy, smoky bacon and a golden breadcrumb crust.
🍳 Step 1: Cook the Bacon and Build the Flavor Base
Start by cooking the 6 oz thick-cut bacon in a large oven-safe skillet over medium heat until it reaches golden brown and crispy. Use a slotted spoon to transfer the bacon to a paper towel-lined plate, leaving the rendered fat in the skillet. Crumble the bacon into small pieces and set aside for later.
In the same skillet with the bacon fat, add the diced yellow onion and cook for 4-5 minutes until softened and translucent. Add the minced garlic cloves and cook for another 30 seconds until fragrant. Sprinkle in the 2 tbsp all-purpose flour and stir for 1 minute to create a light roux that will thicken our sauce beautifully.
🍳 Step 2: Create the Ultimate Cheesy Sauce
Gradually pour in the 1 cup warm whole milk and 1 cup heavy cream while stirring constantly to prevent lumps from forming. Bring the mixture to a gentle simmer over medium-low heat, stirring frequently for 3-4 minutes until it begins to thicken slightly. This is where all that smoky bacon flavor gets incorporated into our creamy base.
Remove the skillet from heat and stir in the 2 cups sharp cheddar cheese, 1 cup medium cheddar cheese, 1.5 tsp kosher salt, 0.5 tsp ground black pepper, and 0.5 tsp mustard powder. Stir until the cheese melts completely and the sauce becomes luxuriously smooth. If you notice any lumps, simply press the cheese mixture through a fine-mesh strainer for that restaurant-quality texture.
👨🍳 Step 3: Assemble the Ultimate Mac and Cheese
Add the 12 oz elbow macaroni to the skillet and toss gently to coat every noodle in that incredible cheesy sauce. The macaroni should be well-coated but still retain some of its texture—this ensures perfect bite and texture. Transfer the entire mixture to a 9x13-inch baking dish, spreading it out evenly in a single layer.
Sprinkle the crumbled bacon evenly over the top, then press the 1 cup panko breadcrumbs lightly over the entire surface. Dot with the 4 tbsp cold unsalted butter and use your fingers to create small indentations in the breadcrumbs—this helps them crisp up beautifully in the oven.
🔥 Step 4: Bake to Golden Perfection
Preheat your oven to 375°F and bake the mac and cheese for 25-30 minutes until the top is deep golden brown and the edges are bubbling. The breadcrumbs should be crispy enough to break with a light tap, and the cheese should be melted throughout with just a slight resistance when you press the center.
For the final touch, broil on high for 1-2 minutes until the top becomes deeply browned and slightly caramelized. Watch carefully to prevent burning, and remove from the oven immediately when you see those beautiful golden spots. Let it rest for 5 minutes before serving—this allows the layers to set perfectly and makes cutting easier.
Pro Tips For Making Baked Mac And Cheese Recipe With Bacon And Breadcrumbs
- COOK BACON FIRST: I learned this the hard way—cooking the bacon before assembling the mac and cheese saves you from a greasy mess later. Crisp it up, drain all but a tablespoon of fat (that’s liquid gold for flavor), and set aside. Trust me, your future self won’t want to fish out soggy bacon from a casserole.
- GRATE CHEESE FINE: Sharp and medium cheddar need to melt like silk, not clump like regret. Use a box grater (not a food processor—those shreds are too big) and toss the cheese with a splash of heavy cream right after grating. This keeps it smooth and prevents those annoying cheese pull-aparts in your bite.
- BAKE UNTIL GOLDEN: Skip the foil halfway through—this isn’t a science experiment. Once the mac and cheese hits 350°F, bake it uncovered for the last 10-15 minutes. That’s when the breadcrumbs turn crispy and the top develops that perfect, caramelized crust. (Yes, even if you’re impatient like me.)
- STIR IN BACON LAST: Tossing the bacon in at the very end guarantees it stays crispy, not rubbery. After the cheese sauce is mixed, fold in the drained bacon just before pouring into the baking dish. This way, it gets a quick toast in the oven without turning into a sad, greasy pile.
Make-ahead tips for this recipe
Prep Ahead Strategy
Cook the 6 oz thick-cut bacon and crumble it completely, then store it in an airtight container in the fridge for up to 3 days. This step saves time and keeps your bacon crispy when you're ready to assemble.
The bacon fat can also be saved and frozen in ice cube trays for future recipes. 🥓
Sauce Prep
Make the cheese sauce up to 2 days in advance and store it in a sealed container in the refrigerator. When reheating, warm it gently over low heat while stirring constantly to prevent scorching.
The sauce will thicken as it cools, so you may need to add 1-2 tbsp milk when reheating. This step is perfect for meal prep—just toss the cooked pasta in later.
Baking Dish Assembly
Assemble the mac and cheese in the baking dish right before baking to ensure the breadcrumb topping stays extra crispy. Mix the 1 cup panko with 2 tbsp melted butter and ½ tsp garlic powder ahead of time, then store in an airtight container.
This pre-mixed topping can be sprinkled on just before baking for maximum crunch. 🍞
Portion Control
For easy serving, divide the assembled mac and cheese into individual portions in ramekins or small baking dishes before baking. This allows you to customize toppings for each serving—sprinkle extra bacon bits or a pinch of smoked paprika on top. Portioning also makes reheating individual servings a breeze.
Storage Tips
Store leftovers in an airtight container in the refrigerator for up to 4 days. To reheat, cover with foil and bake at 350°F for 15-20 minutes until heated through.
For a crispy top, broil for 1-2 minutes at the end. The texture may soften slightly, but it reheats beautifully with that rich, cheesy goodness. ❄️
Freezer-Friendly
This mac and cheese freezes exceptionally well for up to 3 months. Assemble the dish in a freezer-safe baking dish, cover tightly with foil and plastic wrap, then freeze. When ready to eat, thaw overnight in the fridge, then bake at 375°F for 25-30 minutes until heated through.
The cheese sauce will be even creamier after freezing, making leftovers a delightful surprise. 💫
Nutrition facts
Frequently asked questions
Can I use a different type of pasta for this recipe?
While elbow macaroni is ideal for its shape and texture, you can substitute with penne or cavatappi for similar results. Avoid long pasta like spaghetti or linguine, as they won't hold the cheese sauce as well. For extra flavor, try jumbo shell pasta—just increase baking time by 5 minutes to ensure the centers are fully cooked.
How do I prevent the breadcrumb topping from getting soggy?
The key is baking the dish at 375°F until the breadcrumbs are golden and crispy, then broiling for 1-2 minutes at the end. For extra insurance, press the breadcrumbs firmly into place and avoid overcrowding the baking dish. If you're prepping ahead, assemble the dish right before baking to maintain maximum crunch.
What's the best way to make this vegetarian?
Swap the bacon for crispy fried shallots or smoked paprika for smokiness, and use vegetable broth instead of milk in the sauce. Add 1 tbsp nutritional yeast to the cheese mixture for a cheesy depth. For a meaty texture, try crumbled tempeh or mushrooms as a topping. The breadcrumb layer will still add that satisfying crunch!
Can I make this in a smaller baking dish?
Yes! For a 9x9-inch dish, reduce the recipe by about 25% (use 9 oz pasta, 1.5 cups cheese, and ½ cup breadcrumbs). For individual servings, use ramekins or 6-ounce baking dishes and bake for 15-20 minutes at 375°F. The smaller surface area helps create an extra-crispy crust.
Why did my cheese sauce get grainy?
Graininess usually happens when cheese melts too quickly or lumps aren't broken down. Always melt cheese off the heat and stir constantly. For extra-smooth sauce, press the cheese mixture through a fine-mesh strainer before adding to the pasta. Using a mix of sharp and medium cheddar also helps create a creamier texture.