
Side Dishes
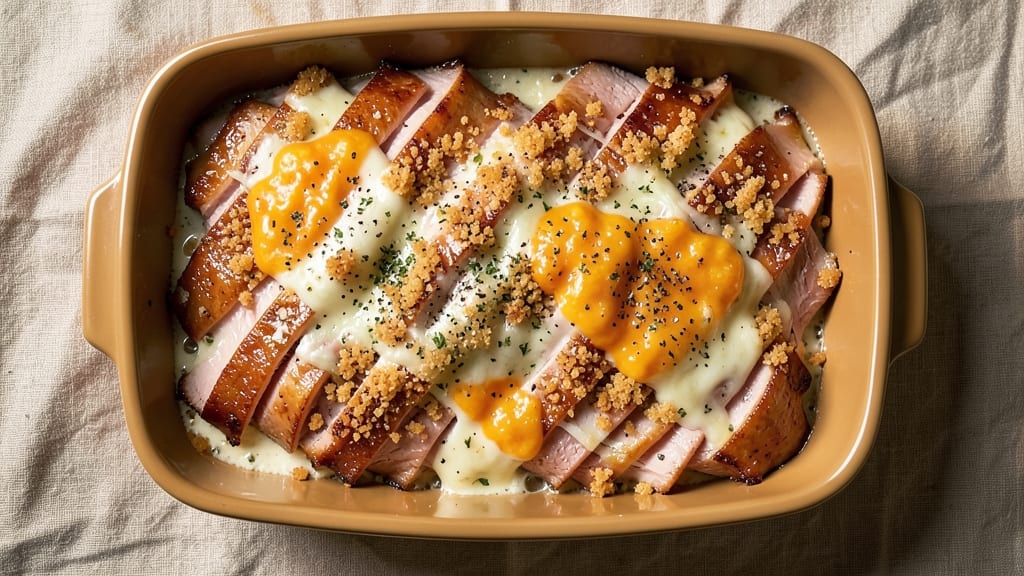
This baked ham and cheese casserole recipe delivers the perfect balance of crispy, golden layers and gooey, pull-apart goodness—ideal for holiday feasts or comforting weeknight dinners.
The secret lies in layering thinly sliced ham with melted cheese and a buttery breadcrumb topping, creating a dish that's both hearty and effortless to prepare.
With just a few simple ingredients and 30 minutes of hands-on time, you'll have a showstopping side that pairs beautifully with roasted vegetables or fresh greens.
The magic happens in the oven, where the breadcrumbs transform into a crispy, caramelized crust while the cheese melts into a creamy, stretchy blanket around the ham. Unlike traditional casseroles that can turn soggy, this recipe maintains its texture thanks to a precise layering technique and the right baking temperature.
It's the kind of dish that feels indulgent but comes together without fuss, making it perfect for both beginners and seasoned cooks.
What you'll end up with is a crispy-topped casserole that's impossible to resist—each bite offers a mix of savory ham, rich cheese, and crunchy breadcrumbs. The layers pull apart easily, revealing pockets of melted goodness that disappear in seconds.
This casserole is versatile enough to serve as a side or even a main dish, especially when paired with a simple salad or crusty bread.
Ready in just 45 minutes, this recipe is ideal for gatherings where you want a dish that's easy to serve and always a crowd-pleaser. The best part? Leftovers reheat beautifully, making it a great option for meal prep. Let's get started on creating this comforting, crowd-approved casserole.
Ingredients for baked ham and cheese casserole
Layered ham, melted cheeses, and crispy breadcrumbs create this showstopping casserole—just 12 ingredients for big flavor.
| Ingredient | Amount | Notes |
|---|---|---|
| Pre-Cooked Ham 🥓 | 1 ½ lb | Thinly sliced, boneless preferred |
| Sharp Cheddar Cheese 🧀 | 2 cups | Shredded, block preferred for freshness |
| Mozzarella Cheese 🧀 | 1 ½ cups | Shredded, low-moisture for crispiness |
| Panko Breadcrumbs 🍞 | 1 ½ cups | Japanese-style for extra crunch |
| Unsalted Butter 🧈 | ½ cup | Melted, full-fat for richness |
| Heavy Cream 🥛 | ½ cup | Full-fat for creamy texture |
| All-Purpose Flour 🌾 | ¼ cup | For breadcrumb mixture |
| Garlic Powder 🧄 | 1 tbsp | For depth of flavor |
| Dried Parsley 🌿 | 1 tbsp | For fresh herb note |
| Diamond Crystal Kosher Salt 🧂 | 1 tsp | Fine grain for even seasoning |
| Ground Black Pepper 🌶️ | ½ tsp | Freshly ground preferred |
| Freshly Ground Nutmeg 🌿 | ¼ tsp | For subtle warmth |
| Green Onions 🧅 | ¼ cup | Thinly sliced, for garnish |
The ham is your star, so pick a high-quality pre-cooked ham with good fat content—Smithfield or HoneyBaked are reliable choices. Look for slices that are about 1/8-inch thick, which ensures even cooking and that perfect pull-apart texture. If you're using a whole ham, slice it yourself against the grain for maximum tenderness. The cheeses are where the magic happens: block cheddar and mozzarella melt more evenly than pre-shredded, and the low-moisture mozzarella prevents a soggy top. For the breadcrumbs, Panko is non-negotiable—its light, airy texture creates that coveted crispy crust. If you can't find it, toast regular breadcrumbs in the oven for 5 minutes at 350°F to dry them out.
No Panko? Toast regular breadcrumbs with a pinch of garlic powder for 5 minutes at 350°F to mimic that crispy texture. Short on cheddar? Swiss or Gruyère add a nutty depth, while Monterey Jack keeps things mild. The breadcrumb topping can be prepped ahead—just store it in an airtight container in the fridge until ready to use. For extra richness, add 1 tbsp melted butter to the breadcrumb mix. The green onions are optional but add a bright pop of color—skip them if you're serving picky eaters. And if you're making this ahead? Assemble the casserole, cover, and refrigerate for up to 24 hours before baking for even deeper flavor development.
This casserole reheats like a dream—just cover with foil and warm at 350°F for 15 minutes. It also freezes beautifully: bake, cool completely, then wrap tightly and freeze for up to 3 months. To serve, I like to sprinkle extra breadcrumbs on top before baking for an even crispier finish. Leftovers? Portion into single servings and reheat in the microwave for 1-2 minutes. The crispy top softens slightly when reheated, so always bake fresh portions if you're serving to guests—trust me, they'll notice the difference.
Why You'll Love This Recipe
- One-Pan Magic: I swear by this—just toss the pre-cooked ham, cheeses, and breadcrumbs into one dish, dot with butter, and bake. No chopping, no fuss, and that golden crust happens while you’re watching TV.
- Melty Perfection: Sharp cheddar and mozzarella team up for a gooey, stretchy center that clings to every bite. The panko topping adds a satisfying crunch—like a hug for your taste buds, but better.
- Leftovers That Don’t Suck: Between us, this casserole tastes even better the next day. I make a double batch on Sundays so I can reheat slices straight from the fridge—no sad, dry edges here.
- Budget Crowd-Pleaser: A single pre-cooked ham stretches to feed four, and the cheeses stretch further when baked. It’s the kind of dish where everyone asks for seconds, but your wallet stays happy. (Yes, even on a Tuesday night.)
Step-by-step instructions for baked ham and cheese casserole
This method delivers that perfect combination of crispy golden crust and gooey, pull-apart layers every time.
Prepare the Breadcrumb Topping
In a medium bowl, combine the 1.5 cups Panko Breadcrumbs, 0.25 cup All-Purpose Flour, 1 tbsp Garlic Powder, 1 tbsp Dried Parsley, 1 tsp Diamond Crystal Kosher Salt, 0.5 tsp Ground Black Pepper, and 0.25 tsp Freshly Ground Nutmeg. Mix thoroughly until all the dry ingredients are evenly distributed through the breadcrumbs.
Next, melt the 0.5 cup Unsalted Butter in a small saucepan over low heat until completely liquid. Pour the melted butter into the breadcrumb mixture and stir until fully incorporated. The mixture should look moist but still hold its shape when pressed together. This topping is what creates that irresistible crispy crust we're after, so don't skip the butter—it's what makes all the difference.
Create the Cheese Sauce Mixture
In a separate large bowl, combine the 2 cups Sharp Cheddar Cheese and 1.5 cups Mozzarella Cheese. Add the 0.5 cup Heavy Cream and mix until the cheeses are fully melted and the mixture becomes smooth and creamy. If you're working in a cooler kitchen, you might need to microwave this mixture in 10-second bursts until it reaches a warm, spreadable consistency.
This cheese sauce is the heart of your casserole, so take your time getting it just right. The cheeses should blend completely with the cream, creating a thick, velvety base that will hold together beautifully when baked. If the mixture looks too thick, add 1-2 tablespoons of warm water to help it reach the perfect pouring consistency.
Assemble the Casserole Layers
Preheat your oven to 375°F and grease a 9x13-inch baking dish lightly with cooking spray. Begin by spreading half of the cheese sauce mixture evenly over the bottom of the prepared dish. Then, layer all of the 1.5 lb Pre-Cooked Ham (thinly sliced) evenly over the cheese sauce, making sure each slice gets a good coating.
Next, spread the remaining cheese sauce evenly over the ham layer. This is where the magic happens—each bite should have that perfect balance of creamy cheese and savory ham. For the final layer, sprinkle the breadcrumb topping evenly over the entire surface, pressing down gently to help it adhere. This final step is crucial for creating that beautiful crispy crust we're aiming for.
Bake to Golden Perfection
Place the assembled casserole in the preheated oven and bake for 25-30 minutes until the top is deep golden brown and the edges are bubbling. The breadcrumb topping should be crispy enough to stand up to a gentle tug, while the cheese underneath should be fully melted and bubbly.
About 5 minutes before the casserole is done, sprinkle the 0.25 cup Green Onions evenly over the top for a fresh finish. The green onions will add a bright pop of color and freshness that cuts through the richness of the cheese and ham. Remove from the oven and let it rest for 10 minutes before serving—this resting time allows the casserole to set slightly and makes it easier to slice into perfect portions.
Serve Warm and Enjoy
Using a sharp knife or spatula, cut the casserole into 6 equal squares (or your desired serving size). The layers should pull apart cleanly, revealing that gooey, melted cheese and perfectly cooked ham beneath the crispy topping. Serve immediately while still warm for the ultimate comfort food experience.
This casserole tastes even better the next day, so if you have leftovers, store them covered in the refrigerator for up to 3 days. To reheat, cover with foil and warm in the oven at 350°F for 15-20 minutes until heated through. The crispy topping might soften slightly, but it's still delicious!
Pro Tips For Making Baked Ham And Cheese Casserole
- CUT HAM INTO SLICES: Thin, even slices (about ¼-inch thick) cook faster and soak up cheese better than thick chunks. I learned this the hard way—uneven ham means some parts stay cold while others get rubbery.
- MELT CHEESE FIRST: Grate the sharp cheddar and mozzarella separately, then mix them with a splash of warm water (or milk) until smooth. This prevents clumping and guarantees a creamy, gooey texture instead of dry lumps.
- DON’T SKIP THE BUTTER TOAST: Mix cold unsalted butter into the panko before topping—about 2 tablespoons per cup of crumbs. The butter melts into golden pockets while baking, adding richness and preventing a dry, bland crust.
- BAKE UNTIL CRUST IS GOLDEN: Cover with foil for the first 20 minutes to melt the cheese, then uncover and bake until the panko turns deep golden brown (not just pale). This is the thing that matters most—skip it, and you’ll have a sad, underwhelming topping.
Make-ahead tips for leftovers
Prep Ahead Strategy
Assemble the entire casserole up to 24 hours in advance and refrigerate uncovered. This allows flavors to meld beautifully while preventing condensation buildup that can make the breadcrumb topping soggy.
I always assemble mine the night before—it's a game-changer for holiday meals when you want to focus on other dishes. 💫
Freezer-Friendly Assembly
For maximum convenience, assemble the casserole completely (including the breadcrumb topping) and freeze it in a 9x13-inch airtight container for up to 3 months. When ready to bake, thaw overnight in the refrigerator, then bake according to instructions.
The texture holds up remarkably well, though the crispiness might need a 2-3 minute broil at the end to restore it.
Portioning for Leftovers
Divide cooled casserole into single-serving portions before storing. I use 1-cup glass containers with snap-on lids for easy reheating. These portions reheat perfectly in the microwave for 1-2 minutes at 50% power, or in the oven at 350°F for 10-15 minutes covered with foil.
The crispy top will soften slightly, but the cheesy ham layers remain irresistible.
Make-Ahead Baking Tip
If you're short on time, assemble the casserole in the morning and refrigerate it. When ready to bake, add 5-10 minutes to the baking time (watch for deep golden brown edges).
The cold start helps create an extra-crispy crust. I've even baked it straight from the fridge for 40 minutes at 375°F with fantastic results—just monitor closely after 30 minutes.
Holiday Party Hack
For gatherings, assemble the casserole in a large disposable foil pan (no greasing needed) and bake it directly on the serving tray. This eliminates transfer steps and keeps everything warm while you focus on other dishes.
The foil pan also makes cleanup a breeze—just toss it after serving. Perfect for Thanksgiving or Christmas when you're juggling multiple dishes! 🎄
Reheating for Maximum Crisp
To revive the crispy topping, transfer leftovers to an oven-safe dish and cover loosely with foil. Bake at 375°F for 10-15 minutes, then remove the foil and broil for 1-2 minutes until golden.
For extra crunch, sprinkle 1 tablespoon fresh breadcrumbs on top before broiling. This method restores that satisfying texture without drying out the cheese layers.
Nutrition facts
Frequently asked questions
Can I use a different type of ham for this recipe?
While pre-cooked ham works best, you can use spiral-cut ham (just remove the rind) or even prosciutto for a more delicate flavor. For extra richness, try black forest ham or honey-glazed ham. Just reduce baking time by 5 minutes if using cooked ham with less moisture.
Why did my breadcrumb topping turn soggy?
Soggy topping usually means moisture got trapped underneath. Always press the breadcrumbs down gently before baking to create better contact. For extra insurance, bake at 375°F for 25 minutes, then broil for 2-3 minutes at the end. Also, make sure your cheese sauce isn't too wet—it should coat the back of a spoon but not drip.
Can I make this casserole ahead of time?
Yes! Assemble it completely (including topping) and refrigerate uncovered for up to 24 hours to prevent sogginess. For freezer prep, bake it first, then cool completely before wrapping tightly for 3 months. Thaw overnight in the fridge, then reheat covered at 350°F for 15 minutes. The texture stays perfect!
What's the best way to serve this dish?
This casserole shines as a main dish with a crisp salad or side dish like roasted Brussels sprouts. For extra flair, drizzle with honey mustard or serve with pickled vegetables to cut the richness. It also reheats beautifully—perfect for meal prep! The crispy top makes it feel special enough for holidays but simple enough for weeknights.
Can I add vegetables to this recipe?
Try adding sautéed mushrooms, bell peppers, or spinach between the ham and cheese layers. For extra crunch, mix diced jalapeños into the cheese sauce. Just be mindful of moisture—blot any veggies well to prevent a soggy topping.