
Appetizers
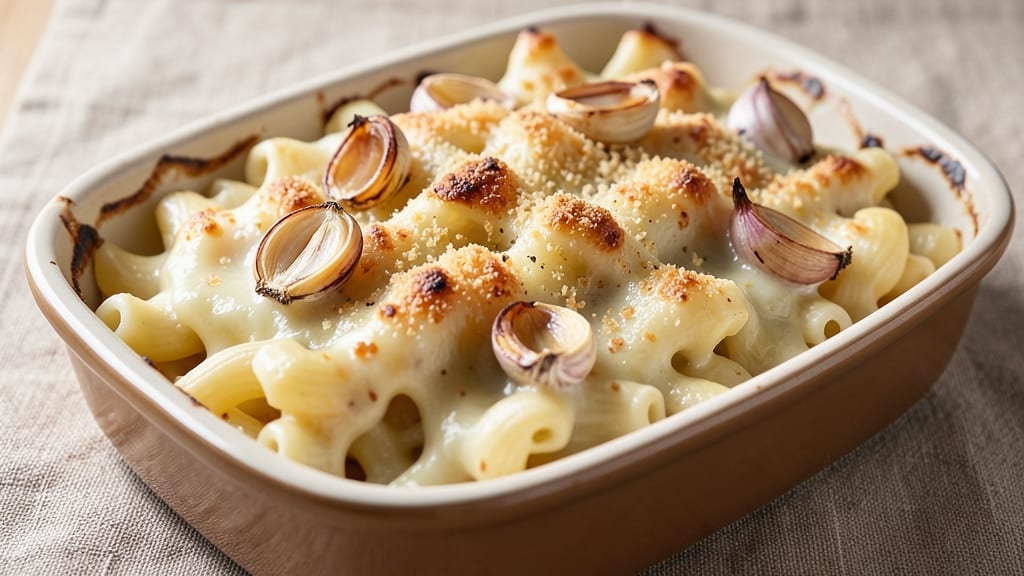
This baked garlic mac and cheese recipe delivers the ultimate comfort food experience—creamy, cheesy layers topped with crispy buttery breadcrumbs and infused with deep roasted garlic flavor. 🌟 The secret lies in slow-cooked garlic that transforms from sharp to mellow, creating a rich, savory depth that elevates every bite.
Perfect for feeding a crowd or treating yourself to a restaurant-quality meal at home.
What sets this recipe apart is the balance of textures and flavors: velvety cheese sauce meets perfectly baked pasta, all topped with golden, crunchy breadcrumbs that stay crisp even after baking.
The roasted garlic adds complexity without overpowering, while the cheddar blend ensures that signature tangy, melty goodness. This dish is foolproof for beginners but impressive enough for any occasion.
By the time it emerges from the oven, you’ll have a bubbling, golden mac and cheese with a crispy top layer that’s impossible to resist. The aroma alone will have everyone gathering at the table, and the first bite delivers that perfect combination of creamy, cheesy, and garlicky satisfaction.
Serve it as a main dish or appetizer—it’s that good.
Ready in just 45 minutes, this recipe requires minimal effort but maximum flavor. The key is letting the garlic roast slowly to develop its sweet, mellow notes, while the cheese sauce thickens perfectly over low heat.
Whether you're a mac and cheese newbie or a seasoned pro, this version will become your new favorite.
Ingredients for baked garlic mac and cheese
Creamy, cheesy, and packed with roasted garlic goodness—this is comfort food at its finest.
| Ingredient | Amount | Notes |
|---|---|---|
| Elbow Macaroni 🍝 | 1 ½ lbs | Uncooked, medium or jumbo size |
| Extra-Sharp Cheddar Cheese 🧀 | 2 cups | Shredded, block preferred |
| Colby Jack Cheese 🧀 | 1 cup | Shredded, for creamy texture |
| Heavy Whipping Cream 🥛 | 1 cup | Full-fat for richness |
| Whole Milk 🥛 | 1 cup | Warmed for smooth sauce |
| Garlic Cloves 🧄 | 12 whole | Peeled, unpeeled for roasting |
| Butter 🧈 | ½ cup | Unsalted, melted |
| All-Purpose Flour 🌾 | 2 tbsp | For thickening sauce |
| Panko Breadcrumbs 🍞 | ¾ cup | For crispy topping |
| Parmesan Cheese 🧀 | ½ cup | Freshly grated, for topping |
| Dried Parsley 🌿 | 1 tbsp | For garnish |
| Salt 🧂 | 1 ½ tsp | Kosher or sea salt |
| Black Pepper 🌶️ | ½ tsp | Freshly ground |
| Dried Mustard 🌶️ | ½ tsp | For depth of flavor |
| Garlic Powder 🧄 | ½ tsp | To complement roasted garlic |
The garlic is the star here—12 whole cloves, unpeeled, roasted until sweet and mellow. Whole Foods or Trader Joe's carry the best quality for roasting. Skip the pre-minced stuff—it burns fast. For the cheeses, block cheddar and Colby Jack make all the difference over pre-shredded (it gets gummy). If you're feeling fancy, swap half the cheddar for Gruyère—it melts like a dream. The pasta? Jumbo elbows hold up better to baking than small shapes.
No heavy cream? Full-fat Greek yogurt works in a pinch—just whisk it until smooth first. Short on Colby Jack? Monterey Jack at half the amount keeps things creamy. The breadcrumbs are non-negotiable for that perfect crisp—Panko stays crunchy, regular breadcrumbs get soggy. Want extra flavor? Mix in 1 tbsp Italian seasoning with the breadcrumbs. The dried mustard and garlic powder might seem small, but they're what take this from 'good' to 'restaurant-quality'—trust me on this.
Roasted garlic keeps for 5 days in the fridge, wrapped tightly in foil. The cheese sauce reheats beautifully—just add a splash of milk to loosen it up. For make-ahead magic, assemble the whole casserole, cover, and refrigerate overnight. Bake straight from cold—it'll still be golden and crispy. Leftovers? Portion into containers—3 days in the fridge, 3 months frozen. The crispy top freezes beautifully too.
Why You'll Love This Recipe
- No-Sauce Struggle: I swear by this method—just toss the cooked pasta with the cheeses and cream right in the baking dish. No stovetop sauce to burn or thin out. The milk and heavy cream blend into that silky, golden sauce while it bakes, and honestly? It’s the only way I’ll make mac and cheese now.
- Garlic Cheese Obsession: That combo of extra-sharp cheddar and Colby Jack? Chef’s kiss. The sharp cheddar melts into tangy pockets while the Colby Jack adds that creamy stretch—plus, the garlic (if you add it) infuses every bite without overpowering. My picky-eater husband actually licks the plate clean.
- Leftovers That Don’t Suck: Between us, most baked mac and cheese turns into a sad, dry brick the next day. Not this one. The cream keeps it luscious for reheating, and I’ve sent it to work lunches in a thermos—still creamy hours later. (Pro tip: Spritz with milk before reheating.)
- Weeknight Crowd-Pleaser: This feeds six for under $10 and takes less time than ordering takeout. Kids? Check. Vegetarians? Check. My college-aged nephew who “doesn’t eat carbs”? Check. It’s the dish I pull out when I’ve got friends over but zero energy—one pan, zero fuss, and zero complaints.
Step-by-step instructions for baked garlic mac and cheese
Here's how to create the ultimate baked mac and cheese with roasted garlic depth and crispy breadcrumbs.
🔥 Step 1: Roast the Garlic Until Sweet and Golden
Preheat your oven to 400°F. Place the 12 whole garlic cloves in a small oven-safe dish and drizzle with 1 tablespoon of the melted butter. Wrap tightly with aluminum foil and roast for 30-40 minutes until the cloves are soft and golden.
Here's the thing—roasting transforms raw garlic's sharp bite into sweet, mellow flavor. You'll know it's perfect when the cloves are tender enough to squish between your fingers and have a beautiful caramelized color. Let them cool slightly before squeezing out the pulp—this concentrated garlic flavor will elevate your mac and cheese to restaurant-quality levels.
🍳 Step 2: Cook the Pasta Al Dente and Prepare the Cheese Sauce
Bring a large pot of salted water to a boil and cook the 1.5 lbs elbow macaroni until 1 minute before the package directions for al dente. Drain and set aside, reserving 1 cup of pasta water. While the pasta cooks, melt 0.5 cup butter in a large skillet over medium heat.
Add the 2 tbsp all-purpose flour and whisk for 1-2 minutes until bubbly. Slowly pour in the 1 cup warmed whole milk and 1 cup heavy whipping cream while whisking constantly to prevent lumps. Stir in the 2 cups extra-sharp cheddar cheese and 1 cup colby jack cheese until completely melted and smooth.
🥘 Step 3: Combine Pasta and Sauce for Maximum Creaminess
Add the cooked pasta to the cheese sauce and stir gently to coat evenly. If the sauce seems too thick, add 2-3 tablespoons of the reserved pasta water until it reaches a creamy consistency that clings to the noodles. Season with 1.5 tsp salt, 0.5 tsp black pepper, 0.5 tsp dried mustard, and 0.5 tsp garlic powder.
Now squeeze the roasted garlic pulp through a fine-mesh strainer into the mac and cheese, discarding the skins. The sauce should be rich, smooth, and bursting with garlic flavor. Taste and adjust seasoning if needed—this is your chance to perfect the balance before baking. Transfer the mixture to a greased 9x13-inch baking dish.
👨🍳 Step 4: Create the Crispy Breadcrumb Topping
In a small bowl, combine the 0.75 cup panko breadcrumbs, 0.5 cup freshly grated parmesan cheese, 1 tbsp dried parsley, and the remaining 1 tablespoon melted butter. Mix until evenly coated. Sprinkle this mixture evenly over the top of the mac and cheese, pressing down gently to ensure good contact.
Here's the secret to the perfect topping—don't skip pressing it down. This ensures maximum crispiness when baked. The panko will expand and create golden, crunchy pockets while the parmesan adds a salty contrast to the creamy cheese below.
🔥 Step 5: Bake Until Bubbly and Golden
Bake uncovered at 375°F for 25-30 minutes until the edges are bubbling and the breadcrumb topping is deep golden brown. The center should be hot and the cheese should be melted throughout. If the topping browns too quickly, tent loosely with foil for the last 10 minutes to prevent burning.
This is where the magic happens—the cheese should be bubbling like a lava lamp while the breadcrumbs transform into crispy, buttery shards. Let it rest for 5-10 minutes before serving—this allows the cheese to set slightly and makes it easier to slice. The result should be a creamy, cheesy interior with a satisfying crunch on top and that irresistible roasted garlic depth throughout.
Pro Tips For Making Baked Garlic Mac And Cheese
- USE ALUMINUM FOIL LIKE A PRO: I learned this the hard way—covering the casserole with foil too early turns your garlic mac into a sad, steamed blob. Wait until the top is bubbling and golden (about 20 minutes in a 375°F oven), then tent it loosely with foil. This keeps the edges crisp while the center melts properly.
- GRATE CHEESE FINE OR REGRET IT: Extra-sharp cheddar and Colby Jack lose their punch if you’re lazy with the grater. Use the smallest holes on your box grater—think table salt texture, not pebbles. I skip pre-shredded cheese here; it’s packed with anti-caking agents that make the sauce grainy. (Yes, even if you’re impatient like me.)
- STIR THE SAUCE HOT: After mixing the cheese sauce on the stove, let it sit off the heat for exactly 30 seconds before stirring. This lets the cheese melt smoothly instead of clumping. Then, stir like you’re mad—scrape the bottom and sides with a wooden spoon to avoid dry spots. Skimp here, and you’ll end up with a cheesy "sauce" that fights the pasta.
- TOAST THE PASTA FIRST: Drain the cooked elbow mac, spread it on a baking sheet, and broil for 2-3 minutes until the edges turn golden. This adds texture and prevents the dish from turning into a mushy pudding. I know, I know—it’s an extra step, but it’s the thing that makes your mac feel restaurant-worthy instead of "weeknight dinner."
Wine and beer pairings for this recipe
Classic White Wine
For this rich, cheesy dish, I always reach for a crisp Chardonnay with subtle oak notes—think La Crema Sonoma Coast or Kim Crawford Sauvignon Blanc. The acidity cuts through the creaminess while complementing the roasted garlic's sweetness.
Serve slightly chilled to enhance the wine's bright character against the warm mac and cheese. 🍷
Full-Bodied Red
A medium-bodied Pinot Noir from Oregon like Domaine Serene or Willamette Valley stands up to the dish's richness without overpowering it. The red fruit notes pair beautifully with the caramelized garlic, while the wine's earthiness balances the cheddar's sharpness.
Let the wine breathe for 10-15 minutes before serving for optimal flavor.
Malty Amber Ale
For beer lovers, a Belgian-style amber ale like Allagash Amber or Fat Tire works wonders. The caramel and biscuit malt notes mirror the roasted garlic's sweetness, while the slight bitterness cleanses your palate between bites. Serve at 50°F to highlight its complex flavor profile. 🍺
Creamy Stout
If you prefer darker flavors, try a smooth stout like Guinness or Samuel Smith's Oatmeal Stout. The coffee and chocolate undertones create a surprising but delicious contrast with the cheesy richness.
The creamy texture of the stout also mirrors the mac and cheese's velvety sauce. Serve at 45°F to preserve its smoothness.
Sparkling Pairing
A dry Prosecco or Cava adds a refreshing lift to this indulgent dish. The bubbles help cut through the richness while the citrus notes complement the roasted garlic. I like La Marca Prosecco for its crisp acidity and affordable price. Serve well-chilled at 45-50°F for the best experience.
Nutrition facts
Frequently asked questions
Why does this recipe use roasted garlic instead of raw?
Roasting transforms raw garlic's sharp bite into sweet, mellow flavor that blends beautifully with the creamy cheese. The concentrated roasted garlic adds depth without overpowering, creating that restaurant-quality taste. Plus, it's much easier to work with—no pungent aroma or harsh aftertaste!
Can I make this mac and cheese ahead of time?
Assemble the casserole completely, cover tightly, and refrigerate overnight. Bake straight from cold for 35-40 minutes at 375°F—the extra time ensures perfect browning. Leftovers keep well for 3 days in the fridge or 3 months frozen (the crispy topping freezes beautifully too!).
What's the secret to the crispy breadcrumb topping?
Press the breadcrumb mixture firmly into the cheese before baking—this ensures maximum contact for crispiness. Use panko (not regular breadcrumbs) and mix in 1 tbsp melted butter for extra richness. For even better results, broil for 1-2 minutes at the end to get that golden, crunchy finish.
Can I substitute any of the cheeses?
Certainly! For extra creaminess, swap ½ cup Colby Jack with Gruyère or Fontina. Need a dairy-free option? Use vegan cheddar and add 1 tbsp nutritional yeast for cheesy flavor. Just avoid pre-shredded cheese—it contains anti-caking agents that make the sauce grainy.
How do I fix a watery cheese sauce?
If your sauce is too thin, simmer it uncovered for 2-3 minutes to evaporate excess moisture. For stubborn cases, mix 1 tbsp cornstarch with 1 tbsp cold water, stir into the sauce, and cook until thickened. Never add raw flour directly—it can create lumps. Always reserve pasta water to adjust consistency!