
Appetizers
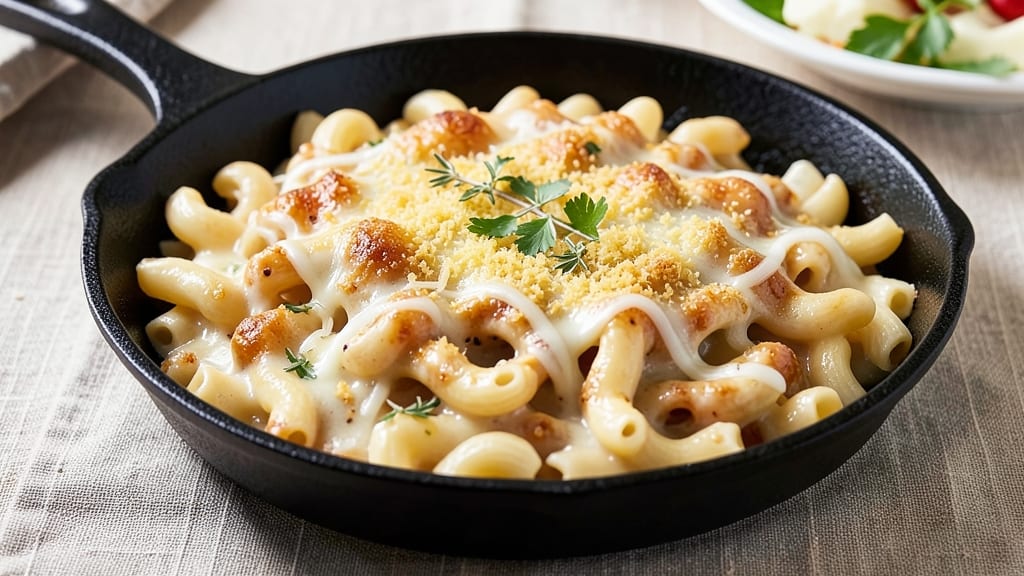
This baked four cheese mac and cheese delivers the ultimate comfort food experience with a crispy breadcrumb crown and layers of melted cheeses that never break. The secret lies in blending sharp cheddar, Gruyère, cream cheese, and Parmesan for a sauce so rich it clings to every noodle.
I've perfected this recipe over years of testing, ensuring the pasta stays al dente while the cheese transforms into a velvety, gooey blanket.
The key to success is a proper cheese sauce made with a roux and whole milk, which creates the perfect balance of creaminess and texture. We'll bake it until the top is golden and bubbling, then crown it with buttery breadcrumbs for that satisfying crunch.
This isn't just mac and cheese—it's a restaurant-quality dish that transforms a simple weeknight dinner into something special.
What makes this recipe truly exceptional is how the cheeses work together: sharp cheddar provides the tang, Gruyère adds nutty depth, cream cheese ensures creaminess, and Parmesan contributes umami richness. The result is a dish that's impossible to resist—each bite delivers that perfect combination of crispy, creamy, and cheesy satisfaction.
Perfect for feeding a crowd or meal prepping for the week, this mac and cheese reheats beautifully while maintaining its creamy texture. Whether you're serving it as a main dish or holiday side, it's guaranteed to become a family favorite. Let's get started on creating this ultimate comfort food masterpiece.
Ingredients for baked four cheese mac and cheese
Four cheeses, one magical sauce, and that perfect crispy crown—this isn't your childhood mac and cheese.
| Ingredient | Amount | Notes |
|---|---|---|
| Elbow Macaroni 🍝 | 1 ½ lb | Short pasta for best texture |
| Sharp Cheddar Cheese 🧀 | 8 oz | Aged 2+ years for tang |
| Gruyère Cheese 🧀 | 6 oz | Freshly grated, nutty flavor |
| Cream Cheese 🧈 | 4 oz | Full-fat for creaminess |
| Parmesan Cheese 🧀 | 4 oz | Freshly grated from block |
| Unsalted Butter 🧈 | ½ cup | Cold for roux, don't melt first |
| Whole Milk 🥛 | 2 cups | Room temperature preferred |
| All-Purpose Flour 🌾 | ¼ cup | For roux, sifted |
| Garlic Cloves 🧄 | 2 cloves | Minced for roux |
| Panko Breadcrumbs 🍞 | ½ cup | Toasted for extra crunch |
| Dried Mustard 🌶️ | ½ tsp | For depth of flavor |
| Salt 🧂 | 1 ½ tsp | Kosher salt, adjust to taste |
| Black Pepper 🌶️ | ½ tsp | Freshly cracked |
| Nutritional Yeast 🍃 | 1 tbsp | Optional, for umami boost |
The cheeses are non-negotiable here. Sharp cheddar gives that signature tang, but I always grab the 2+ year aged version from the store's deli section—it's worth the extra buck. Gruyère is the secret weapon for that nutty depth, and Whole Foods or specialty cheese shops carry the best blocks. Cream cheese? Philadelphia full-fat is my go-to, but any good brand works. The Parmesan? Freshly grated from a wedge—pre-grated gets clumpy and ruins the texture. Pro tip: buy a wedge and grate it yourself; it keeps for weeks in the fridge wrapped in parchment.
No Gruyère? Swiss cheese works in a pinch, but you'll lose some of that nutty complexity. Running low on sharp cheddar? Pepper jack adds heat but changes the flavor profile. The milk can be any kind, but whole milk gives the creamiest sauce. For the breadcrumbs, Trader Joe's has the best toasted panko—it's crispier than the regular stuff. Want extra richness? Add a splash of heavy cream to the sauce. And if you're feeling fancy, toss in a pinch of smoked paprika for a subtle smoky note.
This reheats like a dream—honestly better the next day as the cheeses meld even more. Store leftovers in an airtight container for 4-5 days, or freeze portions for up to 3 months. For meal prep, assemble the dish, refrigerate overnight, then bake straight from the fridge—it'll get extra crispy on top. The breadcrumb crown? Make it ahead and store in a sealed container; just pop it on right before baking. And if you're serving a crowd, double the batch—this disappears faster than you can say 'triple melts'
Why You'll Love This Recipe
- One-Pan Magic: I swear by this recipe on nights when I’d rather not scrub three pots. Just toss the elbow macaroni with the cheeses—sharp cheddar for bite, Gruyère for depth, cream cheese for silkiness—and a splash of milk. Twenty minutes later, golden crust, creamy center, no extra bowls.
- Cheese Love Bomb: Between us, Gruyère and sharp cheddar are a match made in heaven. The Gruyère melts into that velvety sauce while the cheddar adds sharp little pops, and the cream cheese? It’s the glue that makes every bite dangerously good. My picky-eating kid even licks the plate clean.
- Weeknight to Party: Honestly, this works for everything. Weeknight dinner? Check. Potluck where you want to bring something impressive? Double-check. The baked edge gives it restaurant vibes, but the cheesy center keeps it homey—no one will guess it’s my go-to lazy-day meal.
- Leftovers That Win: I make a double batch on Sundays because reheating this is chef’s kiss—just pop it back in the oven for 10 minutes, and it’s like fresh. Plus, the Parmesan rind leftovers? Perfect for sprinkling on soups or eggs. Budget-friendly, foolproof, and my family’s secret weapon for busy mornings.
Step-by-step instructions for baked four cheese mac and cheese
Here's how to create the ultimate baked mac and cheese with a triple-cheese sauce and crispy breadcrumb crown.
Cook the Elbow Macaroni to Perfect Al Dente
Bring a large pot of water to a rolling boil and add 1.5 lb elbow macaroni. I like to use about 1 teaspoon salt per gallon of water—it should taste like the sea. Cook the pasta until it's 1 minute shy of the package directions for al dente. You want it to have a slight bite, as it'll finish cooking in the oven.
Reserve 1 cup pasta water before draining—this starchy liquid is essential for creating a silky sauce. Drain the pasta and return it to the pot, giving it a quick toss with a splash of the reserved pasta water to prevent sticking. This step ensures your sauce clings beautifully to every strand of pasta.
Make the Ultimate Triple-Cheese Sauce
In a large skillet, melt 0.5 cup unsalted butter over medium heat. Add the 2 cloves minced garlic cloves and cook for 1 minute until fragrant—don't let it brown or it'll turn bitter. Immediately whisk in 0.25 cup all-purpose flour to create a roux, stirring constantly for 2 minutes until it turns a light golden color.
Slowly pour in 2 cups whole milk while whisking vigorously to prevent lumps from forming. Bring the mixture to a gentle simmer and cook for 5 minutes, stirring frequently, until it thickens enough to coat the back of a spoon. This is your velvety base sauce. Remove from heat and stir in 8 oz sharp cheddar cheese, 6 oz gruyère cheese, 4 oz cream cheese, 4 oz parmesan cheese, 1 tbsp nutritional yeast, 0.5 tsp dried mustard, 1.5 tsp salt, and 0.5 tsp black pepper. Stir until all the cheese is completely melted and the sauce is smooth and luxurious.
Combine Pasta and Sauce for Maximum Cheese Love
Add the cooked elbow macaroni to the cheese sauce and gently fold everything together until every strand is coated in that glorious, melty goodness. Taste and adjust the seasoning if needed—sometimes the cheeses need a little more salt or pepper to bring out their flavors. This is where all the magic comes together, so don't rush it.
Transfer the macaroni mixture to a 9x13-inch baking dish, spreading it out evenly. The sauce should be just thick enough to hold its shape when spooned, but still have a slight sheen on top. This consistency ensures a perfect bake with a slightly crispy top while maintaining that creamy interior we all love.
Create the Crispy Breadcrumb Crown
In a small bowl, mix together 0.5 cup panko breadcrumbs, 2 tablespoons melted butter, and 1 tablespoon grated parmesan cheese. Spread this mixture evenly over the top of the macaroni, pressing down gently to create an even layer. This crown is what gives your baked mac and cheese that irresistible crunchy texture that contrasts perfectly with the creamy cheese underneath.
Bake at 375°F for 25-30 minutes until the top is deep golden brown and the edges are bubbling. The breadcrumb crown should be crispy enough to stand up to a gentle poke with your finger. If it's browning too quickly, tent the dish with foil to prevent burning while it finishes cooking.
Rest and Serve for Maximum Enjoyment
Remove the baking dish from the oven and let it rest for 10 minutes before serving. This resting period allows the cheese to set slightly, making it easier to slice and preventing a messy slide. The internal temperature should reach 165°F—perfect for serving hot and gooey.
Slice into 6 generous portions and serve immediately. Each bite should deliver that perfect combination of creamy, melty cheese with a satisfying crunch from the breadcrumb crown. The sharp cheddar and nutty gruyère create layers of flavor, while the crispy top adds that restaurant-quality finish we all crave. Enjoy while it's hot—this mac and cheese doesn't wait!
Pro Tips For Making Baked Four Cheese Mac And Cheese
- Pre-shred your cheeses: The clumps in pre-shredded cheese are a nightmare, and they won’t melt smoothly in your sauce. Buy blocks of sharp cheddar and Gruyère, grate them yourself, and toss with a spoonful of flour—it keeps them from sticking while you cook.
- Bake uncovered first: I used to cover my mac and cheese with foil the whole time, and it’d come out soggy. Let it bake uncovered for the last 5 minutes at 375°F—you’ll get that golden, crispy top layer that makes all the difference.
- Don’t overmix the sauce: Stirring the cheese sauce until it’s completely smooth turns it into glue. Once the cheeses melt, give it 2-3 gentle folds with a spatula—just enough to coat the noodles evenly. Lumpy is better than gummy.
- Use half-and-half, not milk: Milk makes the sauce watery, and cream cheese needs something richer to blend properly. Half-and-half adds creaminess without thinning the sauce out—trust me, it’s the non-negotiable here.
Pro cooking tips for perfect results
Roux Perfection
The secret to a silky sauce starts with your roux—don't rush this step! Melt 0.5 cup unsalted butter over medium heat until it's foamy but not browned, then whisk in 0.25 cup all-purpose flour immediately.
Cook for exactly 2 minutes until it turns a pale golden color—this is your flavor foundation. If it darkens too much, you'll get a bitter taste that ruins the whole dish. I like to use King Arthur flour because it creates a smoother roux than store brands. 🌡️
Cheese Melting Order
Adding cheeses in the right order prevents clumping and ensures a velvety texture. Start with the sharp cheddar and gruyère since they're the most flavorful, then add the cream cheese to boost creaminess. Finish with the Parmesan and nutritional yeast for umami depth.
I always melt the cheeses off the heat—this prevents scorching and creates a smoother sauce. Stir constantly until you see a glossy sheen on top, which means it's perfectly emulsified. 🧀
Pasta Water Magic
Never skip reserving that 1 cup pasta water—it's the secret weapon for a sauce that clings to every noodle. The starch in the water acts as a natural emulsifier, preventing the cheese sauce from breaking.
After draining, immediately toss the pasta with a splash of this water to prevent sticking. I like to use De Cecco pasta because it holds up better to the baking process than some cheaper brands. This simple step transforms a good mac and cheese into an exceptional one. 🍝
Even Baking Key
For perfect results, spread your mac and cheese mixture evenly in a 9x13-inch baking dish—don't overfill it. The sauce should be just thick enough to hold its shape when spooned but still have a slight sheen.
I use a glass baking dish because it distributes heat more evenly than metal. When baking at 375°F, check the edges after 20 minutes
Toast your panko breadcrumbs in a dry skillet for 2 minutes before mixing with butter and Parmesan—this adds extra crunch. Press them firmly onto the top of the mac and cheese so they stick. For a golden finish, I like to broil for 1-2 minutes at the very end, watching carefully to avoid burning. The crown should be crispy enough to stand up when you poke it gently with your finger. 🍞 Resisting the urge to dig in right away is crucial—let your mac and cheese rest for 10 minutes after baking. This allows the cheese to set slightly, making it easier to slice and preventing a messy slide. The internal temperature should reach 165°F, which is perfect for serving. I always use a thermometer to check—this ensures food safety while keeping the cheese at its ideal serving temperature. ✨Breadcrumb Crown Tips
Resting Matters
Nutrition facts
Frequently asked questions
Can I make this mac and cheese ahead of time?
Assemble the dish completely (including the breadcrumb crown) and refrigerate for up to 24 hours before baking. When ready to serve, bake straight from the fridge at 375°F for 35-40 minutes, adding 5-10 extra minutes to account for the cold start. The crown will get extra crispy this way!
What if I don't have Gruyère?
No problem! Substitute with Swiss cheese (for mild sweetness) or Pecorino Romano (for saltier depth). Avoid pre-shredded cheeses—they contain anti-caking agents that make the sauce grainy. Freshly grated always wins for texture and flavor.
Why did my cheese sauce break/separate?
This usually happens from one of three things: overheating the sauce (keep heat medium-low when melting cheese), not enough pasta water (always reserve 1 cup), or rushing the roux (cook flour and butter for exactly 2 minutes). Give it a quick stir with a splash of cold milk to re-emulsify if needed.
Can I make this vegetarian?
Yes! Simply omit the optional nutritional yeast (it's dairy-free) and use vegetarian Parmesan if needed. For extra richness, add 2 tablespoons cornstarch to the roux to help thicken the sauce. The recipe already contains no meat, making it naturally vegetarian.
How do I prevent a soggy breadcrumb crown?
Toast your breadcrumbs in a dry skillet for 2 minutes before mixing with butter, and press them firmly onto the top. For extra insurance, broil for 1-2 minutes at the very end (watch closely!). The crown should be golden and crispy enough to stand up when poked.