
Main Courses
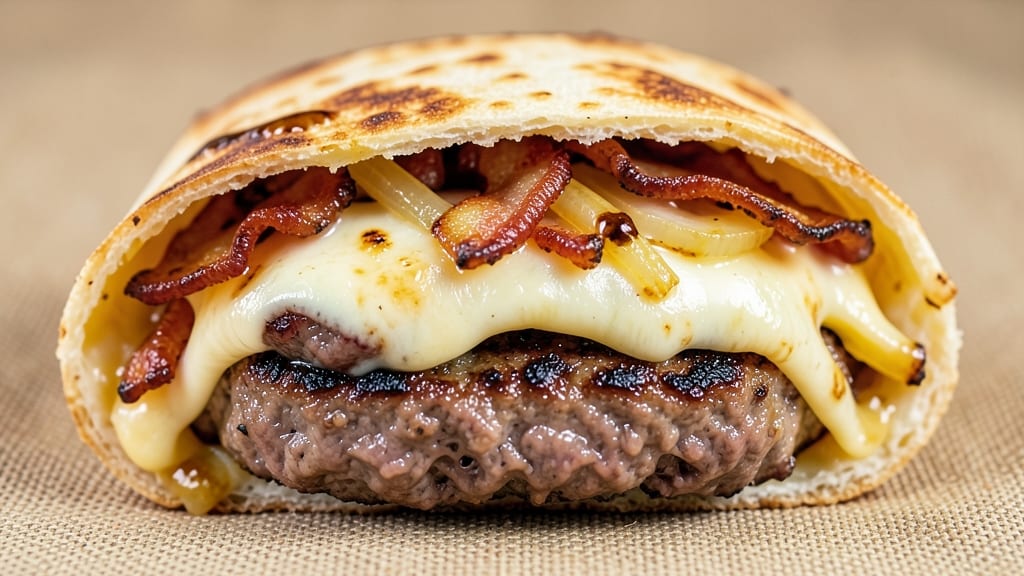
This bacon mac and cheese burger wrap recipe delivers the ultimate handheld meal—juicy beef patties wrapped in creamy, cheesy mac and cheese, all smothered in crispy bacon.
The secret lies in balancing perfectly seasoned ground beef with a rich, gooey mac and cheese filling that holds together when wrapped, while the bacon adds a smoky crunch that ties everything together.
It’s the kind of dish that transforms a simple lunch into a restaurant-worthy experience without requiring hours in the kitchen.
The beauty of this recipe is its versatility—you can grill, pan-fry, or even bake the wraps, depending on your preferred cooking method.
The mac and cheese filling is made with sharp cheddar and a touch of creaminess to ensure every bite is indulgent, while the bacon adds a savory depth that cuts through the richness.
The wrap itself stays sturdy enough to hold all the fillings without falling apart, making it ideal for meal prep or a quick weeknight dinner.
What you’ll end up with is a crispy, cheesy, bacon-drizzled masterpiece that’s packed with flavor in every bite. The burger patty remains juicy and tender, the mac and cheese is gooey and satisfying, and the bacon adds that perfect smoky crunch.
It’s the kind of dish that feels like a cheat day but is actually simple enough to make at home—no fancy techniques required, just great ingredients and a little patience.
Serve these wraps with a side of crispy fries or a fresh salad for a complete meal that’s sure to impress. The combination of textures and flavors makes this recipe a standout for any occasion, whether you’re feeding a family or just craving something hearty and delicious. Let’s get cooking!
Ingredients for bacon mac and cheese burger wrap
Juicy beef, creamy cheese, and smoky bacon—these 15 ingredients create restaurant-style wraps in minutes.
| Ingredient | Amount | Notes |
|---|---|---|
| Ground Beef (80/20) 🥩 | 1 lb | 80% lean for juiciness |
| Sharp White Cheddar Cheese 🧀 | 4 oz | Shredded, block preferred |
| Heavy Cream 🥛 | ½ cup | Full-fat for creaminess |
| Whole Milk 🥛 | ½ cup | Warmed for smooth sauce |
| All-Purpose Flour 🌾 | 2 tbsp | For thickening mac sauce |
| Yellow Onion 🧅 | ½ whole | Diced, medium size |
| Garlic Cloves 🧄 | 3 cloves | Minced, fresh preferred |
| Butter 🧈 | 2 tbsp | Unsalted, for cooking |
| Bacon 🥓 | 6 oz | Cooked crispy, chopped |
| Large Tortilla Wraps 🌯 | 4 whole | Flour or whole wheat |
| Kosher Salt 🧂 | 1 ½ tsp | Adjust to taste |
| Ground Black Pepper 🌶️ | ½ tsp | Freshly cracked |
| Garlic Powder 🧄 | ½ tsp | For beef seasoning |
| Onion Powder 🧅 | ½ tsp | For beef seasoning |
| Paprika 🌶️ | ¼ tsp | Smoked for depth |
The beef quality makes all the difference. 80/20 ground chuck stays juicy while cooking, and you'll find it at most grocery stores in the meat section. Look for packages labeled '80/20'—that fat content keeps the patties tender. For the cheese, sharp white cheddar from the deli counter melts best. I always grab extra because it disappears fast. The bacon? Thick-cut from Costco cooks up crispier than thin slices—worth the investment if you're making a big batch.
No sharp cheddar? Pepper jack or Colby Jack work in a pinch, though the flavor won't be identical. Running low on heavy cream? Half-and-half at double the amount keeps the sauce creamy. The tortillas need to stay sturdy—Mission brand flour tortillas hold up best when warm. For the mac sauce, whisk the flour into the warm milk first to avoid lumps. The spices on the beef? Don't skip the paprika—it adds that smoky depth that ties everything together.
Cooked bacon keeps for 5 days in the fridge, wrapped tightly in foil. The mac and cheese filling reheats beautifully—just add a splash of milk to loosen it. Tortillas stay fresh for 3 days in a sealed bag. Assemble the wraps just before serving so they don't get soggy. For meal prep, cook the beef and mac filling ahead, then assemble fresh—2 days max in the fridge. Freeze the filling for 3 months by portioning into containers before adding the tortillas.
Why You'll Love This Recipe
- One-Pan Magic: I swear by this—just brown the beef, toss in the flour slurry (milk, cream, and that buttery roux), and let the cheddar melt into a gooey blanket. No switching pans, no extra bowls, and honestly? The cleanup is just wiping one sheet.
- Craving-Worthy Crunch: That crispy bacon edge on the wrap? Yes. The creamy, stretchy cheese center? Also yes. The 80/20 beef adds richness without overpowering, and the sharp cheddar—don’t even get me started. It’s the kind of bite that makes you groan in satisfaction.
- Lunchbox Hero: Between us, this is my go-to for packed lunches. Wrap it up, slice it in half, and boom—no soggy sandwiches. My kids actually eat it cold (though I’ll admit, I always sneak a warm bite first). Works for tailgates, potlucks, or just a lazy afternoon.
- Budget-Friendly Feast: Ground beef and cheddar stretch for miles, and the roux turns cheap ingredients into something ridiculous. I’ve fed six people for under $15 with leftovers that taste just as good reheated. (Yes, even on a Tuesday night.)
Step-by-step instructions for bacon mac and cheese burger wraps
Here's how to assemble these smoky, cheesy, handheld masterpieces with perfect texture every time.
Cook the Bacon Until Crispy
Cut the 6 oz bacon into ½-inch pieces and cook in a cold skillet over medium-low heat for 8-10 minutes, stirring occasionally. The key here is patience—you want the bacon to render fat slowly and become deep golden brown and crispy without burning. I like to press down gently on the pieces during the first few minutes to help render the fat evenly.
Once crispy, transfer the bacon to a paper towel-lined plate using a slotted spoon to drain excess fat. Reserve 2 tablespoons of that rendered bacon fat in the skillet—it's packed with flavor and will help build the mac and cheese sauce. Chop the cooked bacon into ¼-inch pieces and set aside for later.
Prepare the Mac and Cheese Sauce
In the same skillet (with the reserved bacon fat), melt the 2 tablespoons butter over medium heat. Add the diced ½ whole yellow onion and cook for 4-5 minutes until softened and translucent. Add the 3 minced garlic cloves and cook for 30 seconds until fragrant—don't let it brown or it'll turn bitter.
Sprinkle the 2 tablespoons all-purpose flour over the onions and garlic, stirring constantly for 1-2 minutes until golden brown. This creates a roux that will thicken our sauce. Slowly pour in the ½ cup whole milk and ½ cup heavy cream, whisking constantly to prevent lumps. Bring to a gentle simmer and cook for 3-4 minutes until slightly thickened.
Reduce heat to low and gradually add the 4 oz shredded sharp white cheddar cheese, stirring until completely melted and smooth. The sauce should coat the back of a spoon. Season with ½ teaspoon garlic powder, ½ teaspoon onion powder, ½ teaspoon ground black pepper, and ¼ teaspoon paprika, stirring well to combine. Keep warm while you prepare the burger mixture.
Cook the Beef Mixture
In a separate skillet over medium-high heat, crumble the 1 lb ground beef (80/20) into small, even pieces. Season immediately with 1½ teaspoons kosher salt and ½ teaspoon ground black pepper, breaking up any large clumps with a wooden spoon. Cook for 5-6 minutes until the beef is well browned and no longer pink in the center.
Drain excess fat if needed (leave about 1 tablespoon for flavor), then stir in the ¼-inch chopped bacon you prepared earlier. The beef should be juicy but fully cooked—if it's still slightly underdone, cook for another 30 seconds to finish. Remove from heat and let it rest for 2 minutes before assembling the wraps.
Assemble the Wraps
Lay out the 4 large tortilla wraps on a clean work surface. Divide the mac and cheese sauce evenly among them, spreading it into a ¼-inch thick layer in the center of each wrap. Then divide the beef mixture evenly, spreading it over the cheese sauce to create a thin, even layer. The goal is to create a balanced bite with both flavors in every mouthful.
Fold the bottom of each wrap up over the filling, then fold in the sides, and finally roll tightly from the bottom up. You can either roll them like a burrito or fold them in half like a taco—both work well. Place the assembled wraps seam-side down on a plate and cover with a clean kitchen towel to keep them warm while you cook them.
Cook Until Golden and Serve
Heat a clean skillet over medium heat (no oil needed—the cheese will prevent sticking). Working in batches if needed, place the wraps seam-side down in the skillet. Cook for 2-3 minutes per side until deep golden brown and crispy on both sides. The cheese should be fully melted and the tortillas should be crispy but not burnt—watch them closely during the last minute.
Transfer to a serving plate and let rest for 1 minute before serving. Cut each wrap in half if desired and serve immediately with a side of cool ranch or blue cheese dressing for dipping. The combination of crispy bacon, creamy mac and cheese, and juicy beef makes every bite irresistible—just don't be surprised if these disappear faster than you can say "cheese pull."
Pro Tips For Making Bacon Mac And Cheese Burger Wrap
- Crush the Beef Early: Break up your 80/20 ground beef into tiny, rice-sized pieces before cooking—this guarantees even browning and better flavor distribution. I used to just crumble it roughly, but smaller bits mean more surface area for that perfect sear, and it mixes better into the mac and cheese later.
- Prep the Cheese Right: Grate your sharp white cheddar yourself—pre-shredded cheese has anti-caking agents that make the sauce grainy. Use a box grater for fine, even shreds, and toss them with a splash of cold milk while you cook to prevent clumping. (Yes, even if you’re impatient like me.)
- Control the Sauce Heat: Simmer the cheese sauce on medium-low—high heat turns it gloppy or burns the flour. I learned this the hard way after one disastrous batch where the sauce separated like a sad science experiment. Stir constantly and pull it off heat just before it looks fully melted.
- Wrap Tight, Press Firm: Roll your wraps snugly but not brutally—too loose and they’ll unravel when you cut, too tight and the filling oozes out. Press the edges with your fingers while rolling, then chill for 10 minutes before slicing for cleaner bites. (Your future self will thank you.)
Wine and beer pairings for bacon mac and cheese burger wrap
Crispy Beer Pairings
A hoppy American pale ale like Fat Tire or Blue Moon is my go-to choice for these wraps. The citrusy notes and light maltiness cut through the richness of the mac and cheese while complementing the smoky bacon.
The carbonation also helps cleanse your palate between bites, making it perfect for a handheld meal. Serve it slightly chilled (45-50°F) to enhance the beer's refreshing quality. 🍺
Malty Stout Contrast
For those who prefer a bolder beer, a roasted stout like Guinness or Samuel Smith's Nut Brown Ale provides an interesting contrast. The caramel and toasted notes in the stout pair beautifully with the caramelized cheese and crispy bacon, creating a rich, satisfying combination.
The dark beer's body stands up well to the hearty flavors without overpowering them. 💛
Light Lager Refresh
If you're serving these wraps outdoors or during warmer months, a crisp Mexican lager like Modelo Especial or Pacifico works wonderfully. The clean, refreshing profile balances the richness of the dish without competing with its flavors.
The slight sweetness of the lager also complements the smoky bacon and sharp cheddar. Serve it ice-cold (38-40°F) for the best experience. ❄️
Wine Pairing Options
For wine lovers, a medium-bodied red like Pinot Noir or Gamay offers a perfect match. The fruity notes and slight acidity in these wines enhance the flavors of the beef and cheese without overwhelming the dish.
Alternatively, a dry Riesling provides a crisp, acidic contrast that complements the richness of the mac and cheese and bacon. Both options should be served slightly chilled (50-55°F) to enhance their refreshing qualities. 🍷
Spicy Margarita Twist
For a non-alcoholic or slightly spicy option, a classic margarita made with tequila, lime juice, and a touch of agave syrup adds a refreshing twist. The tartness of the lime balances the richness of the cheese, while the tequila's slight spice complements the smoky bacon.
Serve it well-chilled (38-40°F) with a salted rim for an extra layer of flavor. 🌶️
Nutrition facts
Frequently asked questions
Can I make these wraps ahead of time?
Assemble the wraps but skip the final cooking step. Wrap them tightly in plastic wrap and refrigerate for up to 2 days. When ready to cook, heat a skillet over medium heat and cook each side for 2-3 minutes until golden and crispy. For freezing, cook the beef and mac filling separately, then assemble with tortillas (uncooked) and freeze for 3 months. Reheat in a skillet or oven at 350°F for 10-12 minutes until warmed through.
What if my tortilla gets soggy?
This is a common issue! To prevent soggy tortillas, make sure your mac and cheese filling isn't too wet—it should be thick enough to coat the back of a spoon. Also, keep the assembled wraps in the fridge (not warm) until ready to cook. If they start to soften, press them gently between two sheets of parchment paper to restore crispness before cooking. For extra insurance, lightly toast the tortillas in a dry skillet for 30 seconds before adding fillings.
Can I use ground turkey or chicken instead of beef?
Yes, but expect a different texture and flavor profile. Ground turkey (especially lean) will make the patty drier unless you add 1 tablespoon extra fat (like olive oil) while cooking. For chicken, use 93% lean ground chicken and cook it for 3-4 minutes total to avoid overcooking. The mac and cheese filling will still taste great, but the overall dish will be lighter. For best results, season the poultry extra well with 1 teaspoon smoked paprika to mimic the beef's depth.
How do I make this vegetarian?
Swap the beef for ½ lb crumbled tempeh or seitan (marinated in soy sauce and smoked paprika) or 1 can (15 oz) black beans, drained and mashed with 1 teaspoon cumin. For extra protein, add ½ cup cooked quinoa to the mac and cheese filling. Use vegetarian bacon (like coconut bacon) or crispy fried tofu for the smoky element. The texture will be different but still delicious!
Can I bake these instead of pan-frying?
Yes! Preheat oven to 400°F and line a baking sheet with parchment paper. Arrange assembled wraps seam-side down and bake for 12-15 minutes until golden and crispy. For extra browning, broil for 1-2 minutes at the end. Baking works well for larger batches and keeps the tortillas from getting soggy. Just watch closely after 10 minutes to prevent burning.