
Main Courses
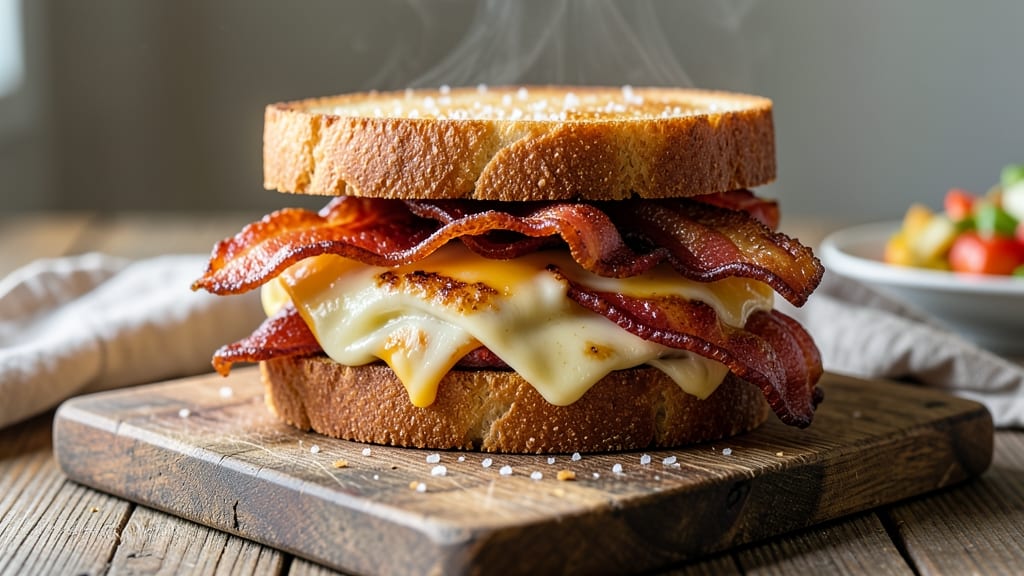
This bacon grilled cheese sandwich recipe delivers the ultimate combination of smoky crispy bacon and gooey pull-apart cheese—every bite is a perfect balance of textures and flavors. After years of perfecting the technique, I've cracked the code for achieving that golden-brown crust while keeping the cheese warm and stretchy inside.
The secret lies in crisping the bacon first and pressing the sandwich just right for even browning. What sets this recipe apart is the layering technique that ensures no soggy bread or cold cheese.
We're talking about perfectly toasted bread with crispy bacon edges and a cheese pull that's so satisfying, you'll want to make it every day. The stovetop method gives you full control over the heat, so you can achieve that professional-quality crust without a fancy panini press.
By the time you take that first bite, you'll understand why this has become my go-to comfort food—rich, smoky, and completely indulgent. The aroma alone will have everyone gathered around your kitchen, and the first bite will have them asking for seconds.
This isn't just a sandwich; it's an experience that transforms an ordinary lunch into something special. Ready in just 15 minutes, this recipe proves you don't need complicated techniques to create restaurant-quality results at home.
Whether you're craving a quick lunch or a cozy dinner, this bacon grilled cheese delivers every time with minimal effort and maximum flavor. Let's get cooking!
Ingredients for bacon grilled cheese sandwich
These ingredients transform simple lunch into a smoky, gooey masterpiece—crispy bacon and melty cheese in every bite.
| Ingredient | Amount | Notes |
|---|---|---|
| Thick-Cut Bacon 🥓 | 4 slices | Smoky flavor, crisped first |
| Sourdough Bread 🍞 | 4 slices | Thick-cut, crust removed |
| Sharp Cheddar Cheese 🧀 | 1 cup | Shredded, aged flavor |
| Mozzarella Cheese 🧀 | ½ cup | Shredded, fresh preferred |
| Unsalted Butter 🧈 | 2 tbsp | Softened for spreading |
| Mayonnaise 🥄 | 1 tbsp | For extra richness |
| Garlic Powder 🧄 | ½ tsp | Enhances flavor profile |
| Black Pepper 🌶️ | ¼ tsp | Freshly ground preferred |
| Salt 🧂 | ¼ tsp | Kosher or sea salt |
| Olive Oil 🫒 | 1 tbsp | For pan coating |
The bacon makes all the difference here—thick-cut slices from Oscar Mayer or Costco crisp up perfectly. If you're in a hurry, Trader Joe's has pre-cooked bacon that still works (just crisp in the pan longer). For the cheese, sharp cheddar adds that tangy bite, while mozzarella keeps it stretchy. I always grab the block cheese and shred it myself—pre-shredded gets clumpy. The sourdough? Look for a crusty loaf with a good chew—Dave's Killer Bread or your local bakery are great spots.
No thick-cut bacon? Regular bacon cooked extra long works, but it won't be as crispy. Short on cheddar? Gruyère or Gouda add depth. The mayo is optional but makes the cheese extra gooey—Hellmann's or Duke's are safe bets. No garlic powder? Fresh minced garlic at half the amount works too. And if you're feeling fancy, add a sprinkle of crispy fried onions on top before serving. The olive oil is key for that perfect sear—don't skip it!
Bacon keeps best in the fridge for 5 days once opened, but I always cook it fresh for this sandwich. Cheese stays good for 2 weeks if sealed tight. Make these ahead? Assemble the sandwiches (no cheese yet), wrap in parchment, and refrigerate for up to 1 day. When ready to cook, just add the cheese and crisp in the pan. Leftovers? Toast them again in the morning—they taste even better cold with a side of tomato soup.
Why You'll Love This Recipe
- Here’s what sold me: the sandwiches reheat like a dream. Pop them in the toaster or air fryer, and that crispy-cheesy combo comes back to life. Plus, bacon stretches my grocery budget further than I’d like to admit—worth every penny.
- Five-Ingredient Magic: I swear by this combo—thick-cut bacon crisped until it’s nearly glass, sourdough toasted to golden perfection, and that sharp cheddar melting into gooey mozzarella. It’s the kind of sandwich where every bite feels like a hug from the inside out.
- No-Fuss Fridays: Between us, this takes less time than deciding what to eat. Cook the bacon first (yes, I leave the pan grease for the cheese—don’t judge), butter the bread, and slap it together. Fifteen minutes max, and zero cleanup if you’re smart about it.
- Lunchbox Hero: Honestly, I make these for my kid’s school lunches—yes, even on a Tuesday. Wrap the cooled sandwich in foil, toss in a few crispy bacon bits on the side, and suddenly you’ve got a lunch that’s actually exciting. (The teacher always asks for one.)
Step-by-step instructions for bacon grilled cheese sandwich
Here's how to build the perfect smoky, crispy, gooey sandwich—every bite delivers that satisfying pull-apart texture.
Cook the Bacon Until Crispy
Place the 4 slices thick-cut bacon in a cold, dry skillet over medium heat. Cook for 8-10 minutes, flipping once, until the edges are deep golden brown and the fat has rendered out. The bacon should be crispy enough to stand up on its own—this is key for that satisfying crunch in every bite.
Transfer the cooked bacon to a paper towel-lined plate to drain excess fat. I like to leave it whole for now so it doesn't break apart when we assemble the sandwiches later. If any bacon crumbles, save those bits—they'll add extra flavor to the cheese filling.
Prepare the Cheese Filling
In a medium bowl, combine the 1 cup shredded sharp cheddar cheese and 0.5 cup shredded mozzarella cheese. Add the 1 tablespoon mayonnaise, 0.5 teaspoon garlic powder, 0.25 teaspoon black pepper, and 0.25 teaspoon salt. Use your hands to mix everything thoroughly—this ensures even distribution of flavors and creates a creamy, cohesive filling.
If your cheddar is particularly dry, you can add 1 teaspoon of milk to help it melt more smoothly. The mozzarella should still be cold and firm at this point—don't let it warm up before assembly, or it'll start sticking together.
Assemble the Sandwiches
Lay out the 4 slices sourdough bread on a clean work surface. Spread 1 tablespoon of softened unsalted butter on the outer surface of each slice—this creates that golden, crispy crust when we grill. Place 1 slice of cooked bacon on each bread piece, then divide the cheese mixture evenly between them.
Top each with another slice of bacon and the remaining bread slices, butter-side out. Press down gently but firmly to help the cheese adhere. Here's the thing—don't overstuff them. You want enough filling to ooze out when you bite in, but not so much that it spills everywhere when you try to flip.
Grill to Golden Perfection
Heat a clean skillet over medium-low heat and add 1 tablespoon olive oil. Once the oil is shimmering, place the assembled sandwiches in the pan. Cook for 3-4 minutes per side until the bread is deep golden brown and the cheese is fully melted and bubbling.
Here's where patience pays off: press down gently with a spatula for 10-15 seconds during the last minute of cooking. This helps create that satisfying pull-apart texture while ensuring the cheese melts completely. You'll know they're ready when the outside is crispy and the cheese is gooey enough to stretch between your fingers.
Rest and Serve
Transfer the sandwiches to a plate and let them rest for 1-2 minutes before serving. This brief rest allows the cheese to set slightly, making it easier to cut and preventing a messy cheese avalanche when you take your first bite.
Cut each sandwich diagonally and serve immediately while the bread is still crispy and the cheese is at its gooiest. The combination of smoky bacon, sharp cheddar, and creamy mozzarella creates a flavor explosion in every bite—exactly what makes this sandwich so irresistible.
Pro Tips For Making Bacon Grilled Cheese Sandwich
- Crisp the Bacon First: Thick-cut bacon takes forever to crisp properly, and you don’t want it soggy between cheesy layers. Cook it low and slow (275°F) until the edges curl, then finish on high heat for a crackle—this keeps it from turning greasy when pressed into the sandwich. I learned this the hard way after burning three batches trying to rush it.
- Butter the Bread Outside In: Skip slathering butter on the inside—it’ll steam instead of brown. Instead, focus on the outer edges of the sourdough and a thin layer on the contact surfaces. This guarantees a crisp crust while keeping the inside gooey. (Yes, even if you’re impatient like me.)
- Layer Cheese Like a Sandwich: Sharp cheddar melts fast and gets runny—place it inside the sandwich, while mozzarella goes on top for that stretchy, golden crust. Pressing with mozzarella facing out makes all the difference, but don’t overstuff or the bread will tear when you flip.
- Press Low and Slow: High heat = burnt bread, sad cheese. After assembling, cook on medium-low (around 325°F) with a heavy pan or weight for 4-5 minutes per side. The cheese will melt evenly, and the sourdough won’t turn to cardboard. (Your future self will thank you.)
Pro cooking tips for this recipe
Heat Control Secrets
Start with medium heat for crisping bacon—this ensures even cooking without burning. Once the bacon is done, reduce to medium-low for grilling the sandwiches. Too high heat burns the bread before the cheese melts properly.
I use a cast-iron skillet because it retains heat perfectly—Lodge makes my favorite. The key is patience: let the cheese melt gradually for that perfect pull-apart texture. 🔥
Butter Matters
Don't skip the butter! Spread 1 tablespoon softened unsalted butter on the OUTSIDE of each bread slice only. This creates that golden crust while keeping the inside moist. I like Plugrá brand for its rich flavor.
If your butter is too cold, it won't spread evenly—soften it at room temperature for 5-10 minutes. Pro tip: Use a pastry brush for even distribution if you prefer less mess.
Cheese Layering
Layer the cheese evenly between the bacon slices—about ¼ cup per sandwich. The sharp cheddar should be on the bottom for flavor depth, with mozzarella on top for stretch. I mix in 1 tbsp mayo to make the cheese extra gooey.
For extra richness, add a sprinkle of Parmesan on top before closing. The cheese should be cold when assembling to prevent premature melting during assembly.
Pressing Technique
Use a wide spatula to press down gently during the last 30 seconds of cooking. This helps create that satisfying pull-apart texture while ensuring even browning. Too much pressure makes the bread soggy—just enough to help the cheese melt completely.
I press for 10-15 seconds per side at the end. A heavy skillet helps distribute pressure evenly without crushing the sandwich.
Bacon Timing
Cook bacon until deep golden brown (about 8-10 minutes)—it should be crispy enough to stand up on its own. If it's not crispy enough, it'll make the sandwich soggy. I like to leave it whole until assembly to maintain structure.
For extra flavor, save the bacon fat in a jar and use it for future cooking. The smoky aroma alone makes your kitchen irresistible. 🥓
Cleanup Shortcuts
Line your work surface with parchment paper to make assembly easier and cleanup faster. I also keep a small bowl of hot water nearby to quickly wipe down the skillet between batches. For the cheese, use a microplane to shred it fresh—pre-shredded cheese gets clumpy.
Store any leftover cheese in an airtight container for up to 5 days in the fridge. The bacon fat can be stored in a jar for up to 1 month.
Nutrition facts
Frequently asked questions
Can I use regular bacon instead of thick-cut?
Yes, but it won't be as crispy! Regular bacon works best if you cook it 2-3 minutes longer on each side to achieve that satisfying crunch. For extra flavor, save the bacon fat in a jar—it's perfect for future cooking. The texture difference is noticeable, but the smoky taste remains delicious.
What's the best bread for this recipe?
Sourdough is ideal for its chewy texture and tangy flavor, but brioche or Texas toast work beautifully too. Avoid soft sandwich bread—it gets soggy too fast. Pro tip: Toast the bread lightly before assembling to add extra crunch and prevent moisture from the cheese making it limp.
Can I make these ahead of time?
Assemble the sandwiches (no cheese yet), wrap in parchment paper, and refrigerate for up to 1 day. When ready to cook, add the cheese and grill as directed. For a quick breakfast, reheat leftovers in a dry skillet for 1-2 minutes per side—they taste even better cold with tomato soup!
Why did my cheese not melt properly?
This usually happens from too-high heat or insufficient pressing. Use medium-low heat and press gently for 10-15 seconds during the last minute of cooking. Cold cheese also melts better—keep it refrigerated until assembly. If your cheese still doesn't melt, try adding 1 teaspoon of milk to the mix to help it become more cohesive.
What other cheeses can I use?
For extra richness, swap in Gruyère, Pepper Jack, or Gouda. Avoid pre-shredded cheese—it contains anti-caking agents that prevent proper melting. If you love spice, add jalapeños or hot honey** to the cheese mix. The key is using a mix of melting and flavorful cheeses for that perfect pull-apart texture.