
Breakfast & Brunch
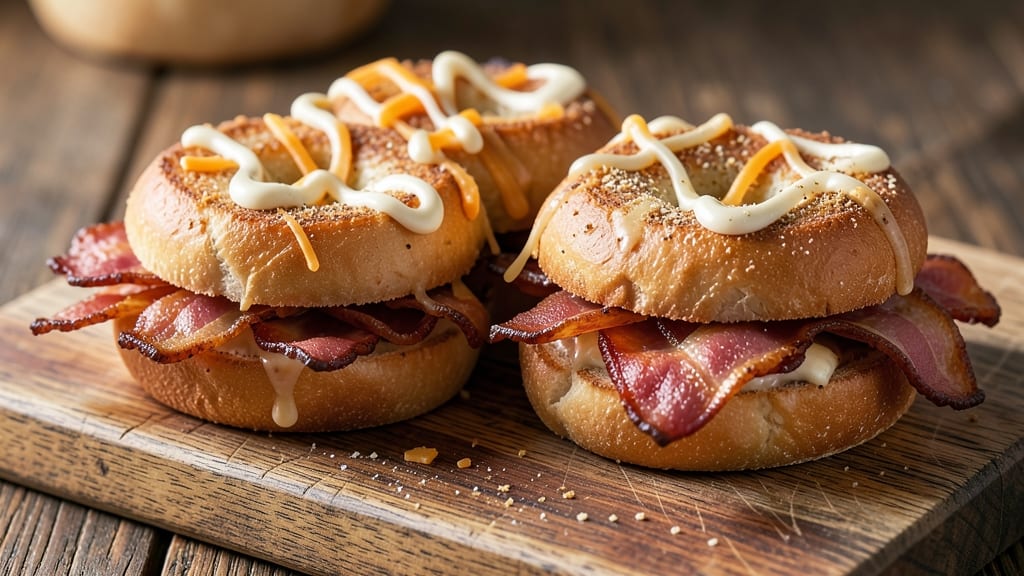
This bacon and cheese bagel recipe delivers crispy toasted edges that shatter with every bite, paired with smoky cheddar and perfectly cooked bacon. The secret lies in toasting the bagel just right—golden brown and crispy without burning—while melting the cheese into a gooey, pull-apart center.
I've perfected this technique over years of weekend brunch experiments, and it never fails to impress.
The magic happens in the assembly: start with a high-quality bagel, toast it until the edges are crispy and the interior stays soft, then layer it with crispy bacon and melted cheddar.
The bacon should be cooked to your preferred level—crispy for texture lovers or just tender for those who prefer a softer bite. This recipe balances richness and texture perfectly, making it a breakfast staple that feels indulgent yet simple.
What you'll end up with is a bagel so good it becomes the star of any meal—whether served as a hearty breakfast, a brunch centerpiece, or even a satisfying snack. The smoky cheddar pulls apart cleanly, the bacon adds salty crunch, and the toasted bagel provides the ideal foundation.
It's the kind of dish that transforms ordinary mornings into something special.
For those who love variations, try adding avocado for creaminess, smoked salmon for a savory twist, or jalapeños for a spicy kick. Serve with a side of hot sauce or a simple egg if you're making it for breakfast.
The possibilities are endless, but the core technique remains foolproof. Let's get to work!
Ingredients for bacon and cheese bagel
Crispy bagels, smoky bacon, and melty cheddar—this brunch staple needs just 10 ingredients for perfection.
| Ingredient | Amount | Notes |
|---|---|---|
| Plain Bagels 🥯 | 4 whole | Sesame or plain, toasted to perfection |
| Thick-Cut Bacon 🥓 | 8 slices | Applewood smoked preferred |
| Sharp Cheddar Cheese 🧀 | 1 cup | Smoky cheddar for authentic flavor |
| Unsalted Butter 🧈 | 2 tbsp | For toasting bagels |
| Mayonnaise 🥫 | 2 tbsp | Optional for extra creaminess |
| Garlic Powder 🧄 | ½ tsp | Enhances cheddar flavor |
| Black Pepper 🌶️ | ¼ tsp | Freshly cracked for brightness |
| Kosher Salt 🧂 | ½ tsp | Diamond Crystal preferred |
| Hot Sauce 🌶️ | 1 tbsp | For serving (optional) |
| Fresh Chives 🌿 | 2 tbsp | Chopped for garnish |
The bagels are non-negotiable here—Thomas' plain or sesame from the bakery section is my go-to, but any fresh bagel works. Look for ones that feel dense but still soft to the touch, not rock-hard. The bacon? Applewood smoked from Costco or Trader Joe's gives that perfect smoky depth, but any thick-cut bacon in the fridge will do. For the cheddar, sharp cheddar with visible speckles melts best—Cabot or Tillamook are my favorites, but any smoky cheddar will work. Pro tip: slice the bagels slightly off-center so they toast evenly.
No applewood bacon? Regular thick-cut bacon works fine—just cook it longer for extra crispiness. Short on cheddar? Mozzarella mixed with cheddar gives a creamier texture, but it won't be as smoky. Love garlic? Add a pinch of garlic powder to the butter while toasting. The mayonnaise is optional but adds a creamy richness that balances the saltiness—skip it if you're watching calories. For the hot sauce, Cholula or Frank's RedHot are my go-tos, but any hot sauce you have on hand will do.
Toast the bagels until they're golden brown and crispy—about 5-7 minutes in a toaster oven at 375°F. Keep them warm in a 200°F oven while you cook the bacon. The bacon should be crispy but not burnt—drain on paper towels to remove excess grease. Assemble immediately so the bagels don't lose their crispiness. Leftovers? Wrap tightly in foil and reheat in a toaster for 2 minutes—the cheese will melt again like magic.
Why You'll Love This Recipe
- Five-Ingredient Magic: I swear by this combo—thick-cut bacon, sharp cheddar, and mayo turn a plain bagel into something ridiculously good with almost no work. Toast the bagel, crisp the bacon, melt the cheese—done.
- Crispy-Creamy Heaven: That first bite? Crunchy bacon, gooey cheddar, and buttery bagel crust all playing together like a perfect breakfast symphony. Honestly, I can’t stop eating them once they’re ready.
- Lunchbox Legend: Pack these for work or school—they hold up shockingly well. Wrap the bagel halves in foil, and you’ve got a handheld meal that’s way better than sad desk lunches.
- Budget Breakfast Win: Sharp chedddar and thick-cut bacon stretch my grocery dollars, and I can make a whole batch in one go. Leftovers? They’re my secret weapon for lazy mornings or late-night cravings.
Step-by-step instructions for bacon and cheese bagel recipe
Here's how to create perfectly crispy bagels with melty cheddar and smoky bacon—every bite will be a pull-apart masterpiece.
Prep the Bagels for Maximum Crispiness
Preheat your oven to 425°F with the rack positioned in the middle. Slice each of the 4 whole plain bagels horizontally, creating two halves per bagel. Arrange them on a baking sheet, cut-side up, and brush the tops generously with 2 tablespoons unsalted butter, making sure to cover every surface evenly.
Here's the thing—this butter isn't just for flavor. It creates a moisture barrier that prevents the bagels from drying out while toasting, and it helps achieve that golden, crispy crust we're after. I like to use a pastry brush for this step, but if you don't have one, a silicone spatula works just as well.
Bake the bagel halves for 8-10 minutes until they're a deep golden brown and the edges are crisp to the touch. You'll know they're ready when the crust sounds hollow when tapped. Remove them from the oven and keep them warm in a 200°F oven while you prepare the bacon and cheese filling.
Cook the Bacon to Crispy Perfection
While the bagels toast, line a second baking sheet with parchment paper and arrange the 8 slices thick-cut bacon in a single layer. I always use Applewood smoked bacon for that authentic depth of flavor, but any good-quality thick-cut bacon will work. Place the bacon in the 425°F oven (same temperature as before) and bake for 15-18 minutes, flipping once halfway through.
You want the bacon to be crispy but not burnt—it should be golden brown with just a hint of caramelization. The edges should be firm to the touch, and the fat should render out nicely. If you notice any slices starting to brown too quickly, remove them from the oven and let them cool slightly on a wire rack while the others finish cooking.
Once done, transfer the bacon to a paper towel-lined plate to drain excess fat. Chop the bacon into ¼-inch pieces using kitchen shears or a sharp knife. The smaller the pieces, the more evenly they'll distribute in the bagels, creating that perfect bite of crispy bacon in every mouthful.
Assemble the Cheesy Bacon Filling
In a small bowl, mix together the 1 cup sharp cheddar cheese, 0.5 teaspoon garlic powder, 0.25 teaspoon black pepper, and 0.5 teaspoon kosher salt. Use your fingers to break the cheese into smaller, more manageable pieces—this ensures it melts smoothly and evenly throughout the bagels. If you're using the optional 2 tablespoons mayonnaise, fold it into the cheese mixture now for extra creaminess.
Here's a pro tip: I like to use a microplane to grate the cheddar cheese finely, almost like a powder. This creates a silky texture when melted, rather than large, gooey chunks. If you don't have a microplane, a box grater with the smallest holes will work, but be sure to pulse the cheese in a food processor for a few seconds to break it down further.
Once your cheese mixture is ready, it's time to assemble. Place one toasted bagel half on a plate and spread half of the cheese mixture evenly over the top. Sprinkle half of the chopped bacon pieces over the cheese, then top with the remaining cheese and bacon. Repeat with the other bagel halves, pressing down gently to help the filling adhere.
Melt and Garnish for the Ultimate Bite
Return the assembled bagels to the oven at 425°F for 3-5 minutes, just until the cheese is fully melted and bubbly. You'll see the edges of the bagels turn a deeper golden color, and the cheese will pull slightly away from the sides—this is your signal that it's ready. Watch carefully, though, as cheese can go from perfect to burnt in seconds.
Remove the bagels from the oven and let them cool for 1-2 minutes before serving. This brief resting period allows the cheese to set slightly, making it easier to cut and serve. Garnish each bagel with 2 tablespoons chopped fresh chives and serve immediately with the optional 1 tablespoon hot sauce on the side for those who like a little kick.
For the best experience, serve these bagels while they're still warm and gooey. The contrast of the crispy toasted bagel, the smoky bacon, and the melty cheddar creates a texture and flavor combination that's simply irresistible. Enjoy them straight from the oven for that ultimate pull-apart moment!
Pro Tips For Making Bacon And Cheese Bagel
- TOAST BAGELS UNTIL GOLDEN: High heat is your friend here—don’t be shy with the toaster. A plain bagel’s crust needs to hit a deep golden brown (think "almost burnt toast" level) before you pile on the cheese. I used to rush this, and the cheese would just slide off like a sad, melted puddle.
- CUT BACON THICKER THAN YOU THINK: Thick-cut bacon is already a pain to cook, but for this recipe, slice it into ½-inch strips instead of the usual ¼-inch. Thicker slices render slower, stay crispier longer, and won’t turn into a greasy mess when you sandwich them between cheese and bagel. (Yes, even if you’re impatient like me.)
- MELT CHEESE UNDER FOIL: Skip the broiler—it’s a cheddar crime. Instead, layer the cheese on the toasted bagel, top with bacon, and tent the whole thing with foil for 3-4 minutes. The steam softens the cheese perfectly without turning it into a sad, rubbery blob. (Your future self will thank you.)
- SPREAD MAYO ON THE INSIDE: This isn’t just about flavor—it’s about structure. Slather the mayo inside the bagel halves (not on top) before adding cheese and bacon. It acts like glue, keeping everything from falling apart when you take that first bite. (I learned this the hard way after dropping a bacon-cheese bomb on my lap.)
Essential equipment for this recipe
Oven Essentials
Your oven is the star of this show—preheat it to 425°F for both toasting the bagels and crisping the bacon. I recommend using a digital thermometer like the Thermoworks Thermapen to ensure accuracy—oven temps can vary wildly.
For even heating, place your baking sheets on the middle rack and avoid overcrowding. A half-sheet pan works perfectly for bagels, while a full sheet pan accommodates bacon slices in a single layer. 🌡️
Pro tip: If you're short on oven space, toast the bagels first, then use the same oven to cook the bacon. Just swap pans quickly—your bagels will stay warm in a 200°F oven while you finish the bacon.
For extra crispiness, I like to use stoneware baking sheets—they conduct heat better than metal and give that perfect golden crust.
Bacon Tools
Thick-cut bacon needs the right tools to achieve crispy perfection. A bacon press like the OXO Good Grips is a game-changer—it renders fat efficiently while keeping bacon flat for even cooking. If you don’t have one, a slotted spoon works just as well for flipping.
For chopping, I reach for kitchen shears—they’re faster than a knife and give you clean, ¼-inch pieces every time. A wire cooling rack is essential for draining excess fat after cooking. 🥓
No press? No problem. Line a baking sheet with parchment paper (perforated if you have it) to catch drippings, and use a pizza peel to transfer bacon in and out of the oven.
For extra crispiness, I like to pat bacon dry with paper towels before cooking—this helps it brown faster and get that satisfying crunch. A meat thermometer isn’t necessary, but if you’re curious, aim for an internal temp of 150°F for perfectly cooked bacon.
Cheese Prep Tools
Sharp cheddar melts best when prepped correctly. A microplane is my go-to for grating cheese finely—it creates a silky texture that melts smoothly.
If you don’t have one, a box grater with small holes works, but pulse the cheese in a food processor for 2-3 seconds to break it into tiny pieces. For mixing, a small mixing bowl is perfect, but I often use my hands—just wet them slightly to prevent sticking. 🧀
For assembly, a spatula helps spread cheese evenly, and a small offset spatula works great for scraping every last bit. If you’re adding mayo, a rubber spatula ensures no streaks.
To keep things tidy, I like to pre-chop fresh chives in a small bowl before assembly—this way, they’re ready to garnish as soon as the bagels come out of the oven. A sharp chef’s knife is a must for clean cuts.
Optional Upgrades
Want to take your bagels to the next level? A toaster oven is perfect for small batches—it toasts bagels evenly and keeps them warm while you finish cooking. For bacon lovers, a bacon thermometer like the Thermoworks Smoke ensures perfect doneness every time.
If you’re making these often, a bagel slicer (like the OXO Good Grips) gives you clean, even slices every time. 🔥
For serving, a wooden board adds rustic charm, and a small ramekin keeps hot sauce handy. If you’re meal prepping, airtight containers with parchment paper between layers keep bagels crispy for up to 2 days.
For reheating, a toaster works best—just 2 minutes restores that gooey cheese magic. A sharp serrated knife makes slicing these bagels effortless, especially if you’re serving them as a brunch platter.
Nutrition facts
Frequently asked questions
Can I use store-bought bacon bits instead of cooking fresh bacon?
Store-bought bacon bits work in a pinch, but fresh-cooked bacon gives that perfect crispy texture and smoky flavor. If you must use bits, toast them in a dry skillet for 2-3 minutes to revive their crunch. For best results, stick with fresh bacon—it makes all the difference in that satisfying pull-apart bite.
What if my bagel gets too dry while toasting?
This happens when bagels toast too long or at too high heat. Keep your oven at 425°F and toast for only 8-10 minutes. For extra moisture, brush the cut sides with a little butter before toasting. If it's already dry, try reheating with a splash of water in a microwave for 10 seconds—it'll soften without sogginess.
How can I make these bagels ahead of time?
Assemble the bagels but skip the final baking step. Wrap them tightly in foil and refrigerate for up to 24 hours. When ready to serve, bake at 375°F for 5-7 minutes until the cheese melts. For reheating leftovers, toast in a toaster for 2 minutes—the cheese will melt again beautifully!
What's the best cheese substitute if I don't have sharp cheddar?
Mozzarella melts beautifully and adds creaminess, while Gouda or Monterey Jack work well for a milder flavor. For extra richness, mix ½ cup cheddar with ½ cup cream cheese. Avoid pre-shredded cheese—the anti-caking agents prevent proper melting.
Can I make these bagels in an air fryer?
Toast bagel halves in the air fryer at 375°F for 4-5 minutes, flipping halfway. Cook bacon in the same air fryer at 400°F for 8-10 minutes, flipping once. The air fryer gets the bagels crispy without drying them out—just watch closely to avoid burning!