
Appetizers
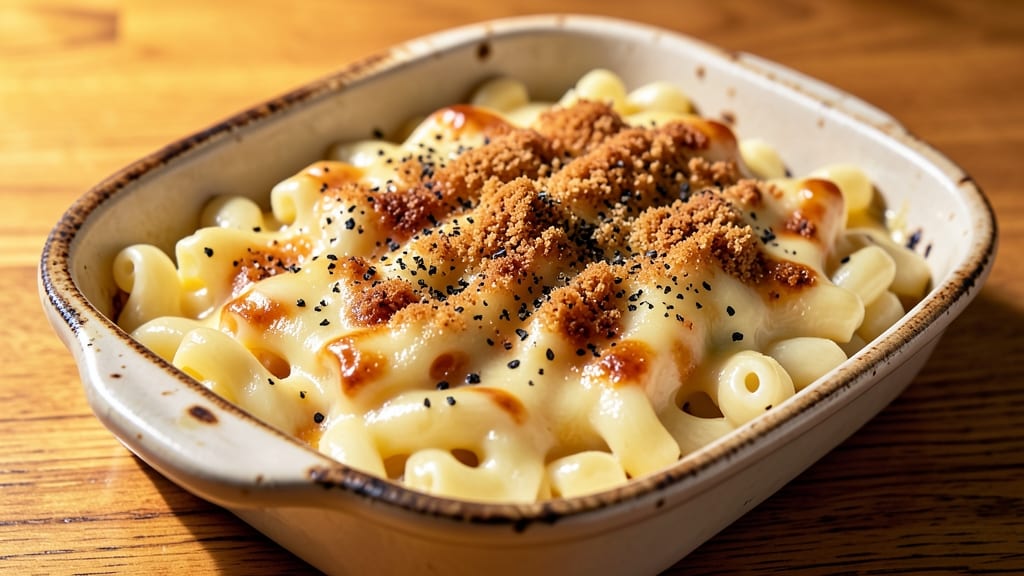
This authentic mac n cheese recipe delivers the perfect balance of crispy baked crust and gooey cheese pulls that separate it from boxed versions. The secret lies in a rich, roux-based sauce that clings to elbow macaroni while baking until golden and irresistible.
I've perfected this technique after years of testing—every bite is a testament to traditional comfort food done right. The foundation starts with a proper roux made from butter and flour, cooked until nutty brown before adding milk and cheese.
Sharp cheddar forms the base, but adding a touch of cream and mustard elevates the flavor to restaurant-quality depth. The pasta cooks al dente to avoid mushiness, then folds into the sauce before baking until the edges turn golden and crisp.
What you'll end up with is a dish that looks as impressive as it tastes—crispy on top, creamy inside, with those signature cheese strings that pull perfectly.
The aroma alone will have everyone gathered around the table, and the texture delivers on every promise: tender pasta, velvety sauce, and a crust that's worth the wait. This recipe works equally well as a main dish or side, and the same sauce technique applies to stovetop versions.
Whether you're feeding a crowd or treating yourself, the results are consistently foolproof. Let's get started on making the most authentic mac and cheese you've ever tasted.
Ingredients for authentic mac n cheese
Twelve essential ingredients transform into restaurant-quality mac and cheese with crispy edges and perfect cheese pulls.
| Ingredient | Amount | Notes |
|---|---|---|
| Elbow Macaroni 🍝 | 1 ½ lbs | Dry, medium or elbow shape |
| Unsalted Butter 🧈 | ¾ cup | European-style preferred |
| All-Purpose Flour 🌾 | ½ cup | White or bread flour |
| Sharp White Cheddar Cheese 🧀 | 3 cups | Freshly grated, block preferred |
| Heavy Cream 🥛 | ½ cup | Full-fat for richness |
| Whole Milk 🥛 | 2 cups | Room temperature preferred |
| Yellow Mustard 🌶️ | 1 tbsp | Dijon for extra depth |
| Garlic Powder 🧄 | ½ tsp | Freshly ground preferred |
| Ground Black Pepper 🌶️ | ½ tsp | Freshly cracked |
| Kosher Salt 🧂 | 1 ½ tsp | Diamond Crystal preferred |
| Panko Breadcrumbs 🍞 | ½ cup | For crispy topping |
| Butter (for topping) 🧈 | 2 tbsp | Melted for extra crisp |
The cheese is non-negotiable here—sharp white cheddar makes all the difference. Grab a block and grate it yourself—pre-shredded gets clumpy and lacks flavor. For the butter, European-style (like Plugrá) has more flavor than regular. The elbow macaroni should be medium or elbow shape—it holds sauce better than other types. If you're feeling fancy, De Cecco or Barilla are solid choices, but any good-quality brand works. The roux is where the magic starts—cook that butter and flour until it's nutty brown, not just pale. That's what gives the sauce its depth.
No sharp cheddar? Extra-sharp or pepper jack adds a nice kick. Running low on heavy cream? Half-and-half works in a pinch, but the texture will be slightly lighter. The mustard is key—Dijon adds complexity, but regular yellow works too. For the breadcrumbs, Panko stays crispy better than regular, but crushed cornflakes or even crushed crackers can substitute. The garlic powder can be swapped for fresh minced garlic at 1/4 the amount, but it's worth having on hand. If you're making this ahead, the sauce can be prepped a day in advance—just reheat gently before adding the pasta.
This bakes best in a 9x13-inch baking dish, but any oven-safe dish works. For extra crispiness, broil the top for 2-3 minutes at the end. Leftovers keep for 4-5 days in the fridge—reheat covered with foil to prevent drying. Freezes beautifully for up to 3 months. I always double the recipe because it disappears fast. The sauce reheats well on its own too, so you can make a big batch for the week. Just store the pasta and sauce separately to keep things fresh.
Why You'll Love This Recipe
- One-Pot Magic: I swear by this method—just toss everything in one pot and stir. No fancy gadgets, no extra bowls, and honestly? The cleanup is just rinsing a single pan. That crispy-cheese crust forms right in the pot, so you don’t even need a baking sheet.
- Sharp Cheese Wins: That sharp white cheddar? It’s the star. The first bite hits with a tangy punch, then melts into velvety creaminess. I’ll be real: I’ve tried pre-shredded, but nothing beats grating my own—it melts smoother and tastes fresher.
- Game for Any Day: Weeknight dinner? Check. Potluck side? Done. Even my picky teenage nephew asks for seconds. The heavy cream keeps it rich without being heavy, so it’s great for lunchboxes or a quick reheat. (Yes, even on a Tuesday night.)
- Budget Comfort Food: This recipe feeds four for under $8 using pantry staples. The butter and flour make it feel indulgent, but the cheddar stretches far, and leftovers reheat like a dream. I’ve made it for game days, sick-day meals, and lazy Sundays—it’s my go-to for when I need comfort without breaking the bank.
Step-by-step instructions for authentic mac and cheese
This method delivers the perfect balance—creamy, cheesy layers with a golden, crispy crust.
Cook the Elbow Macaroni to Al Dente
Bring a large pot of water to a rolling boil and add 1.5 lbs elbow macaroni. Stir immediately to prevent sticking. Cook until 1 minute before the package instructions for al dente—this ensures it finishes cooking in the oven without becoming mushy. Reserve 1 cup pasta water before draining, as we'll use it later to adjust the sauce consistency.
Drain the pasta and return it to the pot. Toss with 1 tbsp yellow mustard and 0.5 tsp garlic powder while still warm. This step adds depth of flavor and prevents the cheese from becoming too heavy. Keep the pasta covered until ready to assemble—it should stay warm but not steam.
Make the Cheese Sauce
In a large, heavy-bottomed pot, melt 0.75 cup unsalted butter over medium heat. Once melted, whisk in 0.5 cup all-purpose flour to form a smooth roux. Cook for 2-3 minutes, stirring constantly, until the mixture turns a pale golden color—this ensures proper thickening without burning.
Gradually whisk in 2 cups whole milk and 0.5 cup heavy cream, ensuring no lumps form. Bring the mixture to a gentle simmer and cook for 3-4 minutes, stirring frequently, until it thickens slightly. Reduce heat to low and add 3 cups freshly grated sharp white cheddar cheese, stirring until fully melted and smooth. Season with 0.5 tsp ground black pepper and 1.5 tsp kosher salt, adjusting to taste.
Combine Pasta and Sauce
Add the cooked elbow macaroni to the cheese sauce, tossing gently to coat evenly. If the sauce is too thick, add pasta water 1 tbsp at a time until it reaches a creamy, pourable consistency. The sauce should cling to the pasta without being watery—this ensures a rich, cohesive texture.
Transfer the macaroni and cheese mixture to a 9x13-inch baking dish, spreading it evenly. The dish should be filled to about ¾ capacity to allow for browning. Cover with foil and let it sit for 10 minutes—this helps the cheese meld and the pasta absorb the sauce fully.
Create the Crispy Topping
In a small bowl, mix 0.5 cup panko breadcrumbs with 2 tbsp melted butter (for topping) until evenly combined. Sprinkle the mixture evenly over the top of the macaroni and cheese, pressing down lightly to ensure it adheres. The topping should be uniformly distributed for even browning.
Bake uncovered at 375°F for 20-25 minutes, until the top is deep golden brown and the edges bubble slightly. The cheese should be gooey and pull apart easily when tested with a fork. If the top isn't brown enough, broil for 1-2 minutes at the end, watching closely to avoid burning.
Rest and Serve
Remove the baking dish from the oven and let it rest for 5 minutes before serving. This allows the cheese to set slightly and makes it easier to slice. The macaroni and cheese should have a crispy, golden crust on top with creamy, stretchy cheese pulls underneath.
Serve immediately with a side of steamed vegetables or a simple green salad. The contrast of the crispy topping and gooey cheese makes this dish truly authentic and satisfying. Store leftovers covered in the refrigerator for up to 3 days, though it's best enjoyed fresh.
Pro Tips For Making Authentic Mac N Cheese
- Melt Cheese Slowly: I learned this the hard way—dumping shredded cheddar into hot cream and expecting perfection is a recipe for clumps. Instead, warm the cheese in the heavy cream over low heat for 3-4 minutes, stirring constantly, until it’s just melted but not bubbling. This ensures a silky sauce, not a gluey mess.
- Toast the Pasta: Skip the al dente rule here. Cook the elbow macaroni one minute less than package instructions, then drain and toss it with a splash of cold water to stop cooking. The pasta will finish absorbing the cheese sauce in the oven, and the slight firmness prevents mushiness. (Yes, even if you’re impatient like me.)
- Skip the Pre-Shredded Cheese: Pre-shredded cheese is coated with anti-caking agents that turn your sauce grainy. Grate your own sharp white cheddar on the largest holes of a box grater—it melts faster and stays smooth. If you’re short on time, buy blocks and grate them yourself; the difference is night and day.
- Bake Until Bubbly: The crust isn’t just for show—it’s what makes mac and cheese authentic. Spread the sauce over the pasta in a buttered baking dish, then bake at 375°F (190°C) until the edges are golden and the sauce is actively bubbling at the edges, about 20-25 minutes. Resist the urge to peek; the steam needs to work its magic.
Best sauces and condiments for this dish
Classic Brown Butter
For a deeper, nuttier flavor, replace half the butter in the roux with brown butter. Melt 3 tbsp unsalted butter in a light-colored pan over medium heat until it turns golden brown and smells nutty (about 5-7 minutes).
Let it cool slightly before whisking into the flour mixture. This adds a rich, caramelized depth that elevates the sauce to gourmet levels. 🔥
Smoky Chipotle Cream
Swap ½ cup heavy cream with a smoky blend: mix ½ cup heavy cream with 1 tsp adobo sauce from canned chipotle peppers and ½ tsp smoked paprika. This adds subtle heat and a smoky aroma that pairs beautifully with the cheddar.
Adjust the chipotle amount based on your heat preference—start with ½ tsp for mild smoke. 🌶️
Truffle Oil Finish
After baking, drizzle ½ tsp high-quality truffle oil over the top and let it sit for 2 minutes before serving. This adds an earthy, luxurious aroma that complements the richness of the cheese. For an even more decadent touch, sprinkle with 1 tbsp grated Parmesan right before serving. ✨
Spicy Sriracha Mayo
Mix 2 tbsp mayonnaise with 1 tsp sriracha and ½ tsp garlic powder for a vibrant, spicy topping. Spread this mixture over the baked mac and cheese before broiling for 1-2 minutes to create a glossy, slightly crispy layer. This adds a tangy kick that cuts through the richness. 💫
Pesto Swirl
Stir ¼ cup basil pesto into the cheese sauce before combining with the pasta. For extra flavor, add 1 tbsp freshly grated Parmesan to the pesto mixture.
The herby, garlicky notes of pesto brighten the dish while keeping it creamy. Serve with a sprinkle of toasted pine nuts for added texture. 🌿
Hot Honey Drizzle
Heat 1 tbsp honey with ½ tsp cayenne pepper in a small saucepan until warm (about 1 minute). Drizzle this sweet-spicy mixture over the baked mac and cheese right before serving. The honey caramelizes slightly, creating a sticky, flavorful crust that balances the cheesy richness. 🍯
Nutrition facts
Frequently asked questions
Why does your recipe use elbow macaroni instead of penne?
Elbow macaroni holds sauce better than penne due to its shape and smaller size. The nooks and crannies trap the creamy cheese sauce perfectly, while penne tends to let sauce slide off. For a restaurant-quality texture, elbow is the gold standard—it's what you'll find in most authentic recipes.
Can I make this recipe without baking?
Skip the baking step and serve it as a stovetop version. After combining the pasta and sauce, heat through on low for 2-3 minutes, then stir in 2 tbsp melted butter for richness. Top with extra cheese and broil for 1-2 minutes just to melt—no crispy crust, but still delicious.
What's the secret to getting that perfect crispy top?
The crispy crust comes from three key steps: using panko breadcrumbs (they stay crispy), pressing them down firmly, and baking at 375°F until golden. For extra insurance, broil for 1-2 minutes at the end—watch closely to avoid burning. The butter in the topping also helps create that irresistible crunch.
How do I fix lumpy cheese sauce?
Lumps happen when cheese melts unevenly. To fix it, whisk vigorously while heating the sauce, or strain it through a fine-mesh sieve for ultra-smoothness. For prevention, grate your own cheese (pre-shredded has anti-caking agents) and add it gradually while stirring constantly. If all else fails, a splash of warm milk helps blend it out.
Can I make this ahead of time?
Yes! Assemble the dish (without baking) up to 24 hours ahead and refrigerate. When ready to serve, bake as directed—just add 5-10 minutes to the baking time. For leftovers, reheat covered with foil to prevent drying. The sauce reheats beautifully, so you can even make it a day ahead and add the pasta fresh.