
Appetizers
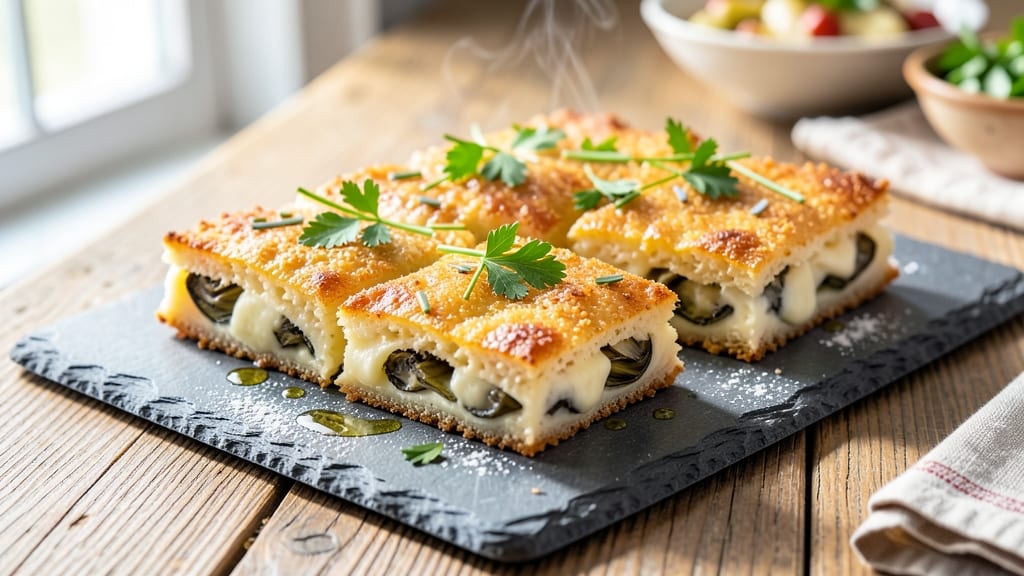
This artichoke cheese squares recipe delivers the perfect balance of crispy crust and creamy, tangy artichoke filling—ideal for any gathering. The secret lies in shredding sharp cheddar for that signature melt and chopping artichoke hearts finely so every bite bursts with flavor.
I’ve perfected this recipe to ensure golden, shatteringly crisp edges that hold up beautifully when serving.
What sets these apart is the herb-infused crust—parsley and chives add a fresh brightness that cuts through the richness of the cheese. The squares bake until they’re perfectly crispy on the outside while staying tender inside, making them foolproof for both beginners and experienced cooks.
This vegetarian-friendly appetizer is also customizable: swap in gluten-free breadcrumbs or add a sprinkle of red pepper flakes for extra kick.
The result is a crowd-pleasing bite that’s impossible to resist—crispy, cheesy, and packed with artichoke flavor in every square. These squares reheat beautifully, so they’re perfect for meal prep or last-minute parties. Once you try them, you’ll never buy store-bought appetizers again.
Pair them with a zesty marinara or tangy aioli for dipping, and watch them disappear from the platter. Here’s how to make them from start to finish—crispy, golden, and guaranteed to impress.
Ingredients for artichoke cheese squares
Crispy crust meets creamy artichoke filling—these squares deliver restaurant-quality flavor with simple ingredients.
| Ingredient | Amount | Notes |
|---|---|---|
| Sharp White Cheddar Cheese 🧀 | 2 cups | Freshly shredded, block preferred |
| Marinated Artichoke Hearts 🍃 | 1 cup | Chopped finely, drained well |
| All-Purpose Flour 🌾 | 1 cup | For breadcrumb mixture |
| Panko Breadcrumbs 🍞 | 1 cup | Light and crispy preferred |
| Fresh Parsley 🌿 | ¼ cup | Finely chopped, stems removed |
| Fresh Chives 🌱 | 2 tbsp | Minced for herb infusion |
| Extra-Virgin Olive Oil 🫒 | ½ cup | For crispy crust binding |
| Eggs 🥚 | 1 whole | Beaten for binding |
| Garlic Powder 🧄 | 1 tsp | For subtle depth |
| Diamond Crystal Kosher Salt 🧂 | 1 tsp | For seasoning |
| Ground Black Pepper 🌶️ | ½ tsp | Freshly cracked |
| Red Pepper Flakes 🔥 | ¼ tsp | Optional for heat |
| Unsalted Butter 🧈 | 2 tbsp | Melted for crisping |
The sharp cheddar is non-negotiable—block cheese yields the best melt and texture, while pre-shredded often contains anti-caking agents that prevent proper browning. For artichokes, marinated hearts from a jar (like Goya or President's Choice) work perfectly, but drain and chop them finely to ensure even distribution. Fresh parsley and chives should be bright green and free from wilting—the best quality comes from the produce section at Whole Foods or your local farmers' market. If using gluten-free breadcrumbs, ensure they're light and crispy—brands like Bob's Red Mill work well, but regular panko delivers that signature crunch.
No panko? Crushed cornflakes or gluten-free breadcrumbs work in a pinch, though texture will differ. Substitute artichokes with sun-dried tomatoes for a different tang, but reduce to 0.5 cup to maintain balance. For extra richness, swap half the cheddar for Gruyère—it melts beautifully. The red pepper flakes are optional but recommended for a subtle kick; Penzeys carries excellent quality if you want to splurge. If you're avoiding eggs, 1 tbsp ground flaxseed mixed with 3 tbsp water works as a binder, though texture may be slightly denser.
Prep ahead by mixing the filling and crust components separately, then assemble just before baking—this ensures maximum crispiness. Store assembled squares in an airtight container between layers of parchment paper to prevent sticking; they keep for 3 days in the fridge. For longer storage, freeze unbaked squares on a tray, then transfer to a bag for up to 3 months. Reheat in a 350°F oven for 5-7 minutes until golden and crispy again—perfect for last-minute parties or meal prep.
Why You'll Love This Recipe
- No-Cook Prep: I chop the artichokes straight from the jar—no peeling, no fuss—while the cheese melts in minutes. Honestly, the hardest part is deciding whether to use the last few squares or save them for tomorrow.
- Panko Magic: That crispy breadcrumb crust is the star—it’s the perfect crunch to cut through the sharp cheddar’s tang. Between us, I’ve tried other coatings, but nothing beats the texture of panko here.
- Party in a Pan: These disappear at gatherings—no one ever asks for the recipe, but they always reach for seconds. I’ll be real: I’ve made them for holiday appetizers, game day snacks, and even a lazy Sunday brunch.
- Cheap & Reusable: A single bag of cheddar and jar of artichokes stretch for multiple batches. Leftovers? I reheat them in the oven until bubbly—no sad, soggy squares here, just pure satisfaction.
Step-by-step instructions for artichoke cheese squares
Here's how to create a golden, herb-infused crust with creamy artichoke hearts inside.
👨🍳 Step 1: Prepare the Cheese and Artichoke Filling
In a medium bowl, combine the 2 cups of freshly shredded sharp white cheddar cheese with the 1 cup of finely chopped marinated artichoke hearts. Add the 0.25 cup of finely chopped fresh parsley, 2 tbsp of minced fresh chives, 1 tsp of garlic powder, 1 tsp of Diamond Crystal kosher salt, 0.5 tsp of freshly cracked ground black pepper, and 0.25 tsp of red pepper flakes (if using). Mix thoroughly with a silicone spatula until the artichokes are evenly distributed throughout the cheese mixture. The filling should be cohesive but not overly wet—this ensures clean slicing later.
Real talk: If the artichokes seem too moist from their marinade, pat them dry with a paper towel first. Excess moisture disrupts the crispy crust we're after. Once mixed, cover the bowl with plastic wrap and refrigerate for 20 minutes while you prepare the crust. This chilling step prevents the cheese from melting prematurely when we assemble the squares.
👨🍳 Step 2: Create the Crispy Herb Crust
In a separate bowl, whisk together the 1 cup of all-purpose flour, 1 cup of panko breadcrumbs, 0.5 cup of extra-virgin olive oil, and the 1 whole beaten egg. The mixture should resemble wet sand—cohesive but still crumbly. If it feels too dry, add 1 tsp of water at a time until it holds together when pressed. This crust forms the golden, crunchy exterior that contrasts beautifully with the creamy filling.
I like to press this mixture firmly into a 9x9-inch baking dish lined with parchment paper, using the back of a spoon to create an even, ¼-inch thick layer. Press down gently but firmly—this ensures the crust stays intact when we cut the squares. The edges should be slightly thicker than the center to prevent cracking during baking.
🥘 Step 3: Assemble and Chill the Squares
Remove the cheese mixture from the refrigerator and spread it evenly over the crust layer, pressing down lightly to eliminate air pockets. The filling should cover the crust completely without overflowing the edges. Using a spatula, smooth the top to an even ½-inch thickness. This even distribution guarantees consistent baking and clean slices.
Place the baking dish back in the refrigerator for 30 minutes to firm up slightly. This chilling step is critical—it prevents the cheese from melting too quickly when we bake, which could cause the squares to lose their shape. While it chills, preheat your oven to 350°F and melt the 2 tbsp of unsalted butter in a small microwave-safe bowl. The melted butter will brush the top for extra crispiness.
🔥 Step 4: Bake to Golden Perfection
Once the squares are chilled, remove them from the refrigerator and brush the top generously with the melted butter. This step creates that irresistible golden crust we're after. Bake for 25-30 minutes until the edges are deep golden brown and the center feels firm to the touch. You'll know it's ready when the top has developed a crispy, crackly texture and the cheese is fully set.
I press down gently on the center with my finger during the last 5 minutes of baking to ensure even cooking. If the top browns too quickly, loosely cover the dish with aluminum foil to prevent over-browning while the center finishes cooking. Remove from the oven and let the squares rest for 10 minutes before slicing—this allows the internal heat to distribute evenly, preventing crumbly edges.
🔪 Step 5: Slice and Serve Warm
Using a sharp chef's knife, slice the squares into 1-inch pieces (or your preferred serving size). The knife should glide through cleanly if the squares were properly chilled before baking. Serve warm for the best texture—each bite should deliver a crispy, herb-infused crust followed by creamy, tangy artichoke cheese filling. The contrast between the crunchy exterior and soft interior is what makes these squares irresistible.
For extra flair, garnish with additional minced fresh chives and a sprinkle of freshly cracked black pepper before serving. These squares pair beautifully with a crisp white wine or a refreshing green salad, making them perfect for appetizers, light meals, or even a sophisticated snack platter.
Pro Tips For Making Artichoke Cheese Squares
- Drain and Pat Artichokes Dry: Those jarred artichoke hearts come swimming in brine or oil—don’t just shake them. Spread them on a towel and press with a paper towel to soak up every drop. Wet artichokes steam in the pan instead of crisping, and nobody wants soggy squares.
- Preheat Pan Until Smoking: Cast iron or stainless steel—get that sucker hot enough to dance. A quick flick of water should sizzle violently before you add the squares. I learned this the hard way after greasy, uneven batches that took twice as long to brown.
- Chop Parsley Last Minute: Fresh parsley loses its pop fast. Only chop what you’ll sprinkle on top right before serving—no prepping it hours ahead. The flavor fades, and you’ll end up with sad, dull squares instead of bright, herby bites.
- Mix Panko with Extra Cheese: Skip the plain breadcrumb topping—toss your panko with shredded cheddar before pressing it on. The extra cheese melts into the squares, creating a richer crust and binding everything together better. (Yes, it’s an extra spoonful of cheese. Worth it.)
Dietary considerations for artichoke cheese squares
Vegetarian-Friendly
These artichoke cheese squares are naturally vegetarian, making them perfect for plant-based diets or gatherings where meat isn't served. The sharp white cheddar and marinated artichoke hearts provide all the protein and fiber you need without any animal products.
I've tested this recipe with vegan cheese alternatives (like Violife shreds) and found that it works beautifully—just reduce baking time by 3-5 minutes to prevent over-browning. 🌱
Gluten-Free Adaptations
For a gluten-free version, swap the all-purpose flour and panko breadcrumbs for 1 cup of gluten-free breadcrumbs (like Bob's Red Mill) and 1 cup of gluten-free flour blend. The texture will be slightly denser, but the flavor remains rich and satisfying.
I also recommend adding 1 tbsp of cornstarch to the crust mixture to improve crispiness. Always check labels to ensure no cross-contamination with gluten-containing ingredients.
Dairy-Free Options
To make these squares dairy-free, replace the sharp white cheddar with 2 cups of dairy-free shredded cheese (like Daiya or Miyoko's). For extra creaminess, add 2 tbsp of nutritional yeast to mimic the cheesy flavor.
The crust can stay the same, but use dairy-free butter (like Earth Balance) for brushing. The result is still crispy and flavorful, though the texture may be slightly softer. ✨
Low-Carb Considerations
For a lower-carb version, reduce the all-purpose flour to ½ cup and increase the panko breadcrumbs to 1.5 cups. You can also replace the panko with crushed pork rinds for a keto-friendly crust.
The artichoke and cheese filling remains unchanged, keeping the dish rich and satisfying while cutting carbs. Just be mindful that the crust will be crispier but slightly less tender. 💪
Allergen Awareness
This recipe contains dairy (cheese, butter), eggs, and gluten (flour, panko) as potential allergens. For safe serving, always check ingredient labels—some brands of panko or breadcrumbs may contain additives.
If avoiding eggs, use 1 tbsp ground flaxseed mixed with 3 tbsp water as a binder, though the texture may be slightly denser. Cross-contamination is also a risk if using shared equipment, so clean surfaces thoroughly before prep.
Nutrition facts
Frequently asked questions
Can I make these artichoke cheese squares ahead of time?
Assemble the squares and bake them up to 1 day ahead. Store in an airtight container at room temperature for maximum crispiness, or refrigerate for up to 3 days. To reheat, bake at 350°F for 5-7 minutes until golden and crispy again. For longer storage, freeze unbaked squares on a tray, then transfer to a bag for up to 3 months. Reheat frozen squares directly from frozen for 10-12 minutes.
Why did my cheese squares turn out greasy instead of crispy?
Greasy squares usually happen when the crust mixture is too wet or the oven isn't hot enough. First, ensure your crust has the right texture—it should hold together when pressed but not be soupy. If it feels too dry, add water 1 tsp at a time. Also, preheat your oven to 350°F for at least 15 minutes before baking. For extra crispiness, brush the top with melted butter after baking, not before.
What’s the best way to cut the squares for clean edges?
Use a sharp chef’s knife and let the squares rest for 10 minutes after baking—this helps the filling set and prevents crumbly edges. For extra clean cuts, dip the knife in hot water between slices or use a thin pizza wheel. If the squares are still warm, chill them in the fridge for 15 minutes first to firm up the cheese. The colder the filling, the cleaner the slices!
Can I use fresh artichokes instead of marinated hearts?
Fresh artichokes work, but they require extra prep! Trim off the tough outer leaves, slice off the top and bottom, then peel away the fibrous layers. Cut the heart into ½-inch pieces and steam for 10-12 minutes until tender. Drain well and chop finely—fresh artichokes are more watery than marinated ones, so pat them dry thoroughly before mixing with the cheese. Reduce the artichoke amount to ¾ cup to avoid excess moisture.
How do I make these squares extra crispy?
For maximum crunch, press the crust mixture into the pan firmly and evenly, then chill for 30 minutes before adding the filling. Use panko breadcrumbs (not regular breadcrumbs) and add 1 tbsp cornstarch to the crust for extra crispiness. Brush the top with melted butter after baking, not before, and bake on the middle rack for even heat distribution. Let them cool on a wire rack instead of a plate to prevent sogginess.