
Desserts
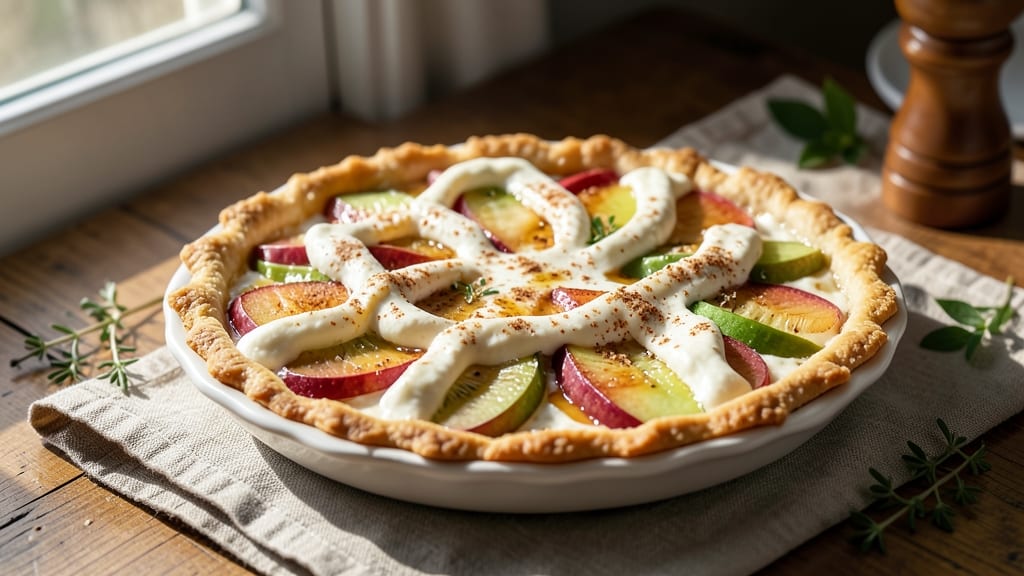
This apple cream cheese dessert recipe delivers the perfect balance of caramelized fruit and velvety cream cheese swirls in every bite. 🌟 The secret lies in a golden crust that encases a silky filling, where tender apples and rich cream cheese create a harmonious texture that's both comforting and elegant.
I've perfected this recipe to ensure the filling stays smooth and creamy while the apples develop that irresistible caramelized sweetness.
The beauty of this dessert is its versatility—it can be baked as a traditional pie, layered in a tart, or even assembled as a no-bake cheesecake for those who prefer simplicity.
The creamy swirls of cream cheese cut through the natural acidity of the apples, creating a flavor profile that's rich yet balanced. Whether you're serving it warm with vanilla ice cream or chilled for a refreshing treat, this recipe is designed to impress without being overly complicated.
What sets this dessert apart is the caramelized top, achieved through a precise baking technique that ensures the apples soften just enough to release their juices while maintaining a slight bite.
The cream cheese filling, meanwhile, remains lighter than traditional cheesecake but just as satisfying, with a texture that's almost custard-like. This is the kind of dessert that feels indulgent yet still feels like a home-cooked masterpiece.
Ready in about 50 minutes, this recipe is perfect for special occasions or when you want to treat yourself to something truly special.
The crust is buttery and flaky, the apples are tender with a hint of spice, and the cream cheese swirls add a luxurious touch that elevates the entire dish. Let's get started on creating this crowd-pleasing dessert!
Ingredients for apple cream cheese dessert
Sixteen ingredients transform into a dessert where golden crust meets velvety cream cheese swirls.
| Ingredient | Amount | Notes |
|---|---|---|
| All-Purpose Flour 🌾 | 1 ½ cups | Unbleached for best texture |
| Unsalted Butter 🧈 | 1 cup | Cold, cubed for crust |
| Granulated Sugar 🍚 | ¾ cup | Plus 2 tbsp for sprinkling |
| Light Brown Sugar 🍚 | ¼ cup | Packed for moisture |
| Large Eggs 🥚 | 1 whole | Room temperature |
| Vanilla Extract 🍯 | 1 tsp | Pure Madagascar preferred |
| Salt 🧂 | ½ tsp | Diamond Crystal kosher |
| Honey 🍯 | 2 tbsp | For caramelizing apples |
| Medium Apples 🍎 | 4 whole | Honeycrisp or Fuji, peeled |
| Ground Cinnamon 🌿 | 1 tsp | Toasted for deeper flavor |
| Lemon Juice 🍋 | 1 tbsp | Freshly squeezed |
| Cream Cheese 🧀 | 8 oz | Full-fat, room temperature |
| Powdered Sugar 🍚 | ½ cup | For swirls and dusting |
| Heavy Cream 🥛 | ¼ cup | Cold for swirls |
| Vanilla Bean Seeds 🌿 | 1 tsp | Scraped from 1 pod |
The crust's success hinges on cold butter and high-quality flour—King Arthur or Gold Medal brands excel here. For the apples, Honeycrisp or Fuji deliver the perfect balance of sweetness and tartness. If you can't find those, Braeburn works well too. The cream cheese must be full-fat—Philadelphia brand is my go-to, but any block-style cream cheese works if you grate it yourself. Pre-shredded contains anti-caking agents that alter texture. Toast your cinnamon in a dry pan for 30 seconds before adding—this intensifies its flavor dramatically.
No vanilla extract? Vanilla bean paste works perfectly, or vanilla sugar at half the amount. Substituting honey with maple syrup requires reducing it slightly to account for water content. For a lower-carb option, replace 2 tbsp brown sugar in the crust with 2 tbsp almond flour. The apples should be peeled and thinly sliced—about 1/8-inch thickness—for even caramelization. If you're short on time, pre-sliced apples from the produce section work, but pat them thoroughly dry first to prevent a soggy crust. The heavy cream for swirls can be whipped to soft peaks before folding if you prefer extra lightness.
Store the assembled dessert in an airtight container for up to 3 days in the refrigerator. For longer storage, freeze the unbaked tart—it keeps for 2 months. Reheat slices in a 350°F oven for 8-10 minutes to restore the caramelized top. The cream cheese filling can be prepped 2 days ahead and stored separately. When ready to bake, assemble and chill the tart for 1 hour before baking—this prevents cracking. For serving, dust with powdered sugar and garnish with candied apple slices for an elegant touch.
Why You'll Love This Recipe
- No Mixer Needed: I swear by this—just creaming butter and sugar by hand until fluffy (about 3 minutes). The crust comes together faster than you can slice an apple, and honestly? That’s the magic.
- Sweet-Savory Magic: The brown sugar caramelizes into the crust while the apples soften just enough to stay tender—like biting into a warm hug. Cream cheese swirls through the filling, balancing the tartness so every bite feels like a dessert hug.
- Weeknight Crowd-Pleaser: This feeds 8 with minimal effort, and leftovers? Even better cold the next day. My kids beg for it after school, and my husband sneaks seconds when he thinks I’m not looking.
- Pantry Staple Power: You’re using ingredients you already own—flour, butter, sugar, eggs—and no fancy apples required. I’ve used Granny Smiths, Honeycrisp, even store-bought pre-sliced ones. Budget-friendly, foolproof, and zero waste.
Step-by-step instructions for apple cream cheese dessert
Master this layered dessert with a caramelized apple topping and velvety cream cheese swirls.
👨🍳 Step 1: Prepare the Cream Cheese Filling
In a medium bowl, beat the 8 oz cream cheese with an electric mixer until completely smooth—no lumps should remain. This takes about 2-3 minutes on medium speed. The mixture should be pale yellow and completely homogeneous.
Add the 0.5 cup powdered sugar, 0.25 cup heavy cream, 1 tsp vanilla extract, and 1 tsp vanilla bean seeds. Beat on medium-high speed for another 2 minutes until fully incorporated and lightened in texture. Here's the thing—this filling needs to be perfectly smooth for those elegant swirls later. If it's too thick, add 1-2 teaspoons cold water to reach a spoonable consistency.
🍳 Step 2: Make the Crust and Apple Filling
In a separate large bowl, combine the 1.5 cups all-purpose flour, 0.75 cup granulated sugar, 0.25 cup light brown sugar, and 0.5 tsp salt. Cut in the 1 cup cold cubed butter using a pastry cutter or your fingers until the mixture resembles coarse crumbs with pea-sized butter pieces. This texture is crucial for a flaky crust.
Press two-thirds of this mixture evenly into a 9-inch springform pan, creating an even layer about ¼-inch thick. For the apple filling, peel and core the 4 medium apples, then slice them into ¼-inch thick rounds. Toss the apple slices with 2 tbsp honey, 1 tsp ground cinnamon, and 1 tbsp lemon juice. Arrange them evenly over the crust layer, slightly overlapping the slices.
🔥 Step 3: Bake the Apple Layer
Preheat your oven to 375°F. Bake the apple layer for 20-25 minutes until the apples are tender when pierced with a knife and the crust begins to turn golden at the edges. You'll see the apples release their juices and caramelize slightly—that's exactly what you want. Real talk: Don't overbake here, or the apples will turn mushy.
Remove the pan from the oven and let it cool completely on a wire rack. This resting period prevents the cream cheese filling from melting prematurely when you add it later. While it cools, prepare the remaining crust mixture by pressing it evenly over the baked apple layer, creating a sealed top crust.
🥘 Step 4: Add the Cream Cheese Swirls
Once the apple layer has cooled completely, spread the prepared cream cheese filling evenly over the top crust, leaving about ½-inch border uncovered. Using a sharp knife or offset spatula, create decorative swirls by gently dragging the knife through the filling in circular motions. This is where the magic happens—the contrast between the caramelized apples and silky swirls creates visual appeal.
Sprinkle the remaining 2 tbsp granulated sugar evenly over the top for a final touch. Here's the moment that matters: the dessert needs to chill before serving. Place it in the refrigerator and let it set for at least 4 hours—overnight is even better. This chilling time allows the flavors to meld and the layers to set properly for clean slices.
🍽️ Step 5: Serve and Enjoy
Before serving, run a knife around the edge of the springform pan to loosen the dessert. Slice into 6 equal wedges and serve chilled. Each bite should deliver a perfect balance of textures: the crisp crust, tender caramelized apples, and velvety cream cheese swirls. The contrast between the warm spiced apples and cool cream cheese creates an unforgettable experience.
For presentation, dust each slice with additional powdered sugar and garnish with a few apple slices or a sprinkle of toasted cinnamon. This dessert keeps well in the refrigerator for up to 3 days, though I doubt it will last that long in your home.
Pro Tips For Making Apple Cream Cheese Dessert
- CHILL THE CREAM CHEESE: Mix the cream cheese and butter cold—straight from the fridge—and fold it into the flour mixture last. I learned this the hard way when my first batch turned greasy; warm cream cheese melts into a mess before the eggs even bind.
- WHISK EGGS UNTIL THICK: Beat those eggs with the sugars until the mixture is pale, thick, and nearly tripled in volume—about 3-4 minutes with a hand mixer. This isn’t just about sweetness; it’s what gives the crumb that signature tender, cake-like texture. (Yes, even if you’re impatient like me.)
- DON’T OVERMIX THE FRUIT: Toss the apples with their juices gently—just enough to coat, then fold them into the batter in one go. Overmixing bruises the fruit and releases too much liquid, turning your dessert into a soggy puddle. (Your future self will thank you.)
- USE BROWN SUGAR FOR MOISTURE: Swap half the granulated sugar for light brown sugar in the filling—it adds chewiness and keeps the apples from drying out. I was skeptical until I tried it; now I double the amount if I’m using tart apples like Granny Smiths.
Essential equipment for this recipe
Springform Pan Essentials
A 9-inch springform pan is non-negotiable for this recipe—it creates clean slices and makes assembly effortless. I recommend the Nordic Ware Natural Aluminum model because it distributes heat evenly and releases easily.
If you don’t own one, a 9-inch pie dish works in a pinch, but you’ll need to adjust baking times slightly (about 5-7 minutes longer). Avoid glass pans—they can cause uneven browning and make the crust soggy. 🌟
Mixing Tools Matter
For the cream cheese filling, an electric mixer (like a KitchenAid Artisan) is a game-changer—it ensures the filling is perfectly smooth and aerated. If you’re mixing by hand, use a rubber spatula and be prepared to work for 5-7 minutes to achieve the same consistency.
For the crust, a pastry cutter or your fingers work, but a bench scraper helps create that perfect crumb texture. 💪
Apple Prep Tools
Peeling and slicing apples efficiently is key. A Y-peeler removes skin without wasting fruit, and a mandoline slicer (set to 1/8-inch thickness) ensures even slices for consistent caramelization. If you’re slicing by hand, a sharp chef’s knife and a cutting board with a non-slip mat prevent accidents.
Toss the sliced apples with honey and cinnamon in a large bowl—I like the OXO Good Grips line for its ergonomic design. ✨
Baking Gear Upgrade
An oven thermometer is worth its weight in gold—many home ovens run 25°F hotter or colder than advertised. Place it on the middle rack while preheating to ensure your 375°F setting is accurate.
For the cooling phase, a wire rack keeps the dessert from sitting in residual heat, which can cause the cream cheese to sweat. If you’re short on time, a cooling rack insert for your countertop works just as well. 🌡️
Swirl Creation Tools
Creating those elegant cream cheese swirls is easier with the right tools. An offset spatula or bench scraper glides smoothly over the filling, while a sharp chef’s knife gives you more control for intricate designs.
For a rustic touch, use a skewer to poke small holes in the filling before baking—this creates a lattice effect when the dessert chills. Pro tip: Dip your tools in hot water and dry them thoroughly before using to prevent sticking. 🎨
Chilling and Serving
While the dessert chills, a large airtight container keeps it fresh, and a sharp serrated knife ensures clean slices. For serving, a dusting brush (like the Westcott brand) makes powdered sugar application effortless. If you’re garnishing with apple slices, a mandoline or sharp paring knife cuts them uniformly.
A small plate warmer revives slices if reheating is needed—just 8-10 minutes at 350°F restores that caramelized magic. 🍽️
Nutrition facts
Frequently asked questions
Can I make this dessert without baking?
For a no-bake version, skip the crust and apple baking step. Instead, layer whipped cream cheese filling (add 1 extra tbsp whipped cream to lighten it) with thinly sliced apples tossed in honey and cinnamon in a 9-inch tart pan. Chill for 6 hours before serving. Top with extra whipped cream and toasted nuts for crunch.
How do I prevent the cream cheese filling from cracking?
Cracking happens when the filling is too warm or the dessert doesn't chill properly. First, ensure your cream cheese is room temperature (not warm). Chill the assembled dessert for at least 4 hours—overnight is ideal. Also, avoid opening the oven door too early during baking to prevent temperature drops. If cracks appear, cover them with extra powdered sugar or caramelized apple slices.
What's the best apple variety for this recipe?
Use Honeycrisp, Fuji, or Braeburn apples—they balance sweetness and tartness perfectly. Avoid overly tart varieties like Granny Smith. If you can't find these, Gala or Pink Lady work well too. For extra caramelization, toss the slices with 1 tsp lemon juice before baking to prevent browning.
Can I make this gluten-free or vegan?
For gluten-free: Replace the flour with 1.5 cups gluten-free 1:1 baking flour (like Bob's Red Mill) and add 1 tbsp xanthan gum to the crust. For vegan: Swap cream cheese for silken tofu blended with lemon juice and maple syrup, and use vegan butter in the crust. The texture will differ slightly but still be delicious!
How long can I store leftovers?
Store leftovers in an airtight container in the fridge for up to 3 days. For longer storage, freeze the unbaked tart (without cream cheese filling) for 2 months. To reheat, bake slices at 350°F for 8-10 minutes to restore the caramelized top. The cream cheese filling can be prepped 2 days ahead and stored separately.